


20
Telephone connection & programming
Powerful facility that enables the system to the telephone 6 numbers in an emergency -
your mobile, friends, relatives, neighbours or colleagues - but not 999 directly.
Telephone connection
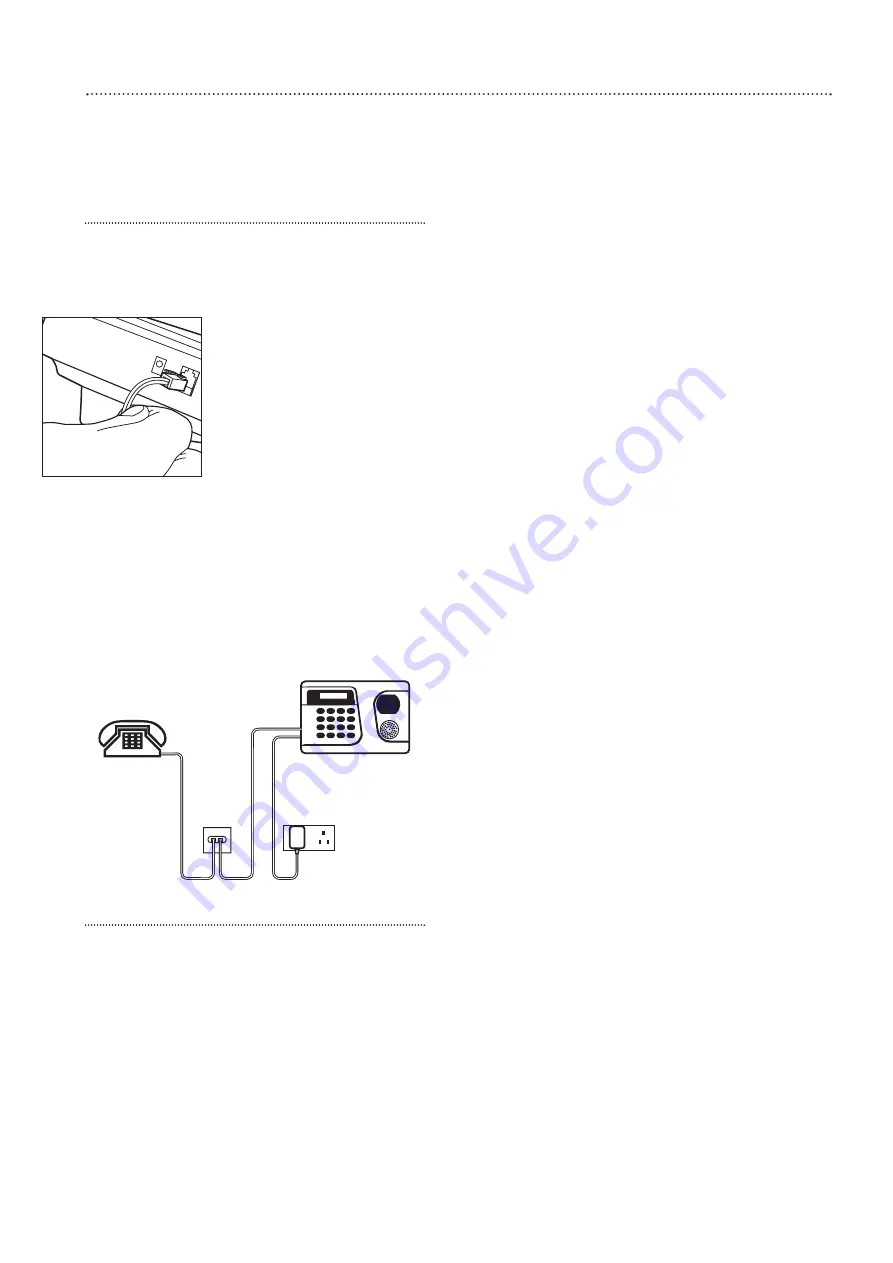
A telephone lead and 2-way adaptor is included
so you can have your telephone and the control
unit connected to the telephone network at the
same time.
1
Plug the 2-way adaptor into
the telephone wall socket.
2
Plug one end of the
telephone lead into the
control unit and the other
end into the adaptor.
3
Plug your telephone into the
2-way adaptor.
• The control unit will not be
able to telephone out if any
handsets are accidently left off, or if someone
is ringing in.
• If you are using an answer machine on the
same telephone line as the system please
ensure that the answer machine is not set to
respond to incoming calls on the first ring.
• If you do not wish to use the telephone
features of the system it is not necessary to
connect the telephone lead to the control unit.
Telephone number programming
The ‘Tel. Settings’ menu allows you to
set/change/delete telephone numbers and
play/record alarm messages.
• Use arrow keys to move the cursor to select
the item, press OK to confirm the selection.
• Select ‘Stop’ or the
a
key, the screen will
return to programming Main menu.
Setting telephone numbers
From ‘Tel. Settings’ menu, select ‘Tel.
Numbers’, this allows you to store the telephone
numbers you wish the alarm to contact.
A maximum of six numbers can be stored in
priority order (in the order A to F).
• The unit will dial using tone dialling.
• Positions A to F represent the priority order of
the six telephone numbers programmed, ‘A’
having the highest priority.
• If a slot does not have a telephone number
stored, three dots are displayed indicating the
slot is empty.
• In the list only the first 9 digits of the telephone
number are displayed. Numbers longer than 9
digits are indicated with two dots after the
digits displayed.
Storing telephone numbers
1
In the ‘Tel. Numbers’ menu, the cursor will be
flashing at location A.
2
Press OK.
3
Enter the first telephone number required.
4
Press OK, the display will return to the ‘Tel.
Numbers’ menu.
5
Using the arrow keys select location B for your
second telephone number.
Repeat these steps until all your telephone
numbers have been stored.
•
The maximum length of a number is 20 digits
including
b
and
c
. If this length is reached, the
control unit will sound 5 beeps and the unit will
only respond to the
a
and OK keys.
•
During entering the number, the
a
key is used
as backspace. However, if the number field is
empty, pressing the
a
key will return to Tel.
Numbers lists screen.
• During entering the number, when the 15th
position is reached, non-fitting numbers will
scroll sideward to the left.
Special function characters
Two special keys
b
and
c
are provided for
special functions.
b
represents a 3-second delay or (pause). The
control unit will not dial the tone
b
.
c
tells the control unit to go off line.
Storing a pager number:
Pager number –
b
- identity code –
c
- OK
The identity code is a number that you can key
in at your discretion. This enables the recipient to
know the call is from the control unit.
• Only one attempt will be made to the pager
number.
Storing a telephone number in PABX phone
system:
PABX access code 0/9/8 –
b
– telephone
number – OK
You can add as many
b
’s as required.
Storing a telephone number with extension
number:
Telephone number –
b
–
b
– extension
number – OK
You can add as many
b
’s as required.
Downloaded from www.ukpanels.com