background image

Instruction #1036093B-4/9

11

12

13

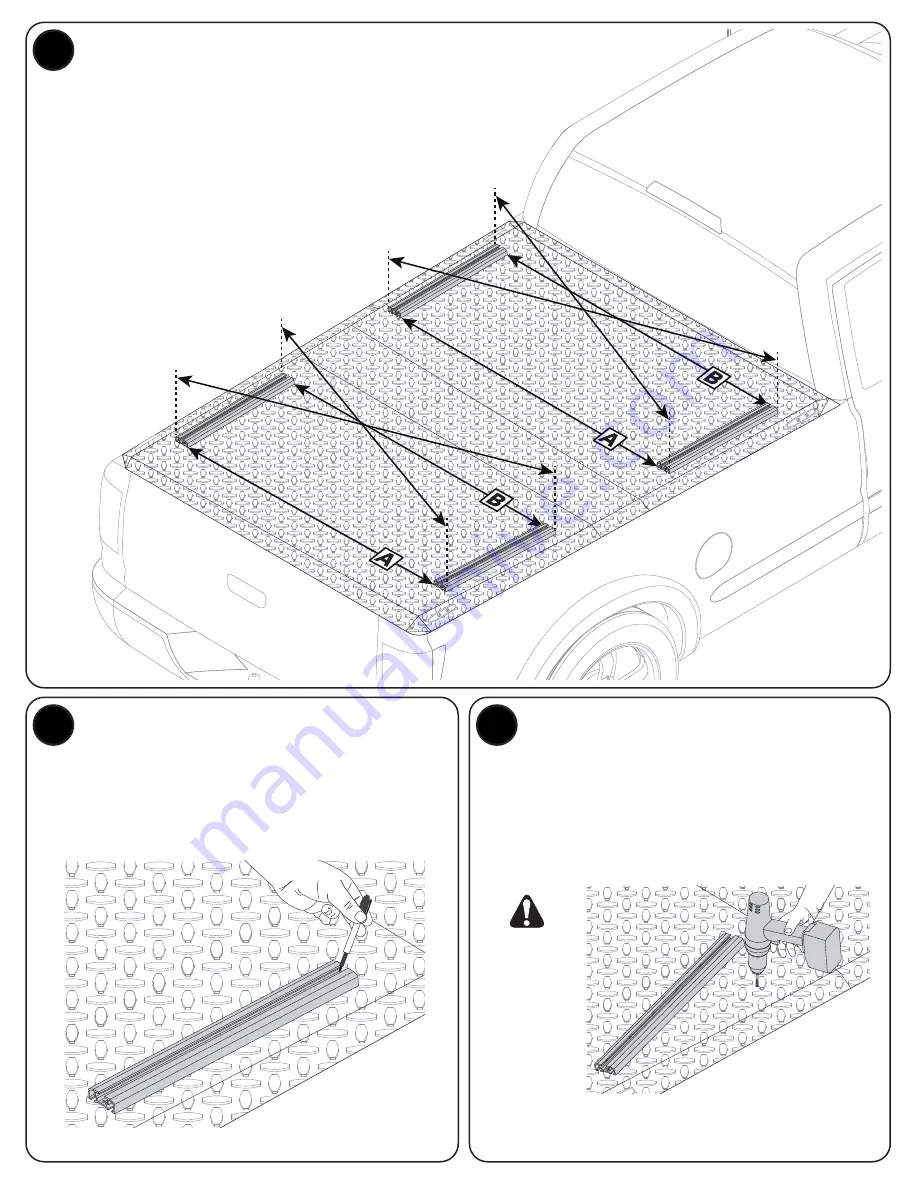
ENSURE THE TRACKS ARE SQUARE AND PARALLEL.

NOTE: 

This step is critical.


1.  Using a measuring tape, measure the track 

to track distances at your installed bolts (A).

2.  Make sure distance B is equal to 

measurement A. 

3.  Once A and B are equal, make sure the 

outside corner to outside corner diagonal 
measurements are equal as shown. 

Without moving the tracks from the 

parallel position you established in the 

previous step, use a marker to mark the 

holes at the opposite end of the tracks.

MARK THE HOLES AT THE 
OTHER END OF THE TRACKS.

4X

4X

DRILL THE SECOND SET OF HOLES.

Pivot the tracks out of the way being careful 

not to scratch your vehicle and drill an 1⁄8” pilot 

hole through the center of the marks you made 

in step 12. Then drill the holes to their final 

diameter of 1⁄4”. 

TIP:

 A center punch can help 

you to locate your pilot hole more accurately.

Never 

punch 

or drill 

through 

the track!

NOTE:

 Carefully clear away any debris 

to prevent scratching your vehicle.

Summary of Contents for Diamondback

Page 1: ...you mark and drill the holes to mount your tracks in a subsequent step you must avoid these crossmembers Look for any other potential obstruction and make note of their locations NOTE The SE cover has 1 crossmember per lifting panel and the HD cover has 2 or 3 crossmembers per lifting panel You must also avoid installing the tracks above the handles to avoid interference You will need to secure th...

Page 2: ...the bend on the cover as shown On each side of the front tracks closest to the center of the cover measure and position 2 from the edge of the bend on the cover as shown POSITION THE TRACKS FOREWARD AND AFT POSITION THE REAR TRACK ENDS POSITION THE FRONT TRACK ENDS 2X 2X 2X 2X 6 7 2X 2X 2X 2X MARK THE REAR PANEL HOLES MARK THE FRONT PANEL HOLES Mark the rear most hole for each rear track Use a mar...

Page 3: ...ove the tracks aside and drill an 1 8 pilot hole through the center of the marks you made in step 7 Then drill the holes to their final diameter of 1 4 TIP A center punch can help you to locate your pilot hole more accurately 8 9 DRILL THE REAR PANEL HOLES DRILL THE FRONT PANEL HOLES 2X 2X 2X 2X 4X 4X Never punch or drill through the track Never punch or drill through the track 10 INSTALL 4 BOLTS ...

Page 4: ...arallel position you established in the previous step use a marker to mark the holes at the opposite end of the tracks MARK THE HOLES AT THE OTHER END OF THE TRACKS 4X 4X DRILL THE SECOND SET OF HOLES Pivot the tracks out of the way being careful not to scratch your vehicle and drill an 1 8 pilot hole through the center of the marks you made in step 12 Then drill the holes to their final diameter ...

Page 5: ...ING HOLES 8X 8X Remove the hardware from each track and remove all of the tracks from the vehicle Drill an 1 8 pilot hole through the center of the marks you made in step 15 Then drill the holes to their final diameter of 1 4 TIP A center punch can help you to locate your pilot hole more accurately NOTE Carefully clear away any debris to prevent scratching your vehicle INSTALL THE END CAPS Press t...

Page 6: ... à l aide d un feutre Marque el orificio de más atrás de cada riel trasero Utilice un marcador para establecer la ubicación de los orificios en los extremos de los rieles más cercanos a la parte trasera del vehículo Sur les glissières avant marquer la position du trou le plus en arrière à l aide d un feutre Marque el orificio más trasero de cada riel delantero Utilice un marcador para establecer l...

Page 7: ...OTA Elimine con cuidado todo resto de material para evitar que el vehículo se raye Enlever la visserie de chaque glissière et déposer toutes les glissières du véhicule Percer un avant trou de 3 mm 1 8 po au centre des marques faites à l opération 15 Puis agrandir les trous à leur diamètre final de 6 mm 1 4 po CONSEIL l utilisation d un pointeau pourra aider à démarrer l avant trou avec plus de pré...

Page 8: ...utilisation de ce produit doivent être conformes aux instructions visant le produit et le véhicule En plus d observer les présentes instructions vérifier les instructions visant la pose du porte bagage et les instructions visant le véhicule Les présentes instructions devraient être jointes au manuel d utilisation du véhicule et conservées à bord lors du déplacement Par sécurité on ne devrait utili...

Page 9: ...ta todas las condiciones circundantes como el estado de la ruta la superficie del camino las condiciones del tráfico el viento etc El manejo del vehículo así como el frenado agarre en las curvas y la influencia de los vientos de costado cambian cuando se adicionan cargas sobre el techo Cuando se transporta todo tipo de carga se debe circular a una velocidad que tenga en cuenta todas las condicione...

Reviews: