background image

14

•  

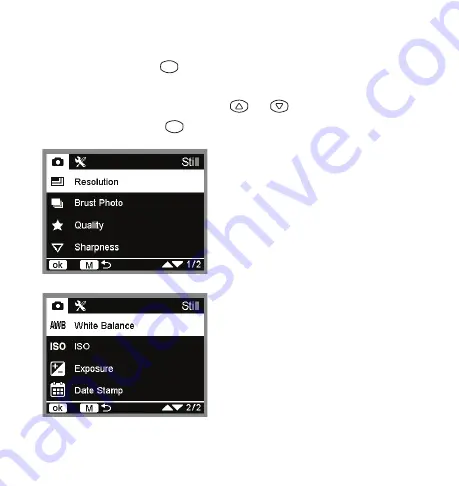
Resolution:

 Select between 12M 

   (4032x3024),  10M (3648x2736), 8M 
   (3264x2448), 5M (2592x1944),,3M 
   (2048x1536), 2MHD (1920x1080), 1.3M 
   (1280x960) or VGA (640x480).
•  

Quality:

 Select between Fine, Normal or 

   Economy.
•  

Sharpness:

 Select between Strong, 

   Normal or Soft.

•  

White Balance:

 Select between Auto, 

   Daylight, Cloudy, Tungsten or Fluorescent.
•  

ISO:

 Select between 100, 200, 300, 

   400 or Auto.
•  

Exposure:

 Select between -2.0, -1.7, 

   -1.3, -1.0, -0.7, -0.3, 0, +0.3 or +2.0.
•  

Date Stamp:

 Select between Date and 

   Time, Date Only or OFF.

Camera settings

•  Press and hold the           button in the photo mode to enter camera 
   settings.
•  In the camera setting page, press         or         to switch between 
   selections and press        to confirm selection.

M

ok

Summary of Contents for BT57706

Page 1: ...User Manual Important retain for future reference Read carefully BT57706...

Page 2: ...4 Dash Cam Modes LED Indicators 5 5 Product Overview 6 6 Camera Controls 7 7 Camera Dimensions 7 8 Installation 8 9 Configuration Menu Settings 11 10 Special Functional Description 17 11 Troubleshoot...

Page 3: ...ian if you are not comfortable installing the product You can also contact YADA at 866 294 9244 to speak to one of our installation specialists if you have any specific questions regarding the Karaoke...

Page 4: ...o de los 30 d as siguientes a la compra para recibir un 1 a o adicional de cobertura de garant a m s all de la garant a est ndar de un a o junto con ofertas de productos y anuncios especiales Enregist...

Page 5: ...tors Power On Dash Cam powers ON when the engine is turned on Alternatively press and hold the power button for more than 3 seconds to power on the Dash Cam Blue LED light stays on when Dash Cam is po...

Page 6: ...6 PRODUCT OVERVIEW Front View Rear View Rear Camera Lens LCD Screen Speaker Front Camera Lens USB Power Port MicroSD Card Slot Mounting Bracket Slot TF...

Page 7: ...7 CAMERA CONTROLS CAMERA DIMENSIONS OK Button Menu Button Power Button Microphone 4 52 115mm 1 57 40mm 1 77 45mm Power Reset Hole Down Navigation Button Up Navigation Button M R ok...

Page 8: ...slide to the left Peel off the 3M VHB adhesive tape 3 M V H B TM 3MVHB TM 3MVHB TM 3MVHB TM 3 M V H B TM 3 M V H B 3 M V H B TM 3MV 3MVHB TM 3M V H B TM 3MVHB TM 3MVHB TM 3MVHB TM 3M V H B TM 3M V H...

Page 9: ...t camera before mounting Mount the Dash Cam to the windshield You can turn on the Dash Cam and check the live screen to determine the most suitable mounting position Warning Do not install the product...

Page 10: ...NTINUED Route and hide the power cable in the headliner and pillars in your vehicle Plug the cigarette lighter adapter into your vehicle s 12 24V DC outlet Adjust the rear camera lens angle to get the...

Page 11: ...Press the button to start recording a flashing red dot will appear on the screen indicating the Dash Cam is recording Files are looped or recorded over by the default of 1 minute The MicroSD card will...

Page 12: ...n the upper left corner of the screen Press the button each time you want to take a picture Image files recorded by the front lens are saved under folder DCIMA Image files recorded by the rear lens ar...

Page 13: ...2 0 Motion Detection Select between ON or OFF Record Audio Select between ON or OFF Date Stamp Select between ON or OFF G Sensor Select between High Medium Low or OFF Video settings Press the button...

Page 14: ...Soft White Balance Select between Auto Daylight Cloudy Tungsten or Fluorescent ISO Select between 100 200 300 400 or Auto Exposure Select between 2 0 1 7 1 3 1 0 0 7 0 3 0 0 3 or 2 0 Date Stamp Selec...

Page 15: ...ing page press or to switch between selections and press to confirm selection Memory Card Capacity Video Resolution Total Recording Time 16GB 720P 60 minutes 16GB 1080P 50 minutes 32GB 720P 120 minute...

Page 16: ...ium Low or Off Date Time Set the date and time Auto Power Off Select between 1 min 3 min 5 min or Off Screensavers Select between 1 min 3 min 5 min or Off Beep Sound Select between On or Off Language...

Page 17: ...ed by loops Note The G Sensor supports sensitivity adjustment and it can be done in the video setting page according to actual needs Park Record function The Park Record function allows the Dash Cam t...

Page 18: ...the Dash Cam to the vehicle s on board power supply in daily use There are 2 ways to charge the Dash Cam s battery The red charge indicator lights up during the charging process The whole charging tim...

Page 19: ...roSD cards will have C10 logo 3 Problem During the playback of pictures and videos a file error message prompts Solution When a MicroSD card storage error or incomplete file occurred please use the ca...

Page 20: ...g cigarette lighter adapter 6 Make sure cord is carefully secured so that it will not be stepped on tripped over or otherwise subjected to damage or stress 7 Do not operate cigarette lighter adapter w...

Page 21: ...driver but is limited Always use your own eyes to confirm the vehicle s surroundings as the displayed image may be faint or dark distorted or not entirely visible Always check behind and all around t...

Page 22: ...ed to be vigilant in supervising applicable to the device Consult local laws and regulations for any restrictions on installation or use Never allow children to play with the device Small parts may be...

Page 23: ...or 1 year from the date of original purchase Where permitted by law YADA s liability shall be limited to that set forth in this limited express warranty This limited express warranty shall be the excl...

Page 24: ...YADA under this warranty are protected only for the unexpired portion of the original warranty 6 This is a repair or replace warranty only and does not cover the costs incurred for the installation r...

Page 25: ...YADA and or its affiliates do not guarantee or promise that the user of Karaoke Dash Cam will not be in an accident or otherwise not collide with an object and or person Our Karaoke Dash Cam is not in...

Page 26: ...ibutor and seller shall not be liable for any injury loss or damage incidental or consequential arising out of the use or intended use of the product Customer Service Contact IF YOU ARE EXPERIENCING A...

Page 27: ...nterference to radio or television reception which can be determined by turning the equipment or and on the user is encouraged to try to correct the interference by one or more of the following measur...

Page 28: ...ML 57706_V1 2975 Red Hill Ave Ste 100 Costa Mesa CA 92626 1 866 294 9244 customercare horizon brands com 2020 Yada All rights reserved www letsyada com CONNECT WITH US letsyada...

Reviews: