background image


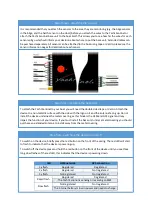
It is recommended that you attach the sensors to the area they are monitoring (e.g. the bilge sensors 
in the bilge, and the hatch sensor on the door) before you attach the wires to the Yacht Sentinel or 
attach the Yacht Sentinel base unit to the boat itself. This allows you to see how far the wires for each 
sensor will go which will inform your decision about where to put the base unit. Extended cables can 
be purchased separately. All sensors can be attached to the boat using tape or Velcro, please see the 

sensor information pages for details about each sensor. 

Step three 

 attaching the sensors 

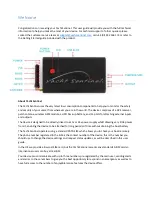
To attach the Yacht Sentinel to your boat you will need the double sided tape or Velcro. Attach the 
device to a non-metallic surface with the side with the logo on it and the antenna facing up. Do not 
install the device underneath a metal covering, as this hinders the GSM and GPS signal and may 
impair the function of your device. If you must install the base unit under a metal covering you should 
purchase an extended antenna to install away from the metal covering. 


Step four 

 installing the base unit 


To switch on the device, briefly press the red button on the front of the casing. The red LED will start 
to flash to indicate that the device is powering up. 

To switch off the device press and hold the red button on the front of the device until you see three 
long slow flashes of the red LED, this indicates that the device is powering down. 


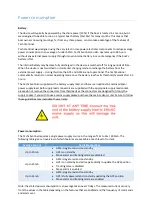
LED 

GSM network 

GPS connection 

1 x flash 

Registered 

Registered 

2 x flash 

Registered 

Not registered 

3 x flash 

Not registered 

Not registered 

Rapid flash 

Registered 

Registered 

The Yacht Sentinel is sending or receiving an SMS 

Slow flash 

Not registered 

Not registered 

The internal battery is low in power and needs to charge 


Step five 

 switching the device on and off 

Summary of Contents for YS

Page 1: ...Yacht Sentinel User Guide Firmware Version 5 Elmbridge House Elmbridge Lane Woking Surrey GU22 9AF United Kingdom support yacht sentinel com 44 0 1932 506 173...

Page 2: ...ormation 9 PIR sensor 9 Bilge sensor 9 Hatch sensor 10 Temperature sensor 10 Outputs 10 Yacht Sentinel App 11 SMS commands 12 Message types 14 Parameter message 15 Status message 15 Alarm message 16 E...

Page 3: ...igned to be directly linked to a 12v or 24v power supply whilst drawing very little power from it enabling the device to be attached for long periods of time without draining the boat battery The Yach...

Page 4: ...s it in with your fingernail or the flathead screwdriver There will be some resistance as the SIM hits the locking mechanism push past this and the SIM will be held firmly in place To remove the SIM p...

Page 5: ...ll the device underneath a metal covering as this hinders the GSM and GPS signal and may impair the function of your device If you must install the base unit under a metal covering you should purchase...

Page 6: ...ied with a battery supply lead and there is an optional AC mains adaptor power supply lead Both supply lead connectors are supplied with the appropriate supply lead socket please do not remove the con...

Page 7: ...s an unexpected move out alarm could signify theft of your boat Geofence mooring You can turn on GPS tracking to send text updates of the course and location of your boat every few minutes This has tw...

Page 8: ...to the base unit as the length of cable may affect where you can install the base unit The base unit should be installed with the logo facing up and the unit secured to a surface using the tape or Ve...

Page 9: ...insert multiple wires into the same slot Using the tape or Velcro attach the sensor to the wall with an unobstructed view of the area you wish to monitor take care not to cover the white lens of the s...

Page 10: ...atures and the Yacht Sentinel will send you an alarm if the temperature goes out of these limits To attach the temperature sensor to the base unit you should use ports 11 12 of the right hand side rem...

Page 11: ...SMS texts Find the app on iTunes or GooglePlay by searching for Yacht Sentinel To get started you will need your Yacht Sentinel contact numbers and the default password 4444 The getting started tutori...

Page 12: ...when the boat moves back within 15m of the radius Set the radius for geofence mooring to between 20 and 200m The geofence perimeter will be drawn at this radius away from the current location of the...

Page 13: ...type with a comma and a new paragraph Enter each command as it appears in this user guide Example 4444 MASTER1 012345678901 ALARM4 ON NO cabin hatch OUT2 ON 90 ALARM4 OUT2DELAY 10 The above example s...

Page 14: ...2 is linked to the hatch alarm TEMPALARM ON TEMPMAX 70 TEMPMIN 2 SUPPLYALARM ON Boat is linked to shore power BATT 12 MOVEALARM OFF RADIUS 20 This is sent to the user that requested a parameter update...

Page 15: ...re is an issue with the physical connection between the sensor and the Yacht Sentinel base unit If an error is found the sensor it relates to may be inoperable or unreliable so it is recommended that...

Page 16: ...perly by inserting into a mobile phone Stand by the Yacht Sentinel and send a status request check to see that the LED flashes to confirm that the command has been received My Yacht Sentinel is not ho...

Page 17: ...ider information Parameter configuration via SMS or App Current state is indicated via a red LED Ambient temperature 0 50 Storage temperature 0 70 GSM Integrated Telit GE865 GSM module Suitable for al...

Page 18: ...s made to ensure that prices shown on yacht sentinel com are accurate at the time of placing your order if by mistake we have under priced an item we will contact you and offer you the following three...

Page 19: ...follow the manufacturer or suppliers instructions or any alteration or repair carried out without prior written approval from Intelligent Devices Limited 8 Faulty goods If you receive goods that are...

Reviews: