


5
of solder being used, a good joint is assured. Too low of a temperature will slow the rate
of solder flow while a high temperature setting might burn the flux in the solder and
emit a heavy, white smoke resulting in a dry joint or permanent damage to the printed
circuit board (P.C.B.) and may also shorten the tip life.
IMPORTANT
: The temperature above 410
℃
(770
℉
) is not recommended for normal
soldering functions, but can be used for short periods of time when high temperatures
are required.
Please note
that the lead free solder alloys require a higher soldering
temperature which shortens tip life.
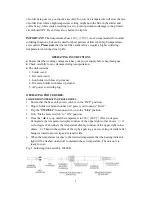
OPERATING INSTRUCTIONS
● Ensure that the working voltage matches your power supply before beginning use.
● Check carefully for any damage during transportation.
● The unit contains:
1. Solder wand
2. Tweezers wand
3. Iron holder with brass tip cleaner.
4. Tweezers holder with brass tip cleaner
5. AC power cord with plug.
OPERATING PROCEDURES:
SOLDER IRON OPERATING PROCEDURES
1.
Ensure that the base unit power switch is in the “OFF” position.
2.
Plug in Solder wand and connect AC power cord to mains “In-let”
3.
Flip the “
TWZ/SIA”
function switch on to the “
SIA
” position.
4.
Turn “Mains power switch” to “ON” position.
5.
Press the “▲” key up until the temperature to 250
℃
(482
℉
)
(If set to degrees
Centigrade, the temperature display window of the upper right corner shows
℃
, if
set to degrees Fahrenheit, the temperature display window of the upper right corner
shows
℉
). Then tin the surface of the tip by applying a new covering of solder after
being warmed to protect tip and extend its life.
6.
When the temperature reaches to the desired temperature that the heating indicator
light will be flashed on and off to maintain the set temperature. The unit now is
ready for use.
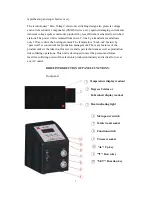
Fig. 1 Soldering iron assembly 108ESD


