8-11
8.4.11 Calibrate Sipper
Align the Sipper with the sample module as described in Section
8.4.12 Install Bottles
Temporarily place the bottle tray next to the instrument and install the bottles. Connect the tubing and cables to the
bottles. Be sure to install new reagents in the clean bottles.
8.4.13 Install Membranes
Install new membranes as prescribed (see Section
).
8.4.14 Prime Fluid System
Prime the buffer and calibration systems (see Section
). After checking for any leaks, reinstall
the pump cover on the side of the instrument and slide the bottle tray into position.
Calibrate the instrument and run the daily checks to confirm operation (see Section
).
Fuse Replacement
8.5
It may be necessary to replace the fuse in the back of the 2500 Analyzer. New fuses may be purchased from YSI or
obtained from many local electrical component suppliers. Be sure to obtain the correct fuse rating as indicated below.
CAUTION:
UNPLUG THE INSTRUMENT FROM THE MAINS SUPPLY
, then unplug the other end of the power cord
from the back of the instrument.
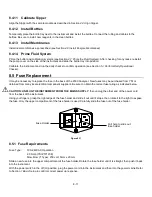
Using your fingers, grasp the right edge of the fuse holder and slide it out until it stops, then rotate it to the right to expose
the fuse. Only the upper compartment of the fuse holder is used. Carefully slide the fuse out of the fuse holder.
Figure 8-11
8.5.1 Fuse Requirements
Fuse Type:
100–240VAC Operation
2.0 Amp (YSI #571238)
Slow-blow (T Type), 250 volt, 5mm x 20mm
Slide a new fuse into the upper compartment of the fuse holder. Rotate the fuse holder until it is straight, then push it back
into the instrument.
With the power switch in the off (O) position, plug the power cord into the instrument and then into the power mains. Refer
to Section
1 Basic Setup
to confirm correct power up response.
Pull here to slide out
fuse holder
Fuse Holder
Summary of Contents for YSI 2500
Page 1: ...USER MANUAL 525021 YSI 2500 Biochemistry Analyzer OPERATIONS AND MAINTENANCE MANUAL...
Page 34: ...5 11 8 The Stat sample results are displayed on the Run Stat tab Stat sample results...
Page 88: ...13 1 13 Notices Declaration of Conformity 13 1...
Page 96: ...17 1 17 Appendix D Line Power Cord and Plug Wiring United Kingdom United States Europe...

