background image

Operation

HandyLab 100

40

ba77062d02

12/2017

Continuing with three-

to five-point calibration

16

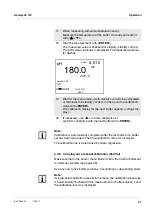
Set the nominal buffer value for the measured temperature with 

<

><

>

17

Accept the calibration value with 

<ENTER>

The calibration display for the next buffer appears (voltage dis-
play).

18

Finish the calibration procedure as a two-point calibration with 

<M>

.

The calibration record is displayed.

pH

4.035

24.8 °C

VariCal

2

15.03.2014

08:00

Buffer


19

Thoroughly rinse the electrode with deionized water.

20

Immerse the electrode in the next buffer solution.

21

When measuring without temperature sensor:
Measure the temperature of the buffer manually and enter it 
with 

<

><

>

.

22

Start the measurement with 

<ENTER>

.

The measured value is checked for stability (stability control). 
The [AR] status indicator is displayed. The measured parame-
ter flashes.

23

Wait for the measurement with stability control to be completed 
or terminate the stability control and take over the calibration 
value with 

<ENTER>

The calibration display for the next buffer appears.

Summary of Contents for SI Analytics HandyLab 100

Page 1: ...OPERATING MANUAL ba77062d02 12 2017 HandyLab 100 pH METER HandyLab 100...

Page 2: ...2 ba77062d02 12 2017 HandyLab 100 Copyright 2017 Xylem Analytics Germany GmbH Printed in Germany For the most recent version of the manual please visit www si analytics com...

Page 3: ...odes 15 4 2 2 Navigation 16 4 2 3 Navigation example 1 Setting the language 18 4 2 4 Example 2 on navigation Setting the date and time 20 4 3 Sensor independent settings 22 4 3 1 System 22 4 3 2 Data...

Page 4: ...data memory 45 4 6 Reset 46 4 6 1 Resetting the measurement settings 46 4 6 2 Resetting the system settings 47 5 Maintenance cleaning disposal 48 5 1 Maintenance 48 5 1 1 Replacing the batteries 48 5...

Page 5: ...measurements rapidly and reliably The HandyLab 100 pro vides the maximum degree of operating comfort reliability and measuring certainty for all applications The proven calibration procedures and aut...

Page 6: ...the menu for measurement settings F1_ Menu Opens the menu for system settings On Off Switches the meter on or off M Selects the measured parameter CAL CAL_ Calls up the calibration procedure Displays...

Page 7: ...Measured temperature with unit 7 Status line 8 Softkeys and date time HOLD AR 25 0 6 093 pH C 4 3 2 5 6 7 8 1 0 14 15 03 2014 10 00 Menu AutoCal e g TEC Calibration with automatic buffer recognition...

Page 8: ...eter that cannot return any voltages or currents that are not allowed SELV and current circuit with current limiting Almost all customary sensors fulfill these conditions 1 pH electrode 2 Reference el...

Page 9: ...rience the operators will know the necessary safety precautions to take when handling chemicals Safety instructions Safety instructions in this operating manual are indicated by the warn ing symbol tr...

Page 10: ...and secure technical condition Function and operational safety The smooth functioning and operational safety of the meter can only be guaranteed if the generally applicable safety measures and the spe...

Page 11: ...maged no longer operates as described in this manual If you are in any doubt please contact the supplier of the meter Obligations of the purchaser The purchaser of this meter must ensure that the foll...

Page 12: ...Short instructions CD ROM with detailed operating manual 3 2 Initial commissioning Perform the following activities Insert the supplied batteries Switch on the meter Set the date and time 3 2 1 Insert...

Page 13: ...The meter has an energy saving feature to avoid unnecessary battery depletion The energy saving feature switches off the meter if no key is pressed during the adjusted interval How to set the switch...

Page 14: ...ff function The instrument has an automatic switch off function in order to save the batteries see section 4 3 1 The automatic switch off function switch es off the meter if no key is pressed for an a...

Page 15: ...operating modes and navigation of the HandyLab 100 is given in section 4 2 1 and section 4 2 2 4 2 1 Operating modes The instrument has the following operating modes Measuring The measurement data of...

Page 16: ...ings and dialogs in procedures contain further sub elements The selection is made with the keys The current selection is displayed with a frame Submenus The name of the submenu is displayed at the upp...

Page 17: ...vigation are explained in the two following sections by reference of examples Setting the language section 4 2 3 Setting the date and time see section 4 2 4 Calibration record Calibration data storage...

Page 18: ...ppears The instrument is in the measuring mode 2 Using F1_ Menu open the Storage config menu The instrument is in the setting mode 3 Select the System submenu with The current selection is displayed w...

Page 19: ...ith ENTER 7 Open the setting mode for the Language with ENTER 8 Select the required language with General Clock Service information Reset System 15 03 2014 08 00 Back Language Deutsch Illumination On...

Page 20: ...values Therefore check the time at regular intervals Note After a fall of the supply voltage empty batteries the date and time are reset Setting the date time and date format The date format can be s...

Page 21: ...ng with and ENTER The time is set 7 If necessary set the Date and Date format The setting is made similarly to that of the time 8 If necessary select and set the Date with and ENTER 9 To make further...

Page 22: ...default con dition Settings To open the Storage config menu press the F1_ Menu key in the measured value display After completing the settings switch to the measured value display with M Menu item Set...

Page 23: ...ntrol function see section 4 4 4 The measured parameter flashes on the display as soon as the measured value is outside the stability range when you switch over between the measured parameters with M...

Page 24: ...the following preparatory activities when you want to measure 4 4 2 Measuring the pH value Temperature sensor Resolution of the temp display Mode yes 0 1 C Automatic with temperature sensor 1 C Manua...

Page 25: ...Measure ment menu 3 Select the pH or mV display with M pH 6 949 25 0 C 15 03 2014 08 00 Menu 1 Freeze the measured value with AR The HOLD status indicator is displayed The HOLD function is active 2 Us...

Page 26: ...owever you can check ORP elec trodes using a test solution 3 Using ENTER start a further measurement with stability control or Release the frozen measured value again with AR or M The AR status displa...

Page 27: ...s are 1 Freeze the measured value with AR The HOLD status indicator is displayed The HOLD function is active 2 Using ENTER activate the Stability control function manu ally The AR status indicator app...

Page 28: ...for calibration and measurement settings of the pH ORP measurement To open the settings display the required parameter in the measured value display and press the F1 menu or ENTER key After completing...

Page 29: ...V pH Unit of the slope The display refers to the Nernst slope of 59 2 mV pH 100 x determined slope Nernst slope Man temperature 25 130 C Entry of the manually determined temperature Formeasurementswit...

Page 30: ...the table for an automatic calibra tion The pH values are valid for the specified temperature values The temperature dependence of the pH values is taken into consideration during calibration No Buff...

Page 31: ...EU 1 995 4 005 7 002 9 208 25 C 12 Fisher 2 007 4 002 7 004 10 002 25 C 13 Fluka BS 4 006 6 984 8 957 25 C 14 Radiometer 1 678 4 005 7 000 9 180 25 C 15 Baker 4 006 6 991 10 008 25 C 16 Metrohm 3 996...

Page 32: ...calibration The meter determines the following values and calculates the calibration line as follows 20 Reagecon TEC 2 000 4 010 7 000 10 000 25 C 21 Reagecon 20 2 000 4 000 7 000 10 000 13 000 20 C...

Page 33: ...41 Calibration evaluation After calibrating the meter automatically evaluates the calibration The zero point and slope are evaluated separately The worse evaluation of both is taken into account The e...

Page 34: ...he sensor menu Buffer menu the buffer set is cor rectly selected see page 28 Use any one to five buffer solutions of the selected buffer set in ascend ing or descending order Below calibration with Te...

Page 35: ...with deionized water 4 Immerse the electrode in buffer solution 1 5 When measuring without temperature sensor Measure the temperature of the buffer manually and enter it with 6 Start the measurement w...

Page 36: ...sure the temperature of the buffer manually and enter it with 12 Start the measurement with ENTER The measured value is checked for stability stability control The AR status indicator is displayed The...

Page 37: ...lly finished with the measurement of buffer solution 1 and the calibration record is displayed 17 When measuring without temperature sensor Measure the temperature of the buffer manually and enter it...

Page 38: ...emperature sensor Measure the temperature of the buffer manually and enter it with 6 Start the measurement with ENTER The measured value is checked for stability stability control The AR status indica...

Page 39: ...n with M The calibration record is displayed pH 7 000 24 8 C VariCal 1 15 03 2014 08 00 Buffer 11 Thoroughly rinse the electrode with deionized water 12 Immerse the electrode in buffer solution 2 13 W...

Page 40: ...03 2014 08 00 Buffer 19 Thoroughly rinse the electrode with deionized water 20 Immerse the electrode in the next buffer solution 21 When measuring without temperature sensor Measure the temperature of...

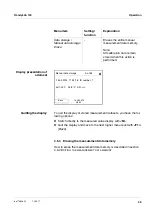
Page 41: ...ecord The calibration record of the last calibration is to be found under the menu item Calibration Calibration record To open it in the measured value display press the CAL_ key 24 Set the nominal bu...

Page 42: ...libration is available white Measured values in this range are suitable for documentation 2 Measuring range for which no valid calibration is available shaded Measured values in this range are not sui...

Page 43: ...table measured value Otherwise the AR display is missing Calibration evaluation or no evaluation Storage locations The HandyLab 100 meter has a measurement data memory 4 5 1 Manual storage You can sto...

Page 44: ...shown on the display The measurement data memory has a function to erase the entire con tents Editing the data memory The memory is edited in the menu Storage config Data storage To open the Storage...

Page 45: ...gher menu level with F1 Back 4 5 3 Erasing the measurement data memory How to erase the measurement data memory is described in section 4 5 2 EDITING THE MEASUREMENT DATA MEMORY Data storage Manual da...

Page 46: ...ngs for pH measurements are reset to the default settings with the Reset function The sensor settings are reset under the Reset menu item in the menu for calibration and measurement settings To open t...

Page 47: ...ystem settings can be reset to the default status The system settings are reset in the menu Storage config System Reset To open the Storage config menu press the F1_ Menu key in the measured value dis...

Page 48: ...tteries Caution Make sure that the poles of the batteries are positioned correctly The signs on the batteries must correspond to the signs in the battery compartment Note Alternatively you can also us...

Page 49: ...ts Re move any splashes immediately 5 3 Packing This meter is sent out in a protective transport packing We recommend Keep the packing material The original packing pro tects the meter against damage...

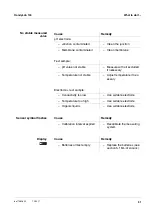
Page 50: ...moisten junc tion Cable broken Replace the electrode Gel electrolyte dried out Replace the electrode Cause Remedy pH electrode The values determined for zero point and slope of the electrode are outsi...

Page 51: ...value not stable Measure with air excluded if necessary Temperature not stable Adjust temperature if nec essary Electrode test sample Conductivity too low Use suitable electrode Temperature too high...

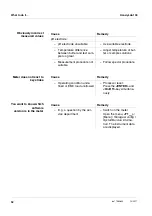
Page 52: ...ference between buffer and test sam ple too great Adjust temperature of buf fer or sample solutions Measurement procedure not suitable Follow special procedure Cause Remedy Operating condition unde fi...

Page 53: ...umidity Yearly mean 75 30 days year 95 Other days 85 Power supply Batteries 4 x 1 5 V alkali manganese batteries type AA Rechargeable batter ies 4 x 1 2 V NiMH rechargeable batteries type AA no chargi...

Page 54: ...0 20 0 0 1 2 00 20 00 0 01 2 000 19 999 0 001 U mV 2500 2500 1 1200 0 1200 0 0 1 T C 5 0 105 0 0 1 T F 23 0 221 0 0 1 Manual temperature input Variable Range Increment Tmanual C 25 130 1 Tmanual F 13...

Page 55: ...ssion is also used when the measuring system is adjusted at the same time see adjusting Electromotive force of an electrode The electromotive force U of the combination electrode is the measur able el...

Page 56: ...Reset Restoring the original condition of all settings of a measuring system Resolution Smallest difference between two measured values that can be dis played by a meter Slope The slope of a linear ca...

Page 57: ...calibration 34 K Keys 6 M Measured value display 16 Measurement accuracy 34 Measurement data memory Edit 44 Erase 44 Storage locations 43 Measurement dataset 43 Measuring ORP 26 pH 24 Menu for calibra...

Page 58: ...Lists HandyLab 100 58 ba77062d02 12 2017...

Page 59: ......

Page 60: ...purpose creating advanced technology solutions to the world s water challenges Developing new technologies that will improve the way water is used conserved and re used in the future is central to our...

Reviews: