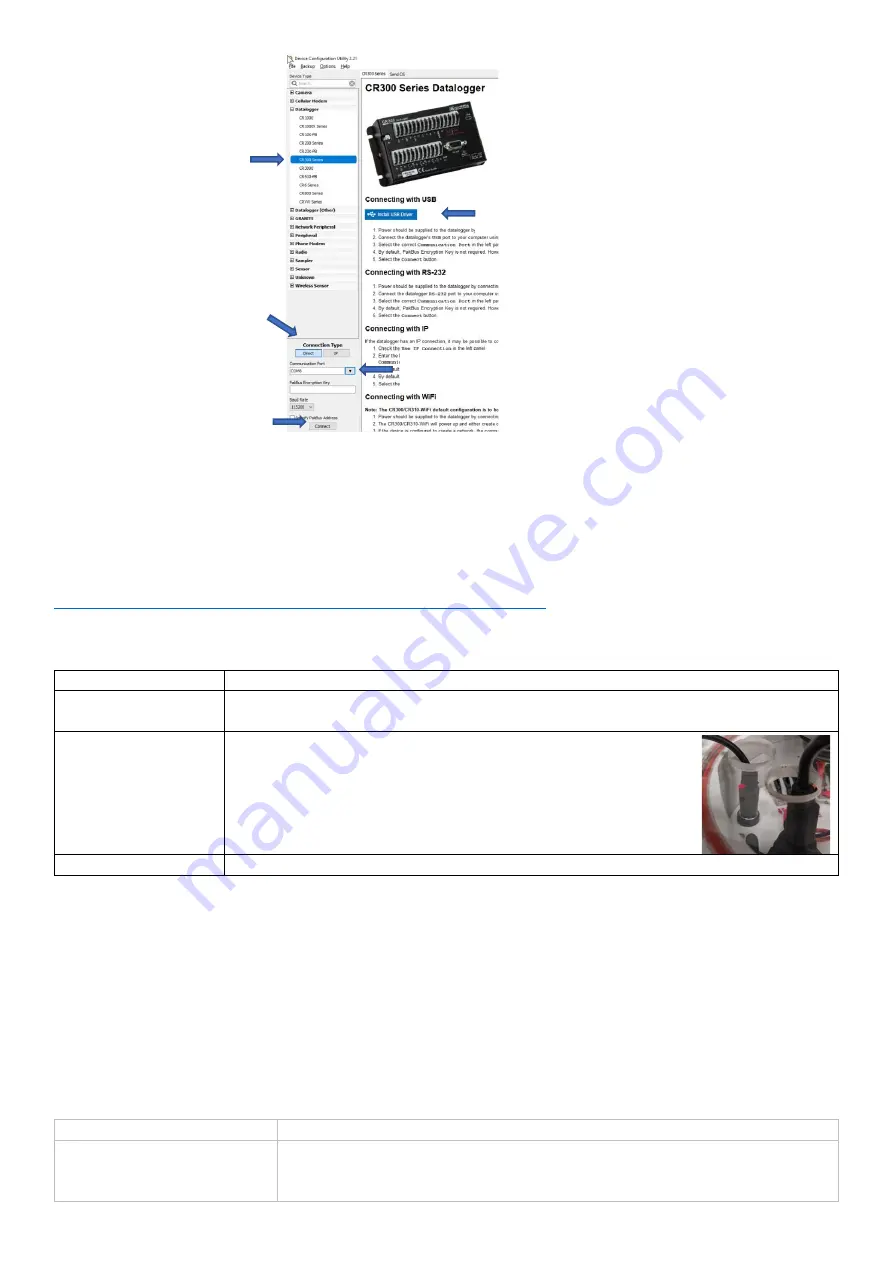
You will most likely need to install USB drivers on the first connection to the station. See Step 2 in the image above
for more instructions.
If this is your first time using a Campbell Scientific datalogger system, a quick start video series may be useful to
introduce basic concepts. Refer to these videos here:
https://www.campbellsci.com/videos/cr300-datalogger-quickstart-part-1
4.2.2
Power Switch
The switch controls power to the Ai1 depending on the model:
Model
Power
Externally Powered
(EXT PWR)
The switch connects/disconnects the external 12V or 24V input
Battery Powered
The switch connects/disconnects the internal battery and external
charging port. For models with a battery, an external charging
cable plugs into the barrel connector through a hole in the bottom
plate, as shown here. The charging port accepts 5 to 6V with the
center pin +.
Solar Powered
The switch connects/disconnects the solar and battery power sources
If the Ai1 is powered through the USB port, the Ai1 will remain operational, although communications will stop.
The switch is inline with an internal fuse that is accessed by opening the Ai1 electronics housing as described in 4.1.
By default, stations are shipped with a 3A fuse which may be replaced to alternative sizes if required. A battery
measurement (if fitted) will only be available when the switch is on and the fuse is installed.
4.2.3
LEDs
Power status
LED’s are mounted on the top of the Ai1 and on the terminal plate, w
ith a flash sequence indicating the
power and program modes:
Table 1
–
Red power LED functions
Off
No power
Double flash every 15 seconds Operating on USB power. Restricted functionality. When running on USB power
everything except the following operates as normal:
-
The internal modem will be off
5. Use the connect button to connect
3. When plugging in a USB cable use the
Direct
type. If connecting through
Eagle.io, use the
IP
type
1. The Ai1 is compatible with the
CR300 series. Select this datalogger
2. On first use, you may need to install a USB driver. Click
this button and follow these steps
4. Once the USB driver is installed, use the pull-down option to find the right
COM port, it will appear as the CR300 datalogger type


