background image

3

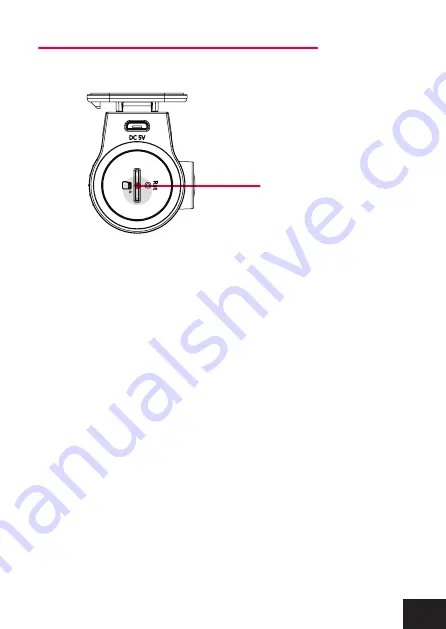
                Memory Card Slot

Car camera supports up to 

64GB TF card,  and

Class 10 TF card is 

required.

1. Insert Micro SD card

2. INSTALLING THE DASH CAM

2. Mounting

2.1 Check the orientation of the Dash Cam camera first 

before installation. When the Dash Cam lens is facing 

outwards, the Hand Gesture Sensor faces down.

2.2 Use an Alcohol wipe to clean the windscreen and 

enhance adhesion.

2.3 Fix the Dash Cam on the inside surface of the 

windscreen by removing backing off 3M tape and press & 

hold firmly to windscreen for 60 seconds. The area near the 

rear-view mirror is suggested where the vision is not blocked. 

Do not install the device on the vehicles airbag or within its 

working range.


2.4 Insert the Micro USB end of the GPS power cable into 

the Micro USB Power socket/ charging point of the Dash 

Cam. Fix the GPS power cable on the inside surface of the 

windscreen by removing backing off 3M tape and press & 

hold firmly to windscreen for 60 seconds. For a better GPS 

signal, make sure the 3M sticker faces toward the sky and is 

not blocked or obstructed. Connect USB charging end of the 

GPS power cable into 12/24V power socket of vehicle.

Summary of Contents for XV20DVR

Page 1: ...R XV22DVR USER MANUAL xviewdrive com au for more information on the Xview range go to our website VIEW INCLUSIONS Dash Cam GPS power cable cable charger memory card XV22DVR model rear camera rear camera cable ...

Page 2: ...r Socket Hand Gesture Sensor Camera Red Flashing when recording Green Mobile phone connected Reset LED Indicators MIC Adhesive Mount Memory Card Slot Rear camera input Reset 1 PRODUCT PICTURE AND FUNCTION Speaker VIDEO ...

Page 3: ...tape and press hold firmly to windscreen for 60 seconds The area near the rear view mirror is suggested where the vision is not blocked Do not install the device on the vehicles airbag or within its working range 2 4 Insert the Micro USB end of the GPS power cable into the Micro USB Power socket charging point of the Dash Cam Fix the GPS power cable on the inside surface of the windscreen by remov...

Page 4: ...ll flash red 2 7 For the Dash Cam to work it must receive power from the charging adapter Once power is removed or turned off the Dash Cam will save the current file and turn off NOTE The Dash Cam power cable must be used to retain date and time settings 2 8 Rotate the camera direction to get the best view 2 9 Once position of the camera is OK hide the cable like the positioning diagram below Sugg...

Page 5: ...cable to the rear cameras location 3 3 Fix the cable along the ceiling or A pillar where it can be safely hidden Drivers side see picture below 3 4 Then mount the rear camera to the inside of the vehicles window with the cable input facing the drivers side 3 INSTALLING THE REAR CAMERA XV22DVR model ...

Page 6: ...ttings menu on your smartphone and turn WiFi on to and display all devices for connection 4 4 Select your Dash Cam model SSID name eg XV22DVR 4 5 Enter the password 12345678 4 5 Once successfully paired to your DASH CAM the Dash Cam will say WiFi Connected 4 6 Once connection is successful the indicator light on the side of your Dash Cam turns red 4 7 After your initial pairing of your device to t...

Page 7: ...7 Pairing screen 5 USING THE APP 5 1 Launch the Xview XV20 or XV22 Dash Cam APP to access functions 5 2 Select Connect to DVR to enter the App 5 3 App screen should look like image below ...

Page 8: ...nterface screen Select the recorded video or photo file you wish to view under the appropriate heading This will open up the playback screen and start playing the recorded video or photo 5 9 Select the downloading icon and the selected file will download from the DASH CAM to your Smartphone for viewing Use the same procedure for pictures Alternatively press the select wording click on individual f...

Page 9: ... speed time mileage and other state information of the car 6 4 When activated a GPS symbol will appear on the App screen and flash until it receives a signal then it will turn green 6 5 The GPS data is automatically saved to the video files In order to view the GPS data using the mobile phone APP you need to download the video file in the Dash Cam to your mobile phone 6 6 Then you must disconnect ...

Page 10: ...a 10 second video clip and save it to the Event folder on the SD card We recommend Low Sensitivity to avoid false triggers Note With this function turned on it may fill up the SD card with locked video files Re format the SD card to create space The device does NOT guarantee video recording of all accidents as built in impact sensor may not be activated due to combination of user settings and the ...

Page 11: ... back to its original settings in the case of a system jam or crash Insert a fine point paper clip into the reset hole next to Memory card slot 10 BACKING UP RECORDED DATA Remove SD Card from the Dash Cam and use a reader connected to a computer to access files and folders EVENT folder is for locked G sensor files GPS folder saves GPS dat files NORMAL folder is for video files PHOTO folder is for ...

Page 12: ...o change For latest manuals and updates refer to the website Please retain this user guide for future reference 11 SPECIFICATION CPU Hisilicon 3516C_V200 Image sensor Sony CMOS sensor Battery Super capacitor Video information 1920 1080 16 9 30fps MP4 Photo information 1920 1080 JPG Storage Supports Micro SD Card Class10 up to 64GB Viewing Angle 152 Wide Angle F1 8 Functions WiFi 2 4GHz 802 11b g n...

Page 13: ...e Check the fuse in the tip of the accessory plug it may need to be replaced Dash Cam Connect the Dash Cam to a computer via the USB cable to see if it powers up Problem The Dash Cam shuts down when connected to the vehicle and the battery will not charge Solution This dash cam does not have a battery it has a Super Capacitor The dash cam will only turn on when the vehicle is switched on Problem T...

Page 14: ...o feel warm to the touch during typical use especially when it is recording HD video Problem The Dash Cam stops automatically while recording Solution Check to see whether there is enough space on the Micro SD card Ensure correct Micro SD card is being used 8 64Gb Class 10 or above Micro SDHC is recommended Other types of Micro SD cards may not be suitable for use in Dash Cams If the correct Micro...

Page 15: ... Check to see if there are any finger prints or dirt present on the Dash Cam lens If needed clean with a soft dry cloth before recording Also be sure to have removed the transparent lens cover during installation Problem The Dash Cam is frozen or not responding Solution Reset the unit by inserting a pin into the reset hole push and hold the reset button for a few seconds and try again Format Micro...

Page 16: ...emical substance cleaning solvent or cleaner to clean the Dash Cam please use a moist soft cloth if you would like to clean the Dash Cam Do not use the Dash Cam under conditions where dust is present Use a moist soft cloth to clean the lens before use to avoid poor video footage Xview is NOT responsible for the loss of any recorded video during operation Although designed to withstand high impact ...

Reviews: