background image

3

14 

Safety Precautions and Notes 

Use only the included power supply to operate your  XremeLife system  

(AC: 120 Volt, 60 Hz ONLY, if outside the US and Canada  
a special adaptor may be required).


To avoid electrical shock, do not attempt to open the unit. 
Opening the unit Voids the warranty 
To prevent fire or shock hazard, do not expose this product to direct rain or moisture.   
Do not operate near bath tub, sink, or swimming pool.   
Avoid operation in moist environments. 
Do not overload electrical outlets or extension cords as this may result in fire  
or electric shock, this unit works only on 120 Volt .   

Power surges or over voltage (i.e. 220 Volt) will damage the unit and void the  
warranty. A surge suppressor and other adaptors may be required and are  
the responsibility of the user. 

Features and Functions of the XremeLife DVR


F

ULLY

 C

HARGE


THE


BATTERY


FOR

 18 

HOURS


B

ATTERY


LIFE

: C

ONTINOUS


USE


APPROXIMATELY

 20 

HOURS

 / 

STANDBY


APPROXIMATELY

 375 

DAYS


T

HE


MAXIMUM


SD


CARD


YOU


CAN


USE


IN


THIS


UNIT


IS

 32

GB


R

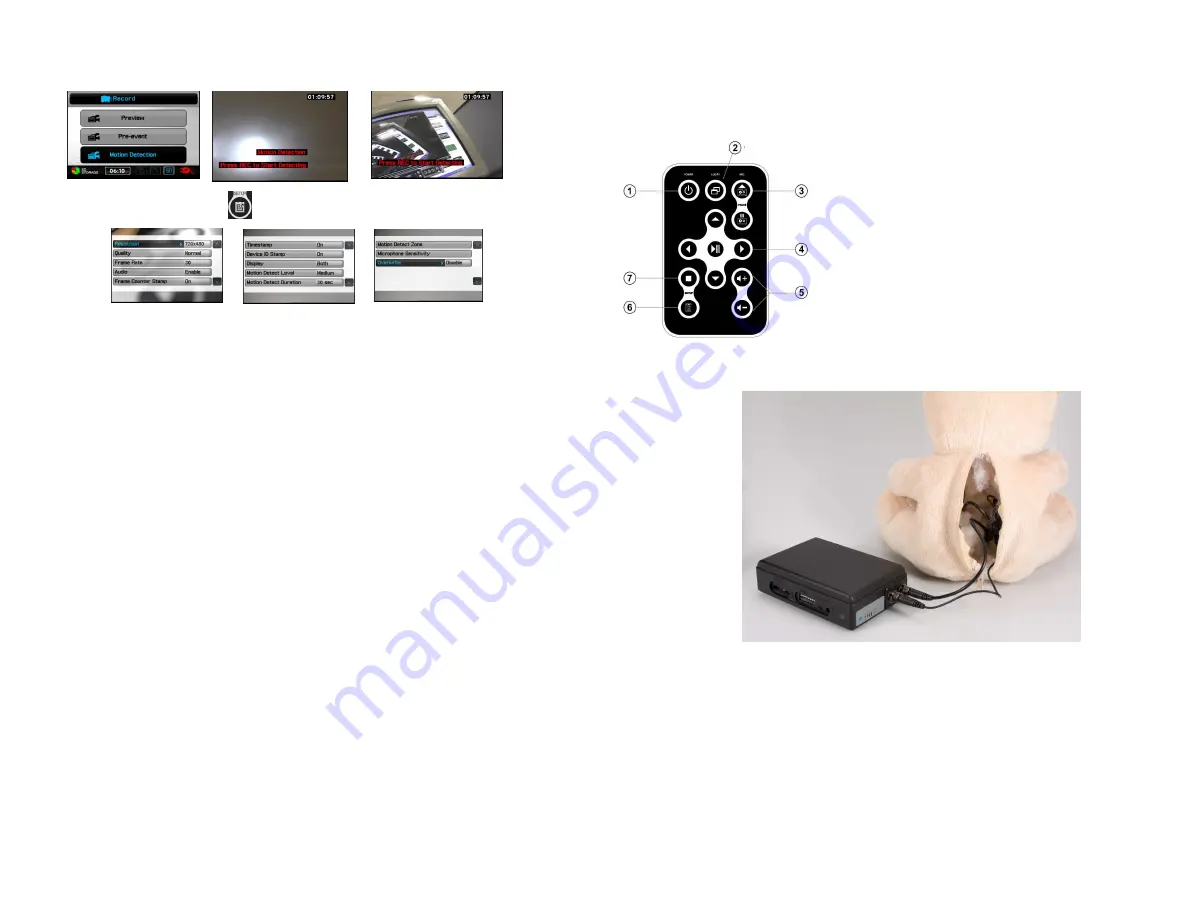
EMOTE


CONTROL


FUNCTIONS


1– P

OWER

 B

UTTON


2– LCD/TV S

WITCH


3– R

ECORD


4– N

AVIGATION

 / 

PAUSE

 / 

PREVIEW


5– 

VOLUME


6– 

SETUP


7– 

ESCAPE

 / 

STOP


What's inside 


The DVR box is located in the back of the Teddy Bear, If you need to remove the box 
for any reason please take caution not to pull on the cables, they are firmly  
attached to the bear, the camera is in the eye and the PIR is in the neck and are not 
removable.  
Gently unscrew the cables if the box is to be removed from the bear. 
When attaching the cables back to the DVR, be sure you have attached them to the 
correct ports, do not force, make sure the pins match before tightening the cables. 
Use care when you change the switches or remove / insert the SD card.


Removal or any Variations made to the bear / DVR / Camera or Motion will void the warranty 


I

f the recording environment is motionless, recording will stop, “detecting” will appear in 

the bottom of screen until the sensor detects motion, the recording will start again, and the 
same event will be repeated.


In Motion Detect Mode , Press  

  SETUP button, the setting items appear:


Resolution (352*288 /640*480/720*56/1024*768/1280*720/1280*960) 

Quality (Good/Norma/ Low) 

Frame Rate ( 1 / 5/ 15 /20/25) 

Audio (Enable/Disable) 

Frame Counter Stamp (On/Off) 

Timestamp  (On/Off) 

Device ID Stamp (ON/Off) 

Display (LCD/TV/BOTH) 

Motion Detect Level ( High/Medium/Low) 

Motion Detect Duration (30 sec/1min/3 min/ 5 min/ 10min) 

Motion Detect Zone >Press |u to select the area for target of motion detect.  

Warning 

Temperature range 

for this unit is 

14ºF to 122ºF  

Summary of Contents for TEDDY BEAR

Page 1: ...h liability shall be limited to an amount equal to one half 1 2 the costs of the goods or 250 00 whichever is less Returned Material In no case will the seller give a refund Seller will accept most goods for ex change or credit at the Seller s discretion within 30 days of purchase date In no case are goods to be returned without first obtaining Seller s permission Only unused goods as currently ma...

Page 2: ...an you get on a 1GB SD card At the default setting of 720x480 30FPS it can record approximately 40 minutes Safety Precautions of the DVR box All the recorded files are stored in the IMAGE VIDEO folder If the file is corrupted so that it cannot be played The system will return to the file detailed list The player can distinguish an unlimited number of files folders However within a folder only up t...

Page 3: ...s located in the back of the Teddy Bear If you need to remove the box for any reason please take caution not to pull on the cables they are firmly attached to the bear the camera is in the eye and the PIR is in the neck and are not removable Gently unscrew the cables if the box is to be removed from the bear When attaching the cables back to the DVR be sure you have attached them to the correct po...

Page 4: ...rectory Connect an external Camera Select Record function then press to enter record page Preview Before connecting an external camera there s no signal on the screen after connect ing screen will show up preview mode and stand by to record Press REC button on the remote control Press STOP to finish recording In Preview mode Press SETUP the setting items appear Resolution 352 288 640 480 720 56 10...

Page 5: ...west Photo file and then to select the photo file to browse Press to the upper file folder listed in date Press once more to the upper level My Record Start slideshow In File list Mode or Image Browsing Mode press SETUP to show the setting items select Start Slideshow to start the Slide Show Press to choose Slide Show then press to start slide show Press to stop Slide Show and return to the file l...

Page 6: ...e setting items will appear In File List mode Press button the setting items will appear In the upper file Press button the setting items will appear Pre event cont Resolution 352 288 640 480 720 576 1024 768 1280 720 1280 960 Quality Good Normal Low Frame Rate 1 5 15 20 25 Audio Enable Unable not available on all models Frame Counter Stamp On Off Timestamp On Off Device ID Stamp ON Off Display LC...

Page 7: ...r pausing the playback Press once the video file will be played in 1 2 speed slow motion Press again to resume the normal play back speed 1 4 Times Speed Playback Press after pausing the playback Press twice the video file will be played in 1 4 speed slow motion Press again to resume the normal playback speed 1 8 times Speed Playback Press after pausing the playback Press three times the video fil...

Page 8: ... Insert the SD card which contains updated software into the device and press enter button after the system is updated it will reboot automatically if the message Update Error is shown it means that there are errors during updating it might be that the software is incomplete or the memory card has some problem please use another memory card or reboot the device after inserting the memory card Push...

Reviews: