XtremeAIR Pro-X Series Installation Manual & User Manual Download Page 13

www.XtremeAirUsa.com

                                                                    PAGE 

13


USE & CARE INFORMATION: 


Operations:   


Read and understand all instructions and warnings in this manual before operating the appliance. Save these instructions 
for future reference.   


Always  leave  safety  grills  and  filters  in  place.  Without  these  components,  operating  blowers  could  catch  on  to  •  hair, 
fingers and loose clothing.   


NEVER dispose cigarette ashes, ignitable substances, or any foreign objects into blowers.   


NEVER  leave  cooking  unattended.  When  frying,  oil  in  the  pan  can  easily  overheat  and  catch  fire.  The  risk  of  self 
combustion is higher when the oil has been used several times.   


NEVER cook on “open” flames under the range hood. Check deep-fryers during use: Superheated oil may be flammable.   


Cleaning:   


The saturation of greasy residue in the blower and filters may cause increased inflammability. Keep unit clean and free of 
grease and residue build-up at all times to prevent possible fires.   


FILTERS  MUST  BE  CLEANED  PERIODICALLY  AND  FREE  FROM  ACCUMULATION  OF  COOKING 
RESIDUE. Old and worn filters must be replaced immediately.   


DO  NOT  operate  blowers  when  filters  are  removed.  Never  disassemble  parts  to  clean  without  proper  instructions. 
Disassembly  is  recommended  to  be  performed  by  qualified  personnel  only.  Read  and  understand  all  instructions  and 
warnings in this manual before proceeding. 

 
MAINTENANCE: 

 
SAFETY WARNING: Never put your hand into area housing the fan while the fan is operating!   
For  optimal  operation,  clean  range  hood  and  all  baffle/spacer/filter/grease  tunnel/oil  container  regularly.  Regular  care  will  help 
preserve the appearance of the range hood.   
 
Cleaning Exterior surfaces:   


Clean periodically with hot soapy water and clean cotton cloth. 

Do not use corrosive or abrasive detergent (e.g. Comet 

Power  Scrub

®

,  EZ-Off®  oven  cleaner),  or  steel  wool/scoring  pads,  which  will  scratch  and  damage  the  stainless 

steel surface.

 For heavier soil use liquid degrease such as “Formula 409

®

” or “Fantastic

®

” brand cleaner.   


If hood looks splotchy (stainless steel hood), use a stainless steel cleaner to clean the surface of the hood. Avoid getting 
cleaning solution onto or into the control panel. Follow directions of the stainless steel cleaner. 

CAUTION:

 Do not leave 

on too long as this may cause damage to hood finish. Use soft towel to wipe off the cleaning solution, gently rub off any 
stubborn spots. Use dry soft towel to dry the hood.   


After cleaning, you may use non abrasive stainless steel polish such as 3M ® or ZEP®, to polish and buff out the stainless 
luster and grain. Always scrub lightly, with clean cotton cloth, and with the grain.   


DO NOT

 allows deposits to accumulate or remain on the hood.   


DO NOT

 use ordinary steel wool or steel brushes. Small bits of steel may adhere to the surface and cause rusting.   


DO  NOT

 allow salt solutions, disinfectants, bleaches, or cleaning compounds to remain in contact with stainless steel • 

for  extended  periods.  Many  of  these  compounds  contain  chemicals,  which  may  be  harmful.  Rinse  with  water  after  ex-
posure and wipe dry with a clean cloth.   

 
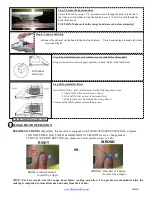
Cleaning Aluminum Grease Filter / Stainless Steel Filter less Grill:   

IMPORTANT:

 Drain oil from oil containers before oil and residue overflow!   


The metal filters fitted by the factory are intended to filter out residue and grease from cooking. It need not be replaced on 
a regular basis but are required to be kept clean.   


Filters should be cleaned after every 30 hours of use.   


Remove and clean by hand or dishwasher. Spray “Formula 409®” or equivalent degreasing detergent and leave to soak if 
heavily soiled. Dry filters and re-install before using hood.   

Replacing Filters:   


Should filters wear out due to age and prolonged use, please contact your local reseller for replacement filters.     

Note: Also replace damaged filter that has punctured or broken mesh, bent or broken frame.   
.   


14 

Summary of Contents for Pro-X Series

Page 1: ...www XtremeAirUsa com PAGE 1 Under Cabinet Range Hood IMPORTANT READ AND SAVE THESE INSTRUCTIONS FOR RESIDENTIAL INDOOR USE ONLY INSTALLATION GUIDE USER S MANUAL PRO X ULTRA SERIES ...

Page 2: ...r explosive materials in adjacent cabinets or surrounding areas Disclaimer The manufacturer and or distributor reseller decline all responsibility in the event of failure to observe the instructions provided for installation maintenance and suitable use of the product The manufacturer and or distributor reseller shall NOT be responsible for any injury due to negligence and the warranty of the unit...

Page 3: ...iring must be properly installed insulated and grounded Before servicing or cleaning unit turn power OFF and un plugged OPERATION Use high settings on cooking range only when necessary Keep all fan baffle spaces filter grease tunnel oil container and grease laden surfaces clean Grease should not be allowed to accumulate on fan baffle spaces filter grease tunnel and oil container Never allow the fi...

Page 4: ... system must have a damper If roof or wall cap has a damper do not use damper supplied for some models only with the range hood For the most efficient quiet operation A distance of 26 to 30 is recommended between stove top and the bottom of range hood It is recommended that the range hood be vented vertically through the roof through 6 or bigger vent work ALWAYS when possible reduce the number or ...

Page 5: ...ANSI NFPA 70 latest edition or CSA Standards C22 1 94 Canadian Electrical Code Part 1 and C22 2 No 0 M91 latest edition and all local codes and ordinances TOOL MATERIAL YOU WILL NEED PARTS SUPPLIED Except UL14 PX10 PX12 PX11 ALL Ultra Series 05 06 07 1 Remote Control for all Pro x Series only except PX11 Baffle Filters Instruction manual Pencil or Marker Phillip Powered Screwdriver Stud Finder Mea...

Page 6: ...CK IN STEP 1 Protect the cook top Put a thick protective covering over counter top cook top or range to protect from damage or dirt STEP 2 Create work station OPTIONAL 08 09 Have 2 pieces 2 x 4 x 20 on both sides of stove plywood on top of them to protect cook top or stove from damage or dirt This plywood will also create a comfortable work station for easy to installing ...

Page 7: ...abinet TIP optional since the hood is heavy use cabinet jack is highly recommended Step 3 Prepare ductwork single outlet Make sure you have a 15amp 120V 60Hz single outlet on the left or right of the duct pipe usually is on of cabinet width Make sure duct pipe is ready to hook up to the range hood before beginning installation 8 diameter duct and roof or wall cap depending on where you will be ven...

Page 8: ...izontal level 3 Slide forward into slot behind the front of hood To remove the baffle please reverse the process Step 9 Install oil tunnel or oil container not available for all models Drop oil tunnel into recess support near rear of hood Refer to the left picture RIGHT a whole button is covered by a finger WRONG Only half of a button is covered by a finger RIGHT VS WRONG Step 7 Secure the hood co...

Page 9: ...gain to clear the screen Touch light button to validate To check time touch light button Note The clock display is only for PX10 Touch Light button to turn the lights on or off 1 While the range hood is on and the blower is running in normal mode touch Power Off Delay button to activate delay off timer 2 Adjust to desired period of delay of timer by touching or button quickly 1 15 minutes Timer be...

Page 10: ...uch and hold down for 1 2 seconds Option 2 Touch and hold down power sign 1 for 1 2 seconds the blower will be running at the same speed as last used Note The system saves user configurations settings such as timer and blower motor speed will remain the same the next time it is turned on B Adjusting blower speed Touch and hold down for increase Touch and hold down for decrease C Turning off the bl...

Page 11: ...lease note that turning off the system will not reset the Power On Elapsed Digital Timer F AUTOMATIC SHUT OFF MACHINE WILL AUTOMATICLY SHUT OFF AFTER APPROX 2 HOURS FOR THOSE MANUFACTURED AFTER AUGUST 2012 ONLY 3 TYPE 3 SOFT PRESS BUTTON CONTROL For All Ultra Series SPECIFICATION Body Design Seamless Stainless Steel Satin Finish Power Rating 120V 60Hz USA Canada standard General Input Power 184W 9...

Page 12: ...t the blower is not spinning at all is stuck or is rattling The blower might be jammed or scraping the bottom due to shipping damage Please contact us immediately The motor is defective possibly seized change the motor 5 The hood is not venting out properly Make sure the distance between the stove top and the bottom of the hood is within 26 and 30 in distance Due to different ceiling height config...

Page 13: ...ol scoring pads which will scratch and damage the stainless steel surface For heavier soil use liquid degrease such as Formula 409 or Fantastic brand cleaner If hood looks splotchy stainless steel hood use a stainless steel cleaner to clean the surface of the hood Avoid getting cleaning solution onto or into the control panel Follow directions of the stainless steel cleaner CAUTION Do not leave on...

Page 14: ...www XtremeAirUsa com PAGE 14 ...

Reviews: