background image

Xtreme Power Conversion Corporation

E90 Service Manual

Page 49

Uninterruptible Power Supply

Battery: Press scroll key for approximately 1 sec. The display will show the Battery voltage, current, estimated 

battery runtime and battery capacity as shown below. 

Load : Press the scroll key for approximately 1 sec. The display will show all three phases of the Load %,  

kW, and kVA  as shown below

INSIDE: press 


 key for approximately 1 sec. to move to the fifth page, the fifth page of data is Inside 

data.

Summary of Contents for E90 Series

Page 1: ...E90 Online UPS 10kVA 15kVA 20kVA Models Service Manual www xpcc com 2019 Xtreme Power Conversion Corporation All rights reserved Rev 8 13 18 ...

Page 2: ...ower Cables 14 Power Cable Connection 15 BatteryPackConnection 17 UPS parallel Installation 25 Operation 27 Operation Modes 27 Turn on off UPS 30 The LCD Display 32 Parallel system commissioning 42 Display Messages Troubleshooting 43 Options 45 Specifications 47 Problems and Solution 48 USBcommunicationportdefinition 49 RS232 communication port definition 50 RS485 communication port definition 51 ...

Page 3: ...the UPS which makes the performance indicators very excellent and the system more stable It not only has self protection and fault diagnosis but also can avoid risks of analog device failure which allows the control system more reliable Settable charging current By setting the battery capacity configured by user the reasonable charging current can be automatically allo cated Constant voltage charg...

Page 4: ... alarm Red off UPS normal Bypass LED Green on UPS bypass output Green flash Bypass abnormal or out of range or bypass switch fail Green off Bypass normal no bypass output Battery LED Green on Battery supply power Green flash Battery discharge termination and pre inform Green off Battery abnormal no battery or battery fail Mains output LED Green on Mains output Green off No mains output Table 2 But...

Page 5: ... will soft start When bus voltage rises around 170V PFC boost begins to work and the bus voltage will be up to about 200V Inverter starts When inverter is ready it will transfer to inverter mode If bypass voltage frequency and phase sequence are normal the inverter voltage will track the bypass power and switch to inverter output without in terruption or the UPS will transfer to inverter intermitt...

Page 6: ...Supply AC DC DC DC principle circuit diagram AC DC DC DC principle As shown above A yellow box shows the rectifier circuit B blue box shows the battery input circuit C other part shows the boost circuit A and C form the PFC rectifier circuit while B and C form the battery boost circuit ...

Page 7: ...s and inverter principle As shown above A yellow box represents bypass circuit of UPS B blue box shows the inverter circuit which converts the Bus voltage into the AC output Charging principle As shown above charger reduces the Bus voltage to a suitable voltage to charge the battery A B Charging fuse Charging Fuse Battery ...

Page 8: ...Output Terminal blocks Weight 296 lbs 1 string 419 lbs 2 string 539 lbs 3 string OPTIONAL Model EBP80 63A EBP80 125A BATTERY PACK Battery quantity and size 80 12V 9AH Dimensions W x D x H 9 8 x 39 2 x 34 0 in Weight 535 lbs ENVIRONMENT Operating temperature 32 104 F 0 40 C Audible noise 55dB from 1M distance for 10 15kVA 58dB from 1M distance for 20kVA Altitude 5 200 ft above sea level APPROVALS U...

Page 9: ...Xtreme Power Conversion Corporation E90 Service Manual Page 9 Uninterruptible Power Supply E90 Cabinet View Outlook Front View Side View Rear view ...

Page 10: ...t Slot 1 SNMP card Relay card 3 Intelligent Slot 2 SNMP card Relay card 4 Optional dry contact output port 5 Power Switch 6 USB port 7 RS485 port 8 RS232 9 O P Switch 10 Maintenance switch its cover 11 Bypass Switch 12 Terminal block for Input output GND 13 EPO switch 14 REPO port 15 Parallel port 2 16 Parallel port 1 17 I P Switch 18 Terminal block for battery ...

Page 11: ...nt Slot 1 SNMP card Relay card 3 Intelligent Slot 2 SNMP card Relay card 4 Optional dry contact output port 5 Power Switch 6 USB port 7 RS485 port 8 RS232 9 O P Switch 10 Maintenance switch its cover 11 Bypass Switch 12 Terminal block for Input output GND 13 EPO switch 14 REPO port 15 Parallel port 2 16 Parallel port 1 17 I P Switch 18 Terminal block for battery ...

Page 12: ...Manual Page 12 Uninterruptible Power Supply Internal view of UPS UPS left view UPS right view EPO interface board Fan INV power board PFC power board Input board Output breaker Maintenance switch Input breaker Input filter ring Battery fuse Batteries ...

Page 13: ...wer Conversion Corporation E90 Service Manual Page 13 Uninterruptible Power Supply UPS module inside view 20KVA PFC inductor board 10 15KVA INV inductor board Output EMI board PFC drive board PFC inductor board ...

Page 14: ...er Conversion Corporation E90 Service Manual Page 14 Uninterruptible Power Supply PFC inductor board 20KVA PFC drive board PFC power board 2pcs charging inductors 6pcs PFC inductors Charging fuse IGBT drive board ...

Page 15: ...anual Page 15 Uninterruptible Power Supply Inverter inductor board INV Power board Control detection board Output EMI board 3pcs inv capacitors 3pcs inverter fuse 3pcs inverter SCR drive board BUS capacitor 6pcs inv inductors Auxiliary power Radiator ...

Page 16: ...Xtreme Power Conversion Corporation E90 Service Manual Page 16 Uninterruptible Power Supply Input EMI board 15 20KVA Input board Input filter inductor board Input fuse board ...

Page 17: ...Xtreme Power Conversion Corporation E90 Service Manual Page 17 Uninterruptible Power Supply Adapter RJ45 interface board EPO interface board USB interface board ...

Page 18: ...s plated bright nickel BAT BAT input P6 Assistant power 15V Name neilsbed Description 1121S 2P P 3 96mm 180 single row square PIN white Assistant power 15V J1 PFC drive board signal Name neilsbed Description 1121S 6P P 3 96mm 180 single row square PIN white PFC drive board signal P15 relay SCR drive signal Name neilsbed Description 301S 10P P 2 54mm 180 two rows square PIN black relay SCR drive si...

Page 19: ...mm tinned copper A Main A phase input J13 B Main B phase input Name blade terminal Description 4PIN 10A M4 screw hole straight leg 8 8 4 11 1mm T0 8mm tinned copper B Main B phase input J14 C Main C phase input Name blade terminal Description 4PIN 10A M4 screw hole straight leg 8 8 4 11 1mm T0 8mm tinned copper C Main C phase input J23 A Main A phase input sampling Name neilsbed Description 1121S ...

Page 20: ...tive battery SCR drive 3 J8 Positive battery SCR drive 1 Name neilsbed Description 1121S 2P P 3 96mm 180 single row square PIN white BAT1 SCR Positive battery SCR drive 1 J10 Positive battery SCR drive 2 Name neilsbed Description 1121S 2P P 3 96mm 180 single row square PIN white BAT2 SCR Positive battery SCR drive 2 J12 Positive battery SCR drive 3 Name neilsbed Description 1121S 2P P 3 96mm 180 s...

Page 21: ...s SCR drive signal Name neilsbed Description 2001S 2P P 2 54mm 180 single row square PIN white BPS_B_RLY bypass SCR drive signal J6 positive battery SCR drive1 Name neilsbed Description 1121S 2P P 3 96mm 180 single row square PIN white BAT1 SCR positive battery SCR drive1 J7 positive battery SCR drive2 Name neilsbed Description 1121S 2P P 3 96mm 180 single row square PIN white BAT2 SCR positive ba...

Page 22: ...ingle row square PIN white Assistant power 15V P9 BUS Name blade terminal Description 4PIN 10A M4 screw hole straight leg 8 8 4 11 1mm T0 8mm tinned copper BUS BUS P10 BUS Name blade terminal Description 4PIN 10A M4 screw hole straight leg 8 8 4 11 1mm T0 8mm tinned copper BUS BUS P14 PFC charger drive signal 301S 30P P 2 54mm 180 two rows square PIN black horn PFC charger drive signal P20 Assista...

Page 23: ...me blade terminal Description 4PIN 10A M4screw hole straight leg 8 8 4 11 1mm T0 8mm tinned copper VOUT_A Output A phase P3 BPS_A Bypass A phase Output Name blade terminal Description 4PIN 10A M4screw hole straight leg 8 8 4 11 1mm T0 8mm tinned copper BPS_A Bypass A phase Output P5 BPS_B Bypass B phase Output Name blade terminal Description 4PIN 10A M4screw hole straight leg 8 8 4 11 1mm T0 8mm t...

Page 24: ... II welded assemblies plated bright nickel PH3_INV_FUSE P2 C phase inv fuse P44 PH1_INV_FUSE P2 A phase inv fuse Name blade terminal Description UHTWSZ Wiring copper bar II welded assemblies plated bright nickel PH1_INV_FUSE P2 A phase inv fuse J1 PH1_INV_Q_ C1E2 VOUT_A A phase inv DC com ponent and Output voltage sampling Name neilsbed Description 1121S 4P P 3 96mm 180 single row square PIN white...

Page 25: ...d copper DCBUS BUS voltage P13 15V 15V ASSISTANT POWER Name neilsbed Description 1121S 2P P 3 96mm 180 single row square PIN white 15V 15V ASSISTANT POWER P28 24V_FAN Fan power Name neilsbed Description 1121S 2P P 3 96mm 180 single row square PIN white 24V_FAN Fan power J4 VBPS_A BAT VINV_A Supply power from auxiliary power Name neilsbed Description 1121S 5P P 3 96mm 180 single row square PIN whit...

Page 26: ...alf bridge INV drive signal J18 24_CSU monitoring unit POWER Name neilsbed Description 1121S 2P P 3 96mm 180 single row square PIN white 24_CSU monitoring unit POWER DSP board Function overview UPS control Communication circuit Parallel circuit Display circuit DSP board Input and output interface definition Table 9 DSP board interface No Definition Specification Name Description J7 ASSISTANT POWER...

Page 27: ...w square PIN white Vbps_A Vibps_N Vbps_B Vbps_C bypass voltage sampling J25 battery voltage sam pling Name neilsbed Description 1121S 3P P 3 96mm 180 single row square PIN white Vbat Vbat battery voltage sampling J18 BUS voltage sampling Name neilsbed Description 1121S 3P P 3 96mm 180 single row square PIN white Vbus Vbus BUS voltage sampling J17 parallelsignal1 Name neilsbed Description 2001S 13P...

Page 28: ... horn Vinv_A Vout_A lower half bridge INV drive signal Output EMI board Function overview Output EMI Output EMI board interface Input and output interface definition Table 10 output EMI board interface No Definition Specification Name Description P1 N Name blade terminal Description copper tinning 1PIN 10A W 6 3mm T 0 8mm N Neutral P10 A Name blade terminal Description copper tinning 1PIN 10A W 6 ...

Page 29: ...ription 4PIN 10A M4 screw hole straight leg 8 8 4 11 1mm T0 8mm tinned copper N N P1 Vin A Name blade terminal Description UHTWSZ Wiring copper bar II welded assemblies plated bright nickel Vin A Input A phase P2 Vin B Name blade terminal Description UHTWSZ Wiring copper bar II welded assemblies plated bright nickel Vin B Input B phase P3 Vin C Name blade terminal Description UHTWSZ Wiring copper ...

Page 30: ...scription 2001S 5P P 2 54mm 180 single row square PIN white RS232 485_A IN RS232 485_A signal J22 485_A signal Name blade terminal Description 2001S 5P P 2 54mm 180 single row square PIN white BAT_T 485_A 485_A signal J23 RS232 USB signal Name blade terminal Description 2001S 5P P 2 54mm 180 single row square PIN white RS232 USB RS232 USB signal J28 SNMP1 signal Name blade terminal Description 200...

Page 31: ... RJ45_1 signal Name PC interface Description RJ45 female 8PIN black 90 metal shell RJ45_1 RJ45_1 signal J2 RJ45_2 signal Name PC interface Description RJ45 female 8PIN black 90 metal shell RJ45_2 RJ45_2 signal EPO interface board Function overview signal interface function EPO interface board interface Input and output interface definition Table 14 EPO interface board interface No Definition Speci...

Page 32: ... square PIN white EPO EPO signal J8 Dry contact signal Name neilsbed Description 2001S 4P P 2 54mm 180 single row square PIN white Dry Contact Dry contact signal J2 RS232 signal Name neilsbed Description 2001S 4P P 2 54mm 180 single row square PIN white RS232 RS232 signal USB USB signal Name PC interface Description USB interface female 6PIN black square 90 USB USB signal Parallel interface board ...

Page 33: ...erature is 15 C 25 C typically is 20 C The place where the battery located should keep the constant temperature and far away from heat and vents UPS location inspection The users manual offers the detailed installation instruction it can be referred for installation Check if enough space is left for maintenance operation ensure that the operator can still pass through freely when the door is fully...

Page 34: ... to the relevant chapters of the user s manual External auto switching and generator power distribution inspection Confirm that the ATS at the input side is three level switch that is the Neutral cannot be cut off if it is four level confirm that when transfer between two sources neutral should meet on before off principle If the AC and generator can be selected at the input side please confirm th...

Page 35: ... maintenance Guidelines for good service The UPS is almost maintenance free and is designed to have a failure rate less than 1 a year Periodical service is only needed for the fans the UPS has a low heat generation A battery change after 3 6 years can be expected and apart from the service to the fan it should normally be the only service done to the unit Due to the size of the UPS and the highly ...

Page 36: ... the maintenance bypass mode for maintenance Follow the process B refer to chapter III for specific information Please note that the do the maintenance in maintenance bypass mode is not absolutely safe Part of circuits are still at work In maintenance mode the load is directly connected to the power via the bypass so the UPS will not provide any protection Step A the load may be closed A1 Turn off...

Page 37: ... UPS mains input switch cannot be OFF arbitrarily to avoid electricity interruption Fault analysis Record the status of display then fix the reason in accordance with the following questions 1 The input supply is abnormal over under voltage 2 Load changes capacity or type 3 Fire 4 There s odor 5 Abnormal noise 6 Bad environment dust or moisture 7 High temperature of UPS or ambient environment Trou...

Page 38: ... has no light and response when connected mains No light and response for LCD Refer to chapter 2 and chapter 3 for operation Check if the 15V in INV POWER board is normal Replace DSP YES Check If the fuse of INV POWER board is good NO Replace INV power board Replace the fuse NO YES END If repaired NO YES ...

Page 39: ... fault long beep Fault ON control detec tion board 9 Fan fault long beep Fault ON fan INV power board 10 Reserve long beep Fault ON 11 Auxiliary power fault long beep Fault ON INV power board control detec tion board 12 Power initializa tion fault long beep Fault ON control detec tion board 13 Positive battery Charge fault long beep Fault ON PFC power board PFC inductor board control detec tion bo...

Page 40: ...C power board control detec tion board 27 Input phase se quence reverse once s Fault flash connection wrong 28 Bypass reverse once s Fault flash connection wrong 29 Output short circuit once s Fault flash output short 30 Rectifier over current once s Fault flash PFC power board control detec tion board 31 Bypass over current once s BPS flash bypass out put overload 32 Over load once s INV or BPS f...

Page 41: ...l in the detec tion board is wrong Battery replacement 1 Refer to the user s manual for battery installation operation 2 Ensure the safe conditions before any operation Please read chapter 2 Security conditions and chapter 3 shutdown disassembly reassembly UPS carefully Be careful when disconnecting the battery Short circuit will damage the battery or wiring Note The battery with the same brand ty...

Page 42: ...hen disconnecting the battery Short circuit will damage the battery or wiring 2 ESD electrostatic discharge precautions The PCB is very sensitive to electrostatic When pick and place the board ensure that the operating personnel and equipment are grounded well The new board is taken out from the anti static packaging only when necessary the old board removed from the UPS should be immediately plac...

Page 43: ...he nuts screws and cables 8 install the left panel and screws 9 Continue with the steps 4 9 in process A or 4 8 in process B in chapter 3 Replace PFC power board 1 Ensure the safe conditions before any operation Please read chapter 2 Security conditions and chapter 3 shutdown disassembly reassembly UPS carefully 2 Operate according to the steps 1 3 of process A or steps 1 3 of process B in chapter...

Page 44: ...mbly UPS carefully 2 Operate according to the steps 1 3 of process A or steps 1 3 of process B in chapter 3 3 Open the front panel remove 4pcs of nuts of the rear panel and then remove the rear panel 4 Remove all the cables of the PCB 5 Remove all the screws of the PCB 6 Replace the PCB package the old PCB 7 Install the screws and cables 8 Install the rear panel and nuts 9 Continue with the steps ...

Page 45: ... Ω 10Ω open or short 5 Charge SCR Q70 Q71 A K Ω open Short 6 Charge SCR QJ1 QJ4 QJ5 QJ6 QJ7 QJ8 QJ3 QJ12 G K 7 Bypass SCR QJ1 QJ4 QJ5 QJ6 QJ7 QJ8 QJ3 QJ12 A K A K open Short 8 Bypass SCR K7 K8 K9 G K G K 10Ω open or short 9 Bypass Relay K3 K4 K5 1 3 1 3 open short PFC power board NO Description Type Checked compo nents Detect Pin Meter stall Normal abnormal 1 BOOST Diode D7 D12 A K diode 0 36V ope...

Page 46: ...pletely no electricity inside the UPS and need extra attention when do the maintenance When cut off all the external input power supplied for maintenance use the bleed resistor to release the energy stored in Bus capacitor after open the case firstly to avoid causing injury to persons Please refer to the UPS repair maintenance especially the Security maintenance conditions and Close Disassembly Re...

Page 47: ...n and press the enter key to enter the highlighted page Data Press the scroll key for approximately 1 sec to highlight Data The Data page will display all three phases of input and output voltage current and frequency and output load percentage as shown below While in the Data page additional data pages to view will be shown on the right side of the screen Input Press ENTER key for approximately 1...

Page 48: ...ion Corporation E90 Service Manual Page 48 Uninterruptible Power Supply Output Press the scroll key for approximately 1 sec The display will show all three phases of the Output voltage current and frequency as shown below ...

Page 49: ...The display will show the Battery voltage current estimated battery runtime and battery capacity as shown below Load Press the scroll key for approximately 1 sec The display will show all three phases of the Load kW and kVA as shown below INSIDE press key for approximately 1 sec to move to the fifth page the fifth page of data is Inside data ...

Page 50: ...Info Press the scroll key for approximately 3 sec to exit Data and press the scroll key for approximately 1 sec move to Info The display will show LCD PFC and INV software versions and power rating as shown below Setting Press the scroll key for approximately 1 sec to move to the setting page then press ENTER key to enter setting user page Press the scroll key to change item press ENTER key to ent...

Page 51: ...uzzer Enable or Disable Enable Test Now OFF 10s 10m EOD End Of Discharge OFF Test Now Press ENTER key to enter test now item press the scroll key to select test value and press ENTER to confirm The Battery manual test command can test battery discharge for 10s 10min and to EOD Maintenance Press ENTER key to enter maintenance and display a password window press change the number and press ENTER to ...

Page 52: ... number in list Time of event or fault State Mode of UPS and event or fault as shown in the examples below Record Event Press the scroll key to select Up or Down or Delete Press ENTER key to confirm Record Fault Press the scroll key to select Up or Down or Delete Press ENTER key to confirm Note If Delete is selected all event or fault records will be deleted ...

Page 53: ...lues Enter Goes into setting pages and confirms values To enter the Maintenance System parameter setting mode press the Scroll and Enter keys simultaneously for 3 seconds The display will show a password window press the Scroll key to change the number and press Enter to select the value the password is 1121 Once the Maintenance password is entered press the Enter key The UPS goes into the Setting...

Page 54: ...o disable ECO reprogram Working Mode to Normal or Parallel 2 Must be in static bypass to change 3 If not in static bypass output will drop load 4 This is the MODBUS device address used for RS232 RS485 communication ports a Press Scroll key to set the address b When battery temperature sensor is open choose ID 1 10 13 15 c If UPS is set for parallel mode and device address parallel quantity device ...

Page 55: ...d press the Enter key to enter the Setting Bypass window as shown below Setting Bypass press the Enter key to enter item and confirm value press the Scroll key to change the value The following parameters can be adjusted Setting Bypass Range Default Upper Limit 10 15 20 25 25 VAC Lower Limit 10 20 30 40 40 VAC F_Range 1 2 4 5 10 10 HZ ...

Page 56: ...attery Range Default Number1 20 20 Capacity2 7 2000 9AH Boost Charge Enable or disable Enable Group3 1 19 1 V Boost 2 30 2 40 step is 0 01V 2 30 vpc V Float 2 20 2 29 step is 0 01V 2 27 vpc V EOD 1 60 1 90V 1 67 vpc I Maxcharge4 1 20A Capacity x Group x 15 1 Number is the number of batteries per string 2 Capacity is the Amp Hour rating of the batteries per string 3 Group is the number of strings o...

Page 57: ...ess the Enter key to enter item and confirm value press the Scroll key to change the value The following parameters can be adjusted Setting Parallel Range Default ID1 1 4 1 Number2 1 4 1 Redu Num3 1 3 0 1 ID Program each UPS in Parallel with a unique ID 2 Number Program the total number of UPS systems in parallel Maximum of 4 in parallel 3 Redu Num Program to the total number of UPS systems in par...

Page 58: ... setting interface to setting the working mode ID parallel number redundant number Require setting the in series number capacity of battery The output voltage level and Bypass protection range are default setting 4 Turn off the input breaker of Unit 1 and make sure the UPS is off Turn on the input breaker of Unit 2 access the LCD setting interface setting the parallel working mode ID NO 2 parallel...

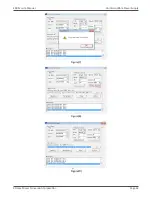
Page 59: ...ng can be performed When finish burning the REC the next burning can be executed after about 20s b If it fails during the REC burning it will show Program was unsuccessful Switch off the UPS and then restart click Update to re burn c If it fails during the INV burning it will show Program was unsuccessful Switch off the UPS and then restart modify the ID number to 1 in the software Close the seria...

Page 60: ... the UPS LCD 5 for laptop pls set the value 5 for desktop computer can set the value 5 6 choose 07 7 choose INV for the program because we are going to update the inverter program the same is REC program 8 is default value no need to change 10 is for the target software INV33 out that we are going to program pls note that you have to click 11 to choose target upgrade file After the setting done pl...

Page 61: ... Page 61 Uninterruptible Power Supply Figure 2 Connect the UPS RS232 to the computer s serial port make sure the communication between them is good Figure 3 After set up the communication between UPS and computer click Update as shown in Figure 4 Figure 4 ...

Page 62: ...p is preparing for the program Figure 5 Figure 6 shows the program work is proceeding Figure 6 Follow below Figs 7 8 9 to finish and exit If need go on the programming pls return to step 3 If finish and stop the programming pls turn OFF the maintenance breaker put on the panel work the UPS to inverter power supply ...

Page 63: ...Xtreme Power Conversion Corporation E90 Service Manual Page 63 Uninterruptible Power Supply Figure 7 Figure 8 Figure 9 ...

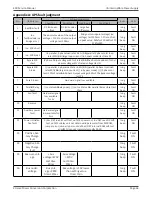
Page 64: ...allel X phase total load rate 50 large loop current in Bypass mode X phase cur rent 10 of rated X phase Output voltage 50 of the Bypass voltage last 2S long beep Fault ON 7 Fuse broken Hardware signal low available long beep Fault ON 8 Parallel Relay fault Inv status Relay open no Inv Status parallel Relay close last 20ms long beep Fault ON 9 Fan fault Hardware signal low available for 5s long bee...

Page 65: ...battery volt age 50V twice s Fault ON 23 Parallel con nection fault Parallel cable fault under the parallel 10ms twice s Fault ON 24 CAN communi cation fault Parallel number more than 1 for single unit and powered UPS is no more than 1 unit twice s Fault ON 25 Share current when parallel fault twice s Fault ON 26 Battery high voltage Setting Charge voltage 20V once s Fault flash 27 Input phase seq...

Page 66: ...lel system 400ms once 2s INV flash 39 Mains voltage abnormal Higher than 270V Lower than 182V once 2s BAT TERY ON 40 Mains frequen cy abnormal Higher than 70Hz Lower than 38Hz once 2s BAT TERY ON 41 Bypass ultra protection Bypass power down and not available BPS flash 42 Bypass ultra tracking Bypass abnormal but powered and bypass instantaneous nor mal then change the Bypass to ultra tracking BPS ...

Reviews: