background image

5

INSTALL CONTROLLER BATTERIES

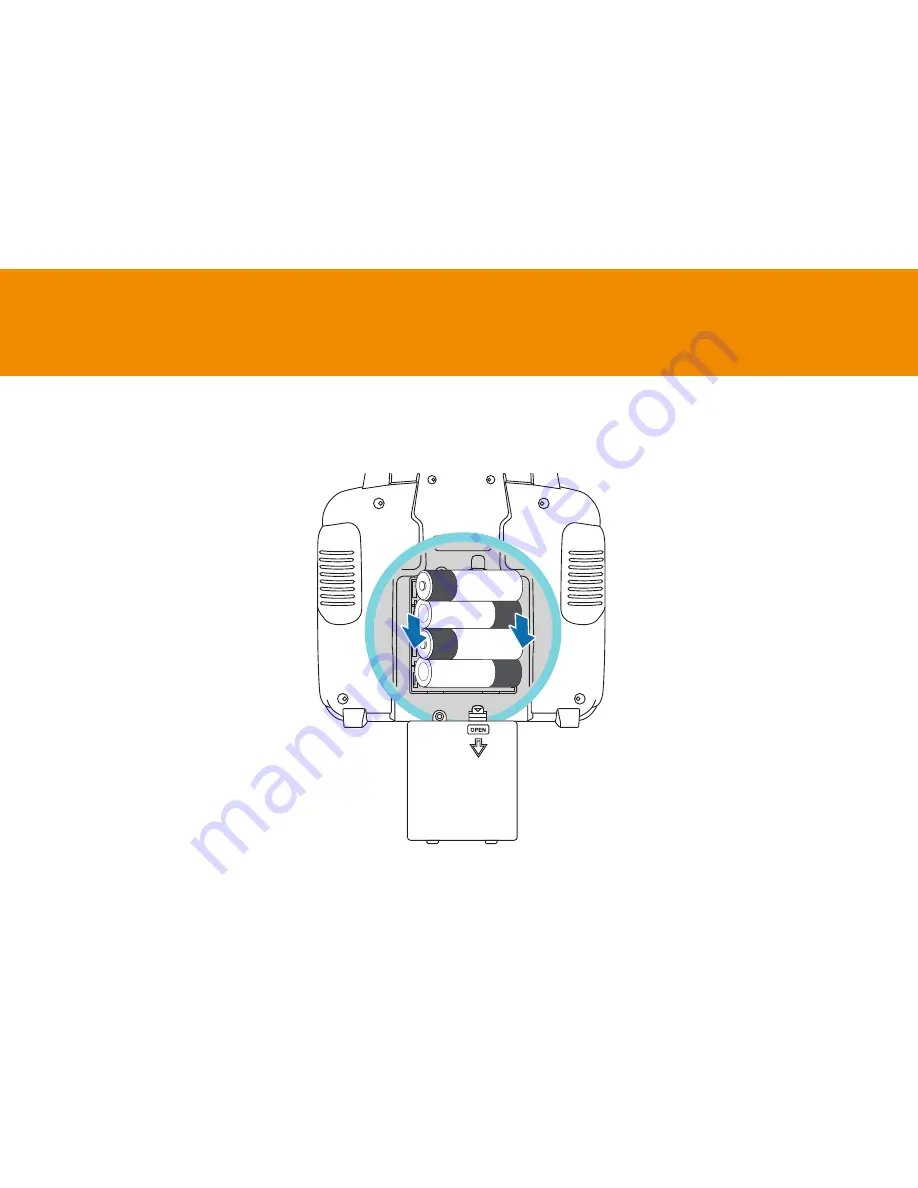
Your controller requires 4 AA batteries (not included). Open the battery cover of the controller, insert 4 new 
“AA” (1.5V) alkaline batteries following the polarity markings (+ and -) inside the battery compartment, and then 
replace the battery cover.

AA 1.5V

AA 1.5V

AA 1.5V

AA 1.5V

Summary of Contents for FlyeEye

Page 1: ...VIDEO DRONE THAT S YOUR EYE IN THE SKY INSTRUCTION MANUAL ...

Page 2: ...electrical hazards Check the weather conditions Do not operate the drone in rainy or snowy conditions or when the wind exceeds 5 MPH 8 KM H Make sure the controller s antenna is pointing straight up Keep the drone within line of sight if line of sight to the controller is lost you may lose control of the drone Always keep a safe distance in all directions around your drone to avoid collisions and ...

Page 3: ...eakage or explosion use sand or a chemical fire extinguisher to extinguish the battery The battery must be recycled or disposed of properly Controller requires 4 x 1 5V AA alkaline batteries not included Installing Replacing batteries must be undertaken by a competent adult Do not mix new and old batteries or types of batteries i e alkaline standard To avoid battery leakage remove batteries from t...

Page 4: ...eo up Photo down Rotation Trim Power Switch Speed Control 360 Flip Sideway Trim Direction Stick Forward Backward Trim Antenna Headless Flight Return Home Hover Get acquainted with your controller Low single beep Medium double beep High triple beep ...

Page 5: ...equires 4 AA batteries not included Open the battery cover of the controller insert 4 new AA 1 5V alkaline batteries following the polarity markings and inside the battery compartment and then replace the battery cover AA 1 5V AA 1 5V AA 1 5V AA 1 5V ...

Page 6: ...ger LED turns green Only charge the battery with the original charger Using other charging equipment will void your warranty may damage the battery and could result in fire or explosion Promptly remove the battery and disconnect the charger from the power outlet once charging is complete CAUTION The LiPo battery which is partially charged at shipment For longest flying time and best performance fu...

Page 7: ...g the red 2 wire connector on the LiPo battery to the drone s power cable located inside the Drone battery compartment Stow the LiPo battery and any excess cables inside the battery compartment and then close the cover power cable battery compartment Black to Black Red to Red ...

Page 8: ... in case of collision under the arm Optional front and rear LED covers can be fitted together with the prop guards under the arms of the Drone if necessary They can make it easier to tell which way the Drone is flying Note Do not over tighten screws as this can cause the mounting holes to deform Use this screw type ...

Page 9: ...9 Attach the landing gear The set of landing gear provides the Drone a stable platform and protects the bottom mounted camera during takeoff and landing PREPARE FOR FLIGHT Use this screw type ...

Page 10: ...mounted plug the camera s power connector into the CAMERA port on the Drone PREPARE FOR FLIGHT CAMERA 1 2 3 camera power connector The camera has no internal memory instead photos and videos are stored on a microSD memory card Be sure to insert a microSD memory card into the microSD slot on top of the camera Peel off the transparent film wrapped around the camera lens Use this screw type ...

Page 11: ... digital gyroscope to stabilize automatically PREPARE FOR FLIGHT 1 2 Turn on the controller Beginning from a neutral position move the Throttle stick all the way up and then all the way down After 2 seconds the controller stops blinking and beeps once more to indicate successful pairing The Drone is ready for takeoff ...

Page 12: ... controls altitude climb descend and rotation while the Direction stick controls forward backward and side to side movements Throttle stick Direction stick Small adjustments made slowly and carefully are the best way to get the Drone to fly well ...

Page 13: ...ing is in progress the Drone s rear LEDs will be blinking To stop recording push the Video Photo button up again To take a photo push the Video Photo button down The Drone s front and rear LEDs will blink once every time a photo is taken Video Photo Don t forget to insert a microSD memory card into the microSD slot located on top of the camera before taking off ...

Page 14: ...rol the altitude using the Throttle stick but any forward or backward movement with the Direction stick will deactivate Return Home You can also press the Return Home button again to resume control of the Drone CAUTION THE DRONE DOES NOT DETECT TREES AND OTHER OBSTACLES IN ITS RETURN TO HOME FLIGHT PATH TO REDUCE RISK OF COLLISION BE AWARE OF YOUR SURROUNDINGS AND MAKE SURE THE RETURN PATH IS CLEA...

Page 15: ... is automatically controlled and the current altitude is maintained All other controls forward backward sideway rotate will continue to work as usual To resume control of the throttle and end Hover mode press the Hover button again Note While Hover mode is enabled the Return Home button does not function Make sure the Throttle stick is in the neutral position before turning Hover mode off This pre...

Page 16: ...d and the Drone will head towards you Push the right stick left or right and the Drone will move to the left or right relative to you Headless Flight button Face the Drone then press the Headless Flight button The controller beeps continuously to indicate you have activated Headless Flight mode To cancel this mode press the Headless Flight button again Right stick It s super easy to fly when you c...

Page 17: ...estore balance and minimize a sudden loss of altitude 360 FLIP Perform a 360 flip maneuver by pressing the 360 flip button and moving the Direction stick in the direction you want the Drone to flip This stunt is best done at least 3 meters above ground in wide open spaces that are free of obstructions ...

Page 18: ... First place the Drone on a flat level surface and then hold both control sticks to the lower left corner until the status lights on the Drone blink rapidly When the lights turn solid the calibration process is complete The Drone responds slowly and does not maintain altitude easily Battery voltage power is running low Before power to the motors is cut off entirely gradually lower the throttle sti...

Page 19: ... card from the Drone camera then insert it into the included USB card reader Plug the USB card reader into the USB port on your computer Playing videos directly from the memory card may cause the videos to be slow or jerky It is best to copy or transfer files to your computer before trying to watch them Do I need to register my Drone Registration is mandatory in the United States because the Drone...

Page 20: ... use this product Any costs associated with the fitting or removal of this product by a tradesman or other person or any other costs associated with its use are the responsibility of the end user This warranty applies to the original purchaser of the product only and is not transferable to any third party Unauthorized end user or third party modifications to any component or evidence of misuse or ...

Reviews: