


B) IMPORTANT NOTES CHARGING THE BATTERY [SEE FIG.A]
a. Connect the power cord of the charger with a wall socket. The charger’s LED turn
green.
b. Slide the battery as far as it will go into the charger, by inserting the battery
terminal into the suitable opening of the charger.
c. The charging LED turn red to show the charge has started. The charger may
become warm and buzz slightly during charging. This is normal, and does not indicate
a fault.
d. The charging LED turn green again to show the battery is fully charged. Remove
the battery from the charger.
Warning
:
When battery charge runs out after continuously use or exposure to direct
sunlight or heat, allow time for the battery to cool down before recharging
to achieve the full charge
BATTERY CAPACITY INDICATOR [SEE FIG.B]
FIG.B
To turn on the light simply press the on/off switch .When you release the on/off
switch, the light will be off.
a. when with about 100% capacity, three LED indicators turn on
b. When with about 60% capacity, two LED indicators turn on
c. When with about 33% capacity, one LED indicator turns on
3.
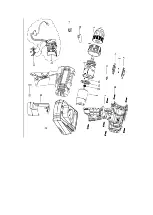
TO REMOVE OR INSTALL THE BATTERY PACK [SEE FIG.C]
Locate buttons on side of the battery pack. Depress both sides to release and slide it
out from the tool. After recharge, insert back into the tool. A simple push and slight
pressure will be sufficient.