XTline XT102699 Manual Download Page 30

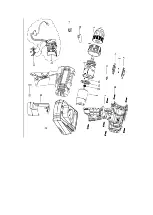
rotate from the hand of the coupling of the cartridge counterclockwise, so as to open the clamping fingers, 
and adjusting the coupling distance between the cam according to the shank diameter of a drill or bits. 
Insert the drill to the end of the cartridge. Turn the Clutch Clockwise and make sure the drill is securely 
installed in the cartridge. 


Speed change 

[SEE FIG.F]


FIG.F


• Always set the speed change lever fully to the correct position. If you operate the 

tool with the speed change lever positioned halfway between the "1" side and "2" 

side, the tool may be damaged. 

• Do not use the speed change lever while the tool is  running. The tool may be 

damaged.To change the speed, first switch off the tool and then  slide the speed 

change lever to the "2" side for high speed or "1" side for low speed. Be sure that the 

speed  change lever is set to the correct position before  operation. Use the right 

speed for your job. 


ON/OFF SWITCH [SEE FIG.D] 

Depress to start and release to stop your drill. The on/off switch is fitted with a brake 

function which stops your chuck immediately when you quickly release the switch. It 

is also a variable speed switch that delivers higher speed and torque with increased 

trigger pressure. Speed is controlled by the amount of switch trigger depression. 

Warning

Do not operate for long periods at low speed because excess heat will be 

produced internally 


FIG.D 


SWITCH LOCK 

The On/Off switch trigger can be locked in OFF position. This helps to reduce the 

possibility of accidental starting when not in use. To lock the switch, place the 

forward and reverse rotation selector in the center position by pushing it on either 

side of the drill. 


Summary of Contents for XT102699

Page 1: ...ie 2x2000MAH Samsung skl idlo 0 8 10mm doba nab jen 60min LED p isv cen LED Indikace stavu baterie max vrt n kov 6mm max vrt n d evo 10mm max vrt n hlin k 20mm V EOBECN BEZPE NOSTN OPAT EN PRO V ECHNA...

Page 2: ...lenosti od pohybuj c ch se st Mohlo by doj t k jejich zachycen 3 Zabra te n hodn mu spu t n P ed p ipojen m akumul toru k n ad se ujist te e je vyp na ve vypnut poloze Nedr te stisknutou spou n ad p...

Page 3: ...Dr k bitu 6 Tla tko zp tn ho chodu 7 Hlavn provozn sp na 8 Baterie 9 Areta n tla tko baterie 10 Pracovn sv tlo 11 V trac otvory 12 Ukazatel stavu baterie Pou it Odstran n a instalace skl idla Obr 2 Za...

Page 4: ...pokud je za zen v provozu M e doj t k po kozen za zen Pro zm nu nastaven rychlosti nejprve vypn te za zen a pot nastavte p ku pro zm nu rychlosti do polohy 2 pro vysokou rychlost nebo do polohy 1 pro...

Page 5: ...Pozn mka P ed pou it m za zen si pozorn p e t te n vod k pou it Dob jen bateri A Nab jen baterie Za zen je vybaveno Li ion bateri Nepou vejte jin typ nab je ky Li ion baterie je chr n na p ed pln m v...

Page 6: ...ine s r o M stem pro uplatn n reklamace je prodejce u kter ho bylo zbo zakoupeno Reklamace v etn odstran n vady mus b t vy zena bez zbyte n ho odkladu nejpozd ji do 30 dnu ode dne uplatn n reklamace p...

Page 7: ...i pru ina kryt p ep na e ploch pru ina motor skl idlo m ni to iv ho momentu p evodovka tla tko z mku sp na e 11 12 14 13 15 16 17 18 19 20 LED kryt sp na baterie klip baterie svorka z vitov roub nab j...

Page 8: ...ch za zen Ochrann kryty Obecn po adavky pro konstrukci a v robu pevn ch a pohybliv ch ochrann ch kryt 2017 08 SN EN 55014 1 ed 3 Elektromagnetick kompatibilita Po adavky na spot ebi e pro dom cnost el...

Page 9: ...sung sk u ovadlo 1 10m doba nab jania 60min LED prisvietenie LED Indik cia stavu bat rie max v tanie kov 6mm max v tania drevo 10mm max v tanie hlin k 20mm V eobecn bezpe nostn opatrenia PRE V ETKY AK...

Page 10: ...h sa ast Mohlo by d js k ich zachyteniu 3 Zabr te n hodn mu spusteniu Pred pripojen m akumul tora k n radia sa uistite e je vyp na vo vypnutej polohe Nedr te stla en sp n radia pri jeho pren anie 4 Ne...

Page 11: ...idlo sp tn ho chodu 7 Hlavn prev dzkov sp na 8 Bat rie 9 Areta n tla idlo bat rie 10 Pracovn svetlo 11 Vetracie otvory 12 Ukazovate stavu bat rie pou itie Odstr nenie a in tal cia sk u ovadla Obr 2 Za...

Page 12: ...ie v prev dzke M e d js k po kodeniu zariadenia Pre zmenu nastavenia r chlosti najprv vypnite zariadenie a potom nastavte p ku pre zmenu r chlosti do polohy 2 pre vysok r chlos alebo do polohy 1 pre n...

Page 13: ...a Pred pou it m zariadenia si pozorne pre tajte n vod na pou itie dob janie bat ri A Nab janie bat rie Zariadenie je vybaven Li ion bat ri Nepou vajte in typ nab ja ky Li ion bat ria je chr nen pred p...

Page 14: ...iestom pre uplatnenie reklam cie je predajca u ktor ho bol tovar zak pen Reklam cia vr tane odstr nenia vady mus by vybaven bez zbyto n ho odkladu najnesk r do 30 dn odo d a uplatnenia reklam cie poki...

Page 15: ...na dekorat vne kryt ploch pru ina motor sk u ovadlo meni kr tiaceho momentu prevodovka tla idlo z mku sp na a 11 12 14 13 15 16 17 18 19 20 LED kryt sp na bat rie klip bat rie blok tvare V z vitov skr...

Page 16: ...tu nale y dok adnie przeczyta niniejsz instrukcj obs ugi poniewa zawiera ona informacje niezb dne do zapoznania si z jego w a ciwo ciami i uzyskania parametr w kt re pozwol cieszy si d ugotrwa ym u yt...

Page 17: ...Moment nieuwagi podczas obs ugi elektronarz dzi mo e spowodowa powa ne obra enia cia a 2 Nale y ubiera si prawid owo Nie nale y nosi lu nej odzie y lub bi uterii Mog one zosta pochwycone przez ruchome...

Page 18: ...ytkowania 7 Nale y u ywa wy cznie akcesori w kt re s dostarczane z danym modelem Inne akcesoria mog nie by odpowiednie dla danego urz dzenia i mog stwarza ryzyko uraz w podczas u ytkowania Szczeg lne...

Page 19: ...s uga Demonta instalacja uchwytu szybkomocuj cego Rys 2 Wiertarko wkr tarka wyposa ona jest w wyjmowany uchwyt szybkomocuj cy z okr g ym wa em Aby wyj uchwyt szybkomocuj cy nale y poci gn tulej zwalni...

Page 20: ...bilnie zamocowana Rys 3 Ko c wki wyjmowanych dysz musz by czyste bez lad w smaru i wi r w metalowych Przed zamontowaniem dyszy nale y j oczy ci Zanieczyszczenia i metalowe wi ry mog zmniejszy stabilno...

Page 21: ...pracy nale y upewni si e prze cznik zmiany pr dko ci jest ustawiony we w a ciwej pozycji Nale y stosowa odpowiedni pr dko dla danego zadania PRZE CZNIK ON OFF RYS D Nacisn prze cznik aby uruchomi urz...

Page 22: ...dy pier cie regulacji momentu obrotowego jest ustawiony na ni sz warto Konfiguracja 1 3 do wkr cania ma ych rubek 4 7 dokr canie rub w mi kkich materia ach drewno gips 8 11 dokr canie rub w materia ac...

Page 23: ...m u ytkowaniu lub wystawieniu na bezpo rednie dzia anie promieni s onecznych lub ciep a akumulator uleg roz adowaniu w wczas aby w pe ni go na adowa nale y odczeka a ostygnie przed kolejnym adowaniem...

Page 24: ...silnik 7 uchwyt wiertarski 8 pier cie regulacji momentu obrotowego 9 przek adnia 10 blokada prze cznika 11 os ona LED 12 prze cznik 14 akumulator 13 klamra akumulatora 15 zatrzask w kszta cie V 16 wkr...

Page 25: ......

Page 26: ...s the information you need to become familiar with its features and obtain the performance that will bring you continued enjoyment for many years Please keep this manual on file for future reference G...

Page 27: ...ce at all times Proper footing and balance enable better control of the tool in unexpected situations 5 Use safety equipment Always wear eye protection Dust mask non skid safety shoes hard hat or hear...

Page 28: ...is dusty 1 The case 2 Speed mode switch 3 Torque converter 4 Removable quick release cartridge 5 Bit holder 6 Reverse switch 7 Power button 8 Battery 9 Battery lock 10 Lamp of illumination 11 Vents 12...

Page 29: ...tridge the tool serves as a battery operated screw driver The bits in the holders are fixed with a magnetic holder To install the bits it is necessary to insert it into the bit holder and to make sure...

Page 30: ...e lever to the 2 side for high speed or 1 side for low speed Be sure that the speed change lever is set to the correct position before operation Use the right speed for your job ON OFF SWITCH SEE FIG...

Page 31: ...g is set on a lower setting Make the setting as follows 1 3 for driving small screws 4 7 tightening of screws in soft types of materials wood gypsum 8 11 tightening screws in soft and solid types of m...

Page 32: ...g When battery charge runs out after continuously use or exposure to direct sunlight or heat allow time for the battery to cool down before recharging to achieve the full charge BATTERY CAPACITY INDIC...

Page 33: ...ative cover 5 plat spring 6 motor 7 drill chuck 8 torque setting ring 9 gearbox 10 switch lock button 11 LED cover 12 switch 14 battery pack 13 battery clip 15 V shape lock 16 tapping screw 17 charger...

Page 34: ......

Reviews: