background image

3) Installation instruction: 

3.1) Size:


Panel size: 325×123×13mm.


Mounting size: 295×110×30mm.


3.2) Power supply: DC/AC 12V. Output current is 500mAh (without locks connection);


3.3) Lock connection: 

Note: 

If the lock s

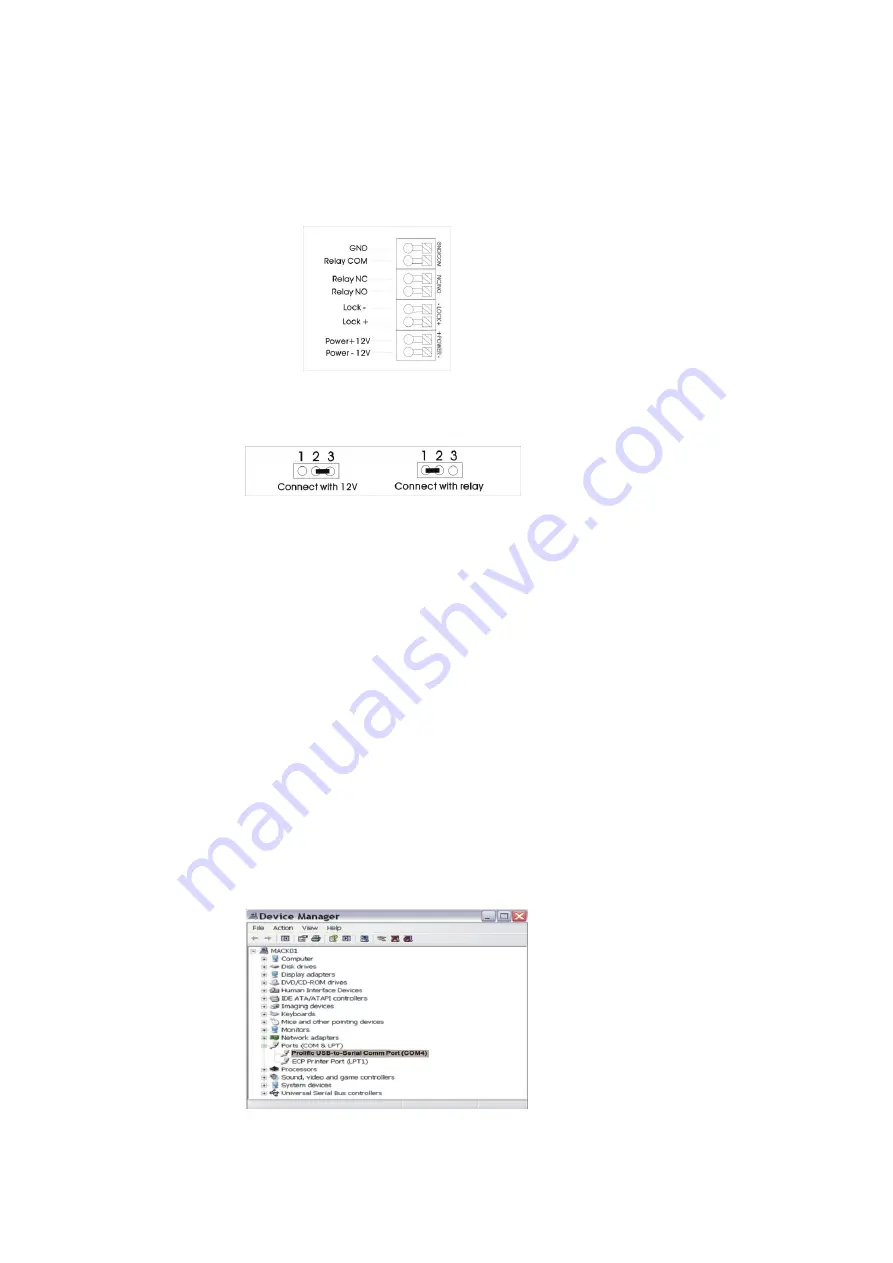
hould be powered by 12V, please connect it with ‘Lock+’ and ‘Relay NO’ (Reference the picture 

above), and put the connectors in pin 2 and pin 3 in the ‘Lock Selector’. If connecting with lock via the relay ,please 

put the connectors in pin 1 and pin 2. (Reference the picture below). 


3.4) Insert the SIM card.


Note: please power off the call station when inserting SIM card.


Note: The GSM intercom transmits and receives messages via the GSM network. Before installation, please use one 

GSM mobile  phone to  test  the strength  of  network signals  in  site.  If  no GSM signals  or  the  signal  is  weak, please 

kindly find another location. 

3.5) Turn on the call stations: After powering on the call station, the screen wil

l show ‘GSM Initiate’. The intercom is in 

initializing. It 

will show ‘GSM Link OK’ after 20 seconds. After the screen show ‘Welcome’, and it will enter the standby 

status. 


4) Install the driving Program of the Data Cable: 

Used for downloading or uploading the volume room numbers and phone numbers. 

4.1) 

Run the program of ‘PL2303_Prolific_DriverInstaller_v130’ in the CD.


4.2) Disassembly the rear covers of call station.


4.3) Connect the call station and PC via data cable.


4.4) 

Open the ‘Device Manager’ in PC. Check the COM of ‘Prolific USB-to-Serial Comm Port’ which connected with the 

data cable. For example, in next picture the COM connected with the data cable is COM4.


Note:  In  Windows  XP,  please  right-

click  ‘My  Computer’  on  the  desktop,  select  ‘Properties’  to  enter  ‘System 

Summary of Contents for GSM DPC-G100

Page 1: ...DPC G100 GSM wireless audio intercom ...

Page 2: ...d call 1 3 Convenient you can answer the calls from the call station remote unlocking by inputting preset 3 digits code It will also effectively protect the privacy of users 1 4 Flexible setting You can arbitrarily set the room No and the corresponding mobile and telephone number according to your request 1 5 Easier changing You can change add or delete the preset telephone mobile phone No by send...

Page 3: ...ignals in site If no GSM signals or the signal is weak please kindly find another location 3 5 Turn on the call stations After powering on the call station the screen will show GSM Initiate The intercom is in initializing It will show GSM Link OK after 20 seconds After the screen show Welcome and it will enter the standby status 4 Install the driving Program of the Data Cable Used for downloading ...

Page 4: ...p 5 5 1 Feature description The user uses the registered telephone or mobile phone to call the SIM card in call station and then the door will auto open Only the registered telephone or mobile phones have this feature 5 5 2 In default status it is forbidden If you want to use this feature you can choose the item auto open to confirm 5 6 Auto answer setting 5 6 1 Feature description the user uses t...

Page 5: ...ck up the 2 files Inhabitant_telnum mdb and user_password mdb into other discs in PC You can use it immediately if the data is lost 7 Set room numbers and its corresponding phone numbers via short message Users can add change or delete the room numbers and its corresponding telephone numbers by sending short message to the PC The telephone number must be registered The format is 55 system password...

Page 6: ...to 9 Operation instructions 9 1 Calling and talking After visitors press the room number and buttons then it will call the corresponding phone number you had set Then the call station is showing Calling and creating the Du Du tone If the 1st set phone number is not answered or busy Then it will auto call the 2nd phone number after 30 S If the 3rd phone number also did not answer the calls then it ...

Page 7: ...m 10 8 Door is in NO status Press 5 button then press to confirm It will return to normal status after contacting cards 10 9 Door is in NC status Press 6 button then press to confirm It will return to normal status after contacting cards 10 10 Only unlock the doors once Press 7 button then press to confirm 10 11 Change the password of access control Press 8 button then input the new 4 digits passw...

Page 8: ... trouble shooting 12 1 If the quantity of room number and phone number you want load to GSM call station is not in volume then you can carry out by sending short message to call station 12 2 We recommend the room number 0 as the guard center for the sake of users convenience 12 3 Check the SIM fee regularly to avoid that the fee is not enough 12 4 After being connected with PC if cannot download d...

Reviews: