


https://www.XPOtool.com
Item 62810
Page 5
The Tool Experts
05 2022
-1
9.
Insert the front end of the paper into the front clamp as far as possible, drawing the paper as
tightly as possible across the bottom pad.
10.
Close the front spring-clip jaw by swinging the lever back and hooking it in place behind the tab
on the left side of the tool.
11.
If the sandpaper loosens during use, loosen the clips and re-insert the paper.
12.
To efficiently remove dust from the work surface, make sure that the holes of the sandpaper
match the holes of the sanding disc.
Note!
Check the sandpaper regularly for tears, cracking, and other damage. Damaged paper can allow
the pad beneath to be damaged. Because of the operator vigilance required in this respect, the pad is
considered a consumable part.
Finishing sanding
1.
Check that the switch is set at “0” (OFF).
2.
Plug the sander into any standard wall socket.
3.
Hold the tool firmly. Check to make sure the abrasive is not obstructed nor touching the work
surface.
4.
Press the switch on the front of the machine with your index finger. Switching the tool on or off
under load may damage it and will cause excessive swirl markings on the workpiece.
Dust control in the workplace
1.
For the dust extraction to work, please make sure that the holes in the sandpaper match the
holes in the turntable. Using the sander's dust extraction also helps to ensure that the sander
does not become clogged with sawdust.
2.
At the back of your sander, you can attach a dust collector with a 39
mm or 1¼″ internal thread
hose, or if not available, a dust bag can be used.
3.
The dust bag slides into the extraction port at the back of the tool.
4.
Empty the bag whenever it is half full.
Sanding tips
•
The base of the sander moves in a tiny circular orbit cutting across the woodgrain, with the
woodgrain and at all angles in between. As the motion is circular, it does not matter how you
move the sander.
•
Extra pressure is seldom needed.
•
Use a grade of sandpaper that will make finer marks than those already on the surface. Too
coarse a grade will not make the surface smoother, while too fine a grade will remove scratches
too slowly or not at all. Continue using finer grades of sandpaper until you obtain the desired
finish.
•
When removing old paint, determine how much paint really needs to be removed. Consider that
old paint may well be toxic and will must be treated with the respect due any toxic material. This
could affect both the tool operator and the environment.
•
When required, wear appropriate breathing protection and dispose carefully of dust and chips.
Lead in dust or chips left after sanding could be tracked throughout residence and release toxins
into the soil. A finish that is cracking or flaking must be taken off, but a finish that is still firmly
attached can be “roughed up” and painted over with primer and a new finish. Always lightly sand
the undercoat with fine grade sandpaper before applying the top coat.
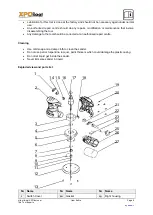
Maintenance
•
Keep the vents clear of dust and debris. This will prevent possible electrical shorts and ensure
proper cooling.
•
Keep the tool housing clean and free of oil and grease using mild soap and a damp (not wet)
cloth.
•
Inspect the cord regularly and have it replaced by an authorised electrician if its damaged.


