background image


Engl

ish 

7. 

Water and Moisture - Do not use this product near water  for example, near a bath 


tub, wash bowl, kitchen sink, or laundry tub; in a wet basement; or near a swimming 


pool; and the like. 

8. 

Accessories - Do not place this product on an unstable cart, stand, tripod,  

bra-

cket, or table. The product may fall, causing serious injury to a child or adult, and  

seri-

ous damage to the product. Use only with a cart, stand, tripod, bracket, or table  recommen-
ded by the manufacturer, or sold with the product. Any mounting of the  p r o d u c t   s h o u l d 
follow the manufacturer's instructions, and should use a mounting  

accessory  recom-

mended by the manufacturer. 
9. 

A product and cart combination should be moved with care. Quick stops, excessive 


force, and uneven surfaces may cause the product and cart combination to overturn.  

10. 

Ventilation - Slots and openings in the cabinet are provided for ventilation and to 
ensure reliable operation of the product and to protect it from overheating, and these 
openings must not be blocked or covered. The openings should never be blocked by 
placing the product on a bed, sofa, rug, or other similar surface. This product should 
not be placed in a built-in installation such as a bookcase or rack unless proper 
ventilation is provided or the manufacturer's instructions have been adhered to. 

11. 

Power Sources - This product should be operated only from the type of power sour-
ce indicated on the marking label. If you are not sure of the type of power supply to 
your home, consult your product dealer or local power company. For products inten-
ded to operate from battery power, or other sources, refer to the operating instructi-
ons. 

12. 

Grounding or Polarization - This product may be equipped with a polarized alterna-
ting-current line plug (a plug having one blade wider than the other). This plug will fit 
into the power outlet only one way. This is a safety feature. If you are unable to 
insert the plug fully into the outlet, try reversing the plug. If the plug should still fail to 
fit, contact your electrician to replace your obsolete outlet. Do not defeat the safety 
purpose of the polarized plug. Alternate Warnings - This product is equipped with a 
three-wire grounding-type plug, a plug having a third (grounding) pin. This plug will 
only fit into a grounding-type power outlet. This is a safety feature, If you are unable 
to insert the plug into the outlet, contact your electrician to replace your obsolete 
outlet. Do not defeat the safety purpose of the grounding-type plug. 

13. 

Power-Cord Protection - Power-supply cords should be routed so that they are not 
likely to be walked on or pinched by items placed upon or against them, paying parti-
cular attention to cords at plugs, convenience receptacles, and the point where they 
exit from the product.  

14. 

Protective Attachment Plug - The product is equipped with an attachment plug ha-
ving overload protection. This is a safety feature. See Instruction Manual for replace-
ment or resetting of protective device. If replacement of the plug is required, be sure 
the service technician has used a replacement plug specified by the manufacturer 
that has the same overload protection as the original plug. 


SAFETY INFORMATION 

Summary of Contents for HSD 7510

Page 1: ......

Page 2: ......

Page 3: ...ns 4 Features 9 Accessories 10 Output and control elements 11 Remote control 14 The rechargeble battery 17 Connecting the Player to other componets 19 Basic operations 20 System setup 32 Specification...

Page 4: ...EMPT THIS CAUTION DURING PLAYBACK THE DISC SPINS AT HIGH SPEED SO DO NOT LIFT OR MOVE THE PLAYER DOING SO MAY DAMAGE THE DISC CAUTION This Digital Video Disc Player employs a Laser System Make sure th...

Page 5: ...e party responsible for compliance could void the user s authority to operate this equipment BATTERYWARNING The DVD player contains a NiMH battery pack There is a risk of fire and burns if the battery...

Page 6: ...ult your product dealer or local power company For products inten ded to operate from battery power or other sources refer to the operating instructi ons 12 Grounding or Polarization This product may...

Page 7: ...fire or electric shock 19 Object and Liquid Entry Never push objects of any kind into this product through openings as they may touch dangerous voltage points or short out parts that could result in...

Page 8: ...r operating condition 24 Wall or Ceiling Mounting The product should be mounted to a wall or ceiling only as recommended by the manufacturer 25 Heat The product should be situated away from heat sourc...

Page 9: ...CD MPEG 1 and MPEG 2 Video MPEG 4 Video AUDIO CD JPEG Kodak Picture CD Integrated card reader for SD MMC and MS memories USB 1 1 port for external storage DVB T receiver with automatic channel scan EP...

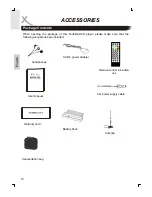
Page 10: ...the package of this Portable DVD player please make sure that the following accessories are included AC DC power adapter Remote control ink batte ries User manual Warranty card Car power supply cable...

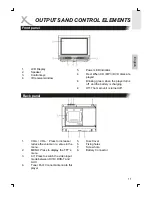
Page 11: ...and the battery is charging Off The main unit is turned off Back panel 1 VOL VOL Press to increase reduce the volume or a value in the menu 2 MENU Press to display the TFT s menu 3 AV Press to switch...

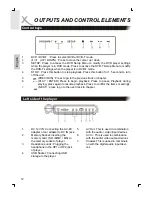
Page 12: ...ENTER Press to begin playback Press to pause Playback during playing press again to resume playback Press to confirm the items or settings 7 NEXT press to go to the next track to chapter Left side of...

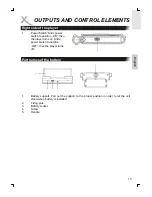
Page 13: ...ch to position ON then the player turns on Slide power switch to position OFF then the player turns off Part names of the battery 1 Battery support Pull out the support to the proper position in order...
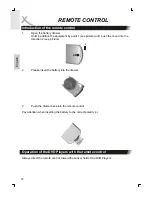
Page 14: ...tion 2 see picture 2 Please insert the battery into the drawer 3 Push the drawer back into the remote control Pay attention when inserting the battery to the correct polarity Always direct the remote...

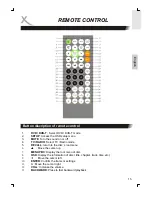
Page 15: ...ECALL return to the disc s root menu 6 Move the cursor up 7 MENU PBC Display the root menu of disc 8 OSD Display the information of disc title chapter track time etc 9 Move the cursor left 10 ENTER Co...

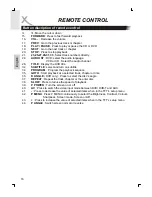
Page 16: ...lect and turn on subtitle 34 PROGRAM Program the palyback sequnce 35 GOTO Start playback at a selected track chapter or time 36 D ANGLE DVD only Press to select the disc s angle 37 REPEAT Repeat the t...

Page 17: ...r or lower temperatures Please recharge the battery once per year if it is not used for a long time The battery unit can be used for about 300 cycles of recharging and operation However this depends o...

Page 18: ...e battery 2 Connect AC DC adapter to the player When charging the charge LED indicator lights up Red When the battery is full the LED indictor is green The charing time is around 5 to 6 hours player i...

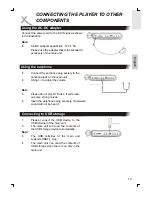
Page 19: ...earphone jack on the main unit Using to adjust the volume Note Please do not play DTS disc It will produ ce some strong noises Insert the earphones plug securely otherweise sound will not be heard Con...

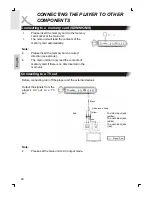
Page 20: ...ure The main unit can only read the contents of memory card if there is no disc inserted in the main unit Connecting to a TV set Before connecting turn off the player and the external devices Output t...

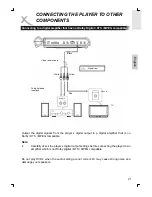
Page 21: ...amplifier that is no Dolby DTS MPEG compatible Note Carefully ckeck the player s digital output settings before connecting the player to an amplifier which is not Dolby Digital DTS MPEG compatible Do...

Page 22: ...digital output to a decoder or amplifier with build in decoder Note For a compatible decoder or amplifier 5 Speackers front left right center surround left right and a subwoofer are requiered to enjoy...

Page 23: ...S Note Please set the main unit to AV input mode Connecting to a Audio Video player system Black Video audio cable Yellow White Red Signal flow To Video Output jacks To Audio Output jacks Connect to A...

Page 24: ...n the player 3 Slide the disc cover and put in the disc 4 Loading disc the disc type will be showm on the screen 5 Press PLAY to start playback Note Please place the disc carefully Do not play poor qu...

Page 25: ...u as brightness contrast color sharpness screen mode screen on off You can set a mode suitable for the subject picture 1 Press to adjust the value of selected items 2 Press AV to switch from AV IN mod...

Page 26: ...me playback PLAY Fast forwarding Fast reversing 1 Press REV on the remote control for 1 5 seconds to scan backward at 2x 4x 8x 20x times of normal speed 2 Press FWD on the remote control for 1 5 secon...

Page 27: ...for repeat playback REPEAT Searching the disc 1 Press GOTO 2 Use the cursor and ENTER to select the proper item for selection of playing time title chapter or track 3 Press ENTER again to confirm you...

Page 28: ...ome discs may not allow for some program functions 3 The player cannot start playback of the list if you select an item that it is not part of the playing disc Using OSD 1 Press OSD to display disc ty...

Page 29: ...yback angle when playing a DVD disc Note This function is only available on certain DVD media D ANGLE Playback of MP3 and JPEG discs 1 Use the direction buttons to move the cursor to the directory fil...

Page 30: ...remove the USB storage device if you don t want to use the USB mode any longer 5 This unit supports playback of MP3 JPEG and MPEG4 files Note The supported USB format is USB1 1 Playback of USB files...

Page 31: ...Zone properly as the local situation then press Next to go on 3 Press Yes to start auto scan 4 The TV and radio program will be listed on the screen if the antenna reveives signal Press to choose a p...

Page 32: ...screen saver This function will save the LCD life if the unit is in stop or no disc mode for over 1 minute ON Screen saver enabled OFF Screen saver disabled Default ON Screen sever ON OFF Selecting a...

Page 33: ...removing scenes being too violent or containing sex scenes that are not suitable for children There are 8 levels normal and children By selecting normal the lock function is disabled Default 8 ADULT...

Page 34: ...nguage and press ENTER to confirm your selection Selecting a sub title language In the subtitle language selection menu you can use the direction buttons to move the cursor to the desired language and...

Page 35: ...nel Dolby digital amplifier Default SPDIF PCM Adjusting the key When you enter the KEY menu you can use the cursor keys to adjust the desired tone and press ENTER Adjusting the brightness When you are...

Page 36: ...desired hue then press ENTER Adjusting the saturation When you are in VIDEO SETUP you can enter the satuation menu and move the cursor keys to the desired saturation then press ENTER Adjusting the sha...

Page 37: ...V AC 50 60Hz with power supply Power consumption 10 W StandBy 10 mA Battery Lithium Ion Battery 2200 mAh TV type PAL NTSC playback only Display Dimension 9 2 23 6 cm 16 9 Resolution 800 x 480 Interfac...

Page 38: ...y Check the cable connections Setting error Check the settings of the DVD Player and the TV set No sound over speakers Earphones may be plugged in Remove the earphones No sound over TV or amplifier Ca...

Page 39: ...video signal is transmitted via a single signal line CVBS should only be used if your playback device does not offer other interfaces for connection with you Xoro TV set as CVBS due to technical reas...

Page 40: ...ion Compatible Digital is a patented coding and decoding process transporting the complete details of a high resolution master recording to a CD There were several attempts to improve the sound qualit...

Page 41: ...rce to another without having to leave the digital transmission which would result in worse quality S Video Describes the way video signals are transmitted With S Video luminance and colour informatio...

Reviews: