8 Katom St., Misgav Industrial Park, 2017400, Israel
Tel: +972-4-9951999; Fax: +972-4-9990287
PM0622.10 – Blue Steel CXT3000/CXT4000 CompletePBX Getting Started Guide (electronic version)
Page
2
of
7
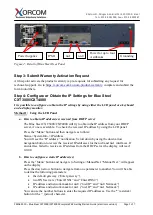
Figure 2: Detail of Blue Steel Rear Panel
Step 3: Submit Warranty Activation Request
At this point activate the product warranty (a pre-requisite for submitting any request for
technical support). Go to
https://xorcom.com/xorcom-product-warranty
, complete and submit the
form found there.
Step 4: Configure or Obtain the IP Settings for Blue Steel
CXT3000/CXT4000
It is possible to configure or obtain the IP settings by using either the LCD panel or a keyboard
and a display monitor.
Method 1: Using the LCD Panel
a. How to obtain IP address(es) received from DHCP server
The Blue Steel CXT3000/CXT4000 will try to obtain the IP address from your DHCP
server, if one is available. To check the received IP address by using the LCD panel:
Press the “Menu” button and then navigate as follows:
Status->SystemInfo->IP address
You will see the “IP address:” notification. Scroll down by using the down arrow
navigation button to review the received IP addresses for the nic0 and nic1 interfaces. If
an interface failed to receive an IP address from the DHCP server the display will read:
0.0.0.0
b. How to configure a static IP address(es)
Press the “Menu” button and navigate to Settings->ManualNet. “Manual Net:” will appear
on the display.
Press the down arrow button to navigate from one parameter to another. You will be able
to define the following parameters:
the default gateway (“Enter gateway”),
two DNS servers (“Enter DNS1” and “Enter DNS2”)
IP address and network mask for nic0 (“nic0 IP” and “nic0 Netmask”)
IP address and network mask for nic1 (“nic1 IP” and “nic1 Netmask”)
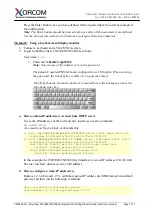
You can use the number buttons to enter the required IP addresses. Use the '*' (asterisk)
button for the '.' (period) character.
Power Supplies
IPMI
nic0
nic1
Power for up to four
Astribanks
Grounding


