background image

Touch Screen Operation

-16-

BT Operation

1.  Pairing and Connecting
     Prior to using the BT device named XOMAX as a hands-free system 
     for a BT-enabled mobile phone for the first time, you must 

as follows:    

     Press the BT hands-free icon or press 
     the pair button on the remote control 
     to turn to BT mode as right:

*   During the use of the BT device named
       XOMAX” as a hands-free system 
     for a BT- enabled mobile phone; Switch 
     on the BT mode of your mobile phone; then s

 BT device 

     and enter it; 

BT device 

car 

XOMAX

, select it and enter it; then i


with

     the BT device  XOMAX of the car A/V system, Confirm it, then the frame of the 
     BT logo will light all the time.
  
*    

finishing pairing and 

ing


 or the mobile phone 

     plays music

2.  BT PHONE


In power off mode, a incoming call or call out to wake up this unit and turn to BT

     hands-free mode, when the phone call ended the unit back to power off mode.

1)  Make a call

(1) Dial with mobile phone directly;

(2)

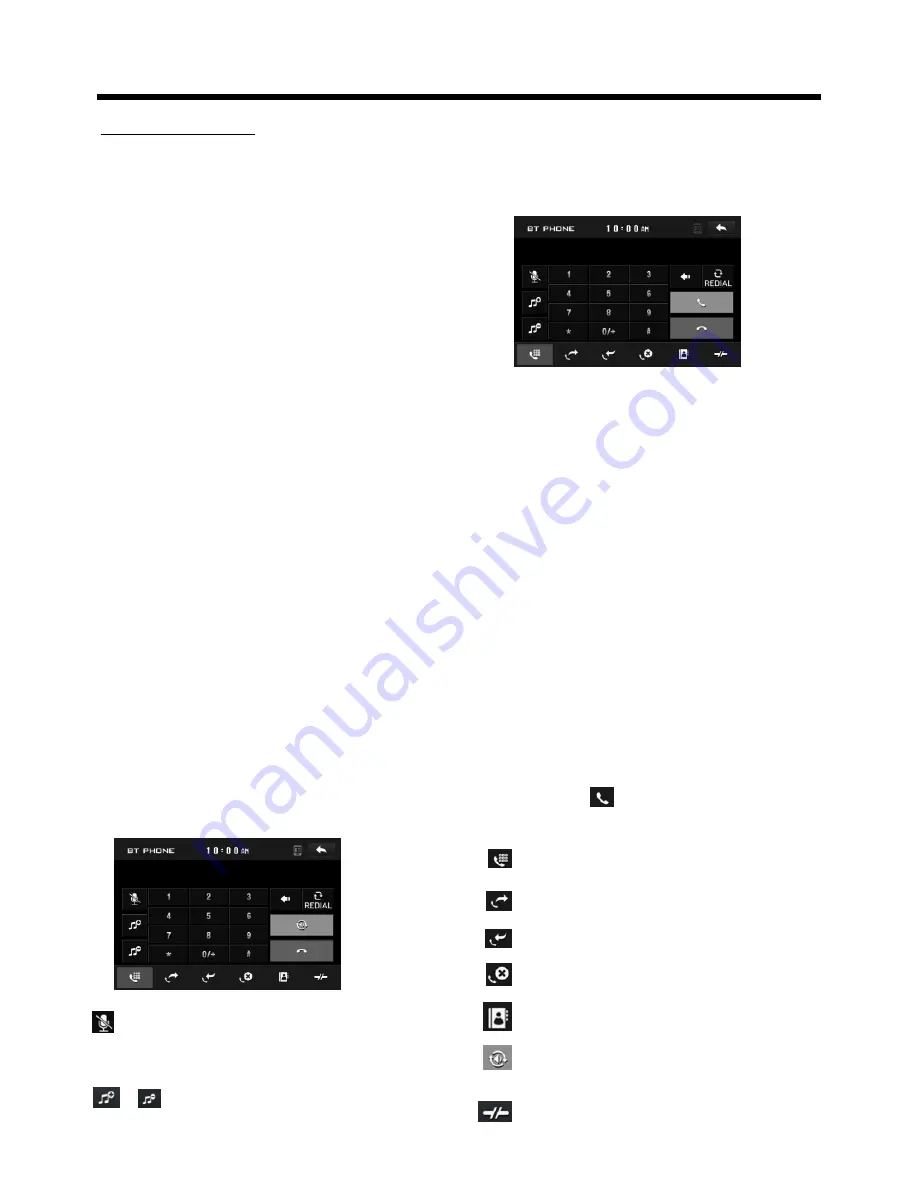
a. Touch the BT PHONE  icon in home menu or touch the        icon during playing
     to turn to BT PHONE interface,the icons function as follows: 

pair and 

     connect them


elect the item to find a

When it finds the 


of the 

A/V system, the name 


 will be displayed

t will pair and connect 

When 

connect

, the audio of the mobile phone transfers 

to the car audio system whenever a call is made or received

.

Dial with BT Phone or on touch screen;


           : Tap to turn to dial interface.

           :  Tap to check the outgoing call.

           :  Tap to check the incoming call.

           :  Tap to check the missed call.

           :  Tap to turn to the contacts.

           : During talk, tap to change the 
             sound from the phone to the unit.

           :  Tap to do disconnection.


       : Tap to mute the sound that the 
     subscriber you dialed can’t hear 
     your vioce, tap again to return normal.

       &      : Same as VOL+ and VOL- or 
                  VOL knob. 

Summary of Contents for XM-VRSU713BT

Page 1: ...ch Screen FLIP DOWN AND DETACHABLE CONTROL PANEL Remote Control Digital Video Disc Player Control Panel USB Port and AUX Input Memory Card Slot AM FM RDS Digital PLL Tuning Radio BT Compatible INSTALLATION MANUAL XM VRSU713BT CAR AUDIO VIDEO SYSTEM ...

Page 2: ...To ensure safety while driving and to comply with laws drivers should not watch video or operate the video device while driving ...

Page 3: ...become clear the temper ature in your car becomes normal DO NOT install any receiver in locations where it may obstruct the steering wheel and gearshift lever operations as this may result in a traffic accident it may obstruct the operation of safety devices such as air bags as this may result in a fatal accident it may obstruct visibility DO NOT operate any receiver while manipulating the steerin...

Page 4: ...e vehicle Install the unit where it does not get in the driver s way and cannot injure the passenger if there is a sudden stop like an emergency stop If installation angle exceeds 30 from horizontal the unit might not give its optimum performance Avoid installing the unit where it would be subject to high temperature such as from direct sunlight or from hot air from the heater or where it would be...

Page 5: ...Installation 3 Installation diagram MOUNTING BRACKET MOUNTING BRACKET MOUNTING BOLTS HEX NUT SPRING WASHER PLAIN WASHER TAPPING SCREW DASH BOARD METAL MOUNTING STRAP CONSOLE HEX BOLT PLASTIC FRAME ...

Page 6: ...RONT RCA AUDIO OUT SOCKET VIDEO OUTPUT SOCKET VIDEO OUTPUT SOCKET RCH IN RED LCH IN WHITE VIDEO IN YELLOW AV IN PINK B 12V REAR CAMERA SWITCH B PARKING BRAKE GREY GREY BLACK FRONT RCH SPK VIOLET VIOLET BLACK WHITE WHITE BLACK GREEN GREEN BLACK REAR LCH SPK AUTO ANTENNA BLUE GROUND B MEMORY BACK UP B IGNITION SWITCH B RED YELLOW BLACK REAR RCH SPK FRONT LCH SPK LIGHT GREEN FUSE KEY GROUND BLACK KEY...

Page 7: ...or back one track 8 TITLE When playing a Digital Video pressing this button will open the TITLE menu which is recorded on the media When playing a VCD disc press this button to create a PBC Playback Control menu for the disc to assist in making playback selections 9 RPT 2 Repeat function for media playing In radio mode press to select the store station 2 10 DISP 1 In video playing mode press to sh...

Page 8: ...te VOL knob to set it 15 MUTE Press this button to turn off the audio Press again to restore the sound to its prior volume level 16 BAND In Radio mode press this button repeatedly to switch between the five radio bands FM1 FM2 FM3 AM1 MW1 AM2 MW2 In BT mode press to reject a call 18 EQ Press repeatedly to cycle through the different equalizer curve presets you may wish to use for enhanced listenin...

Page 9: ...emove the battery holder as the direction indicated by the arrow See 2 Replace the battery Set a new battery property with side up as illustrated See 3 Insert the battery holder Push in the holder to the original position See 1 2 3 4 Inserting the Battery Note The lithium cell in the battery compartment of remote control has been secured for transport with a Before initial use please remove this p...

Page 10: ...advantage to auto select is that each time you turn the unit on it checks to see what kind of monitor is connected which causes a 1 POWER icon In any modes touch the POWER icon to switch the unit off 2 When the unit is power on tap to turn off the display and the unit still work tap anywhere of the display to turn on the display again 3 SETUP icon Touch to enter the SETTING mode the message will d...

Page 11: ... the connected TV set Normal PS For 4 3 TV Played back in the PAN SCAN style If connected to wide screen TV the left and right edges are cut off Normal LB For 4 3 TV Played back in LETTER BOX style If connected to wide screen TV black bands appear at top and bottom of the screen Wide For 16 9 TV Select when a wide screen TV set is connected RATING Select to turn Parental Control on or off changes ...

Page 12: ...language ILLUMINATION COLOR Touch to select the color for the display Tap auto icon to change automatically CALIBRATION Touch the arrow as show to calibration the display COLOR 20 20 20 BRIGHTNESS CONTRAST TINT NOTE If RESET is selected all memory data will deleted please re adjust Rear View Camera When connecting the rear view camera the mirror image of the rear view is auto matically displayed o...

Page 13: ...TON 6 USB PORT and COVER 7 AUX IN JACK 8 MU PTY BUTTON 9 TA AF BUTTON 10 BAND BUTTON 11 MICROPHONE 12 REL BUTTON 13 IR SENSOR WINDOW 14 CARD SLOT Front View Drawing after Removing Control Panel 14 Control Panel 1 7 2 3 4 6 9 8 10 12 13 5 MODE CH1 6 BND MIC REL IR RESET PUSH SEL VOL _ OPEN AUX IN PTY MU AF TA 11 ...

Page 14: ...Select the station Press and the station until it show the frequency band your select Retrieve a preset station Touch the 1 6 ranges briefly to retrieve a station which had been stored in the memory in advance the chose number is shown on display In radio mode LOC or tap icon select LOC DX Selecting The Frequency Band Touch the screen of BAND section repeatedly to select the band the message will ...

Page 15: ...I MUTE RDS TA OFF RDS AF OFF REG FUNCTION at certain times some stations divide up their programs into regional programs with varying content REG ON the message REG ON will appears in the display for a few seconds Note the display capacity is limited It is possible that in the double display mode some segments of the display are deleted the function REG ON prevents the radio from switching to alte...

Page 16: ...witch the AF function ON and OFF Touch the AF section on touch screen or swing and keep the SEL knob in the TA AF direction for about 2 seconds the AF function is activated The AF symbol appears in the display When the AF function has been switched on the radio continuously tests the signal strength of the AF frequency The test interval for each AF frequency depends on the signal strength of the c...

Page 17: ... the icon or press the RPT button on the remote control to select REPEAT mode as follows 2 RDM RANDOM FUNCTION During media playback touch screen of section press the RDM button on on the remote control to play in random Each play mode the order is different Touch it again to cancel this function Note in random mode the button is not available OSD During playback touch the screen or press the DISP...

Page 18: ...t to wake up this unit and turn to BT hands free mode when the phone call ended the unit back to power off mode 1 Make a call 1 Dial with mobile phone directly 2 a Touch the BT PHONE icon in home menu or touch the icon during playing to turn to BT PHONE interface the icons function as follows pair and connect them elect the item to find a When it finds the of the A V system the name will be displa...

Page 19: ...l if you want to reject it touch icon or press button on remote control 4 Ending a call When ending a call touch icon or use button 5 Switch the audio between the unit and your device During phone hands free system of the car A V system touch icon or press button on remote control to switch the audio between the unit and your device 6 During phone and icon or use the MUTE button to mute sound icon...

Page 20: ... playback after pausing or stopping is available only for some mobile phone 2 When the play is paired and connected to the unit the car A V system 3 he device of supports AVRCP corresponding o fast forward backward functions Mute function To select the Equalizer mode To decrease the volume level To increase the volume level Loudness Function Subwoofer Function 3 BT MUSIC 1 Touch BT MUSIC in home m...

Page 21: ...ion On the front panel of this unit there is an AUX IN jack follow the diagram below to connect analogue replay devices only for the Audio connect if you want to connect the Video please plug the Video input on the back of the unit Use this jack to replay sound of other replay equipment such as Digital Video players computers etc Via the loud speakers 1 Please connect the external device with ster...

Page 22: ...ure safety while driving and to comply with lows drivers should not watch video or operate the video device while driving As the interface show here is only the audio output now tap the icon the picture of the auxiliary input video show on the display and tap the display again to turn to audio mode Now you can watch the video from your External video equipment such as Digital Video players compute...

Page 23: ... type highlighted bar 2 Audio play mode select 3 Picture play mode select 4 Movie play mode select 5 Current play track Card OPERATION The unit can support playback MP3 WMA JPEG MP4 format which are stored on SD memory cards Please read the following instructions before you start using a memory card Inserting the card as follow USB OPERATION Card OPERATION SONG SONG USB 001 002 002 003 004 005 5 2...

Page 24: ...uch the icon to turn to home menu Before operation press the icon to cancel the original input that to set your favour There are 2 KEY for no more than 12 buttons to select For first time use this function input a key such as 0 38 0 38 is a magnitude of voltage according to your car through the steering remote and show in button 1 position Then tap Assign and tap the button 1 and then select the i...

Page 25: ...MHz USA 87 5 MHz 107 9MHz American 1 87 5 MHz 108MHz American 2 87 5 MHz 108MHz OIRT 88 1 MHz 107 9MHz Usable sensitivity 15dBu I F Frequency 10 7 MHz AM MW Frequency EUR 522 KHz 1620 KHz USA 530 KHz 1710 KHz American 1 530 KHz 1710 KHz American 2 520 KHz 1600 KHz OITR 531 KHz 1602 KHz Usable sensitivity 40dBu I F Frequency 450 Khz BT BT specification V1 2 Class 2 BT profile supported Headset Hand...

Page 26: ...t in MUTE mode BLACK AND WHITE PICTURE OR SCREEN ROLLING Ensure that you have set right mode of video system e g PAL NTSC FLAWS OF PICTURE OR SOUND Check whether AV connector and output terminal is stained Check whether there is condensation inside the lens If so power on the player and do not work for an hour or so then try again SOME FUNCTION BUTTONS DO NOT WORK Turn off ACC power then turn on a...

Reviews: