background image

8 / 

23


Network Weatherproof Camera Installation Manual 


2

2

.

.

3

3

.

.

3

3

.

.


C

C

o

o

n

n

n

n

e

e

c

c

t

t

i

i

n

n

g

g


t

t

o

o


C

C

a

a

b

b

l

l

e

e

s

s


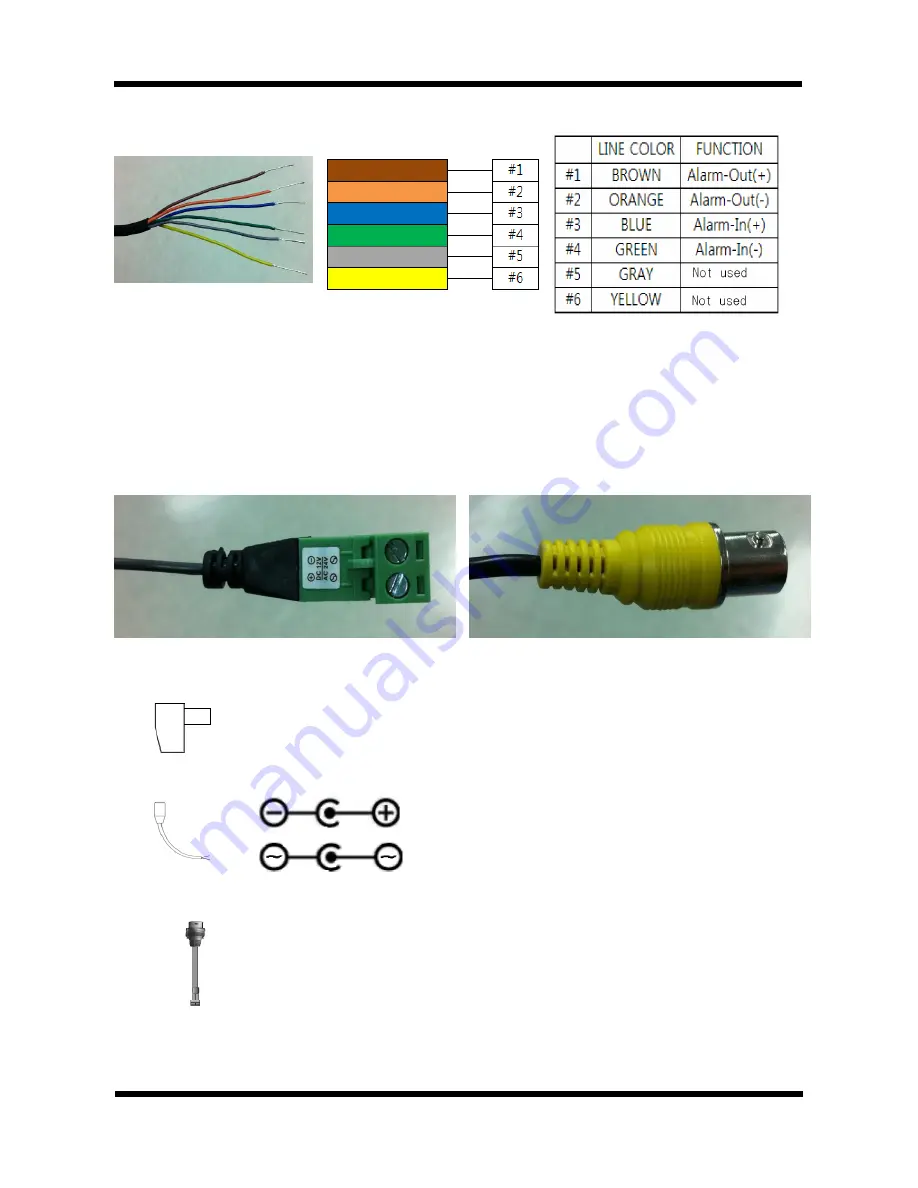
INPUT, OUTPUT 


Alarm    Connection   

These wires connect to Alarm input/output devices.   


Alarm Sensor Input: Connect to an Alarm sensor device such as an IR Sensor or a Heat sensor. The 

operation of this input can be configured to either 

normally close or normally open.


  Alarm Output: Connect to a relay that drives alarm devices such as a 

Siren Lamp or an Alarm Light.


The operation of this output can be configured to either 

normally close or normally open.


Please refer to 

“2.3.4 Connection to Alarm Devices” 

for detailed instruction on how to connect a 

sensor and a relay.


                  POWER IN                                                                                      VIDEO OUT 


Power Input 

Use the cable adapter (DC12V JACK) in the package to connect power. 
Please use the power supply provided in the package.   
When  connecting  to  a  power  supply,  please  note  the  following  power  ratings  and  the 
diagrams below:    (DC12V/2A, AC24V 2.5A) 


Analog Video Output   

This output can be used to check the video during the installation. 
Use the supplied BNC connector 
Connect the adapter to a video cable with BNC termination. 
(Select Video Out in menu to enable this output) 


Summary of Contents for NXE3055MR

Page 1: ...XNET Network Weatherproof Camera Installation Manual Ver 1 2 XNET Network Weatherproof Camera NXE3055MR Installation Manual ...

Page 2: ... immediately if there is any problem with the product Do not disassemble the product for alteration or repair This product complies for CE Europe and FCC USA regulations for industrial and home electrical device INFORMATION This equipment has been tested and found to comply with the limits for a Class A digital device pursuant to Part 15 of the FCC Rules These limits are designed to provide reason...

Page 3: ... Designation 6 2 3 1 Switch and Controls 6 2 3 2 Internal configuration 7 2 3 3 Connecting to Cables 8 2 3 4 Alarm Device Connection 10 2 3 5 Mounting the Camera 11 3 Software Installation 13 3 1 Installing system 13 3 2 IP Installer and IP address Configuration 18 3 2 1 About IP Installer 18 3 2 2 IP Address Configuration 18 4 Using Web Viewer 20 4 1 Logging In 20 4 2 Web Viewer Page 21 5 Specifi...

Page 4: ...nal voice communication between Client s PC and camera Smart Event feature Motion detection Alarm sensor output pre and post alarm for automated surveillance with no need for an attendant or monitoring Installation Wizard Easy and unified installation for large network Motion Detection with three different areas Alarm output and Video Audio data transmission to FTP site or e mail Supports Various ...

Page 5: ...T BASE 1EA SUNVISOR 1EA CD Software and User s manual DC Plug AC DC CONNECTOR CVBS Cable A Plug for DC Power Adaptor Two Position Connector for Power Input BNC connector for Analog Video Output Accessory L WRENCH 2EA SCREW 4EA Wall Anchors 4EA Sunvisor Screws 1EA Nut 4EA 2 2 2 2 P Pr ro od du uc ct t I In nf fo or rm ma at ti io on n NXE3055MR Install CD IP Installer Viewer Program CMS IP Weatherp...

Page 6: ...ht level 4 Casing Screws front 4EA attach the front and rear bodies together 5 Sunvisor Shields off the direct sunlight to avoid overheating the camera module 6 Sunvisor Screws fix the Sunvisor on the main body 7 Rotate adjusting Bolt fixes the adjustment of the camera s rotational angle 8 Tilt adjusting Bolt fixes the adjustment of the camera s tilt angle 9 Pan adjusting Bolt fixes the adjustment...

Page 7: ...as an RCA termination Enable Video Out in Camera s menu to activate this Analog video output The analog Video can only be used in resolutions lower than VGA 3 Factory Reset Button When the Camera is powered up press and hold this button for 3 seconds to reset the camera to factory default state 4 Autofocus Button Adjust automatically the focus of the camera 5 LINK LED Yellow light indicates that t...

Page 8: ...peration of this output can be configured to either normally close or normally open Please refer to 2 3 4 Connection to Alarm Devices for detailed instruction on how to connect a sensor and a relay POWER IN VIDEO OUT Power Input Use the cable adapter DC12V JACK in the package to connect power Please use the power supply provided in the package When connecting to a power supply please note the foll...

Page 9: ...mmunication using the camera this can be used to listen to the audio from a remote PC Network Cable This RJ 45 Ethernet terminal connects to a 100Mbps LAN When an optional PoE is used the power will be supplied from the Network Cable Network cable of this product is not water resistant Do not use the other power connector when powering up the product through PoE The Product is not covered under wa...

Page 10: ...re 2 5 NC or NO can be configured in Menu Please note that the Alarm Sensor device requires a separate power source Alarm in Alarm in Photo Coupler Sensor Device Signal 5 30VDC GND Adaptor Internal Circuitry External Circuitry Alarm Output This terminal can only drive up to DC 30V 400mA A relay has to be used to operate Alarm devices that require higher voltage or current ALARM DEVICE POWER Alarm ...

Page 11: ...or Install Sunvisor to the Camera s main body using Sunvisor washers and screws Mounting the Camera Ceiling Mount type Wall Mount Type Mount the Bracket Base on the installation surface using the four 6mm screws provided Mount the camera s main body on the Bracket Base using the four 5 16 screws provided as shown in the figure ...

Page 12: ...Manual Adjusting the Camera Angle Ceiling Mount type Wall Mount Type After mounting the Camera unlock the fixing screws shown in the picture using the L wrench provided to adjust the camera s angle as desired Tighten the fixing screws back when done ...

Page 13: ... em m Connecting the camera Directly to a PC The camera can be directly connected to a PC for configuration A Connect the camera to your PC directly using a crossover LAN cable as shown below NOTE The camera will set its IP address to the default value 192 168 123 100 after looking for a DHCP service This process approximately takes 20 30 seconds B Next change the PC s network configuration in the...

Page 14: ... set in anywhere between 192 168 123 2 and 192 168 123 254 except for 192 168 123 100 which is taken by the camera C Insert the Setup CD into your CD ROM drive and install IPInstaller software D Click Next when the Installation Wizard box pops up E Click Install to begin the Installation ...

Page 15: ...15 23 Network Weatherproof Camera Installation Manual F Click Finish to complete the installation G IP Installer will launch automatically as shown below Double click on the camera from the list ...

Page 16: ...s on the IP installer software Internet Explorer will prompt you to install ActiveX Please accept the ActiveX download in order to view video NOTE Click on Setting in the main screen to change the configurations of the camera Enter the default User name and Password when the login prompt opens up Default User name root Default Password admin ...

Page 17: ... existing LAN Please connect the camera to a router using a LAN cable as shown below NOTE If the DHCP server is enabled at your router camera will automatically receive an IP address from the router Otherwise camera s IP address will be automatically set to the default value 192 168 123 100 COMPUTER Direct Network Cable NETWORK HUB ...

Page 18: ...s easily If your network uses a DHCP server the server will automatically assign an IP addresses to the camera If your network does not have a DHCP server the camera will assign itself a default IP address 192 168 123 100 For detail refer to the user s manual of the IP Installer 3 3 2 2 2 2 I IP P A Ad dd dr re es ss s C Co on nf fi ig gu ur ra at ti io on n A The following window will appear when...

Page 19: ...llation Manual C When you enter the IP address and click Set button the box shown in Figure 3 4 will appear Figure 3 3 Select Network Adapter Box D Select the adapter and click Select button to complete changing the IP address of the camera ...

Page 20: ...in If you have changed the HTTP port number from the default value put a colon and the port number at the end of the IP address For example enter the following address when you changed the port to 8080 http 192 168 123 100 8080 Address format for accessing as an administrator When using the default IP address and port number http 192 168 123 100 When the IP address and port number have been change...

Page 21: ...a features can be configured Please refer to User Manual for detail Motorize Opens up Motorize page This page can control Zoom and Focus of the network camera Please refer to User Manual for detail Triple Stream Service Main Stream Displays the Main Stream Video Image Sub Stream Displays the Sub Stream Video Image Enable Dual Codec in Video Setup Page to view the Sub Stream Video Please refer to U...

Page 22: ...streaming Main H 264 1080P CBR VBR Dual H 264 MJPEG 720p Triple H 264 MJPEG D1 Image settings Compression level setting Configurable White Balance Brightness Saturation Sharpness DNR 3DNR BLC EXPOSURE Intelligent Audio Two way full duplex G 711 Network Protocol IPv4 HTTP TCP RTSP RTP UDP SMTP FTP ICMP DHCP UPnP Bonjour ARP DNS DynDNS NTP Multicast HTTPs SNMP Supported DDNS CNB DDNS DynDNS org Refe...

Page 23: ...l IP Class IP66 Operating Temperature Humidity 20 50 0 80 Pan Tilt Horizontal 4 Axis Movement for Free Lens Rotation Power 24VAC 24 28V 12VDC 11 15V Dual Voltage Maximum IR on FAN on DC12V 6 0W AC24V 500mA Maximum IR on HEATER on DC12V 8 0W AC24V 670mA Dimensions Weight Net 109 4 W x 122 7 H x 343 1 D mm Approx 1 45kg ...

Reviews: