background image

XA4 Series High Density Access Points

4

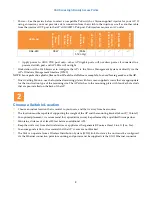
Connect Cables and Install AP

NOTE

: Once you connect GIG1/POE, an automatic upgrade typically starts soon after the AP has Internet connectivity. Do 

not unplug this port during the upgrade or the AP may become inoperable. The upgrade should take 10 minutes or less. 

Zero-Touch Provisioning and Ongoing Management

Most customers use the Xirrus Management System (XMS) for the initial setup and continuing management of 
Xirrus APs. XMS users set up new APs for zero-touch provisioning via the following platforms. Wait five minutes 
after powering up the AP to automatically discover it, then use XMS to view and manage it. Newly discovered 
APs are automatically assigned to the XMS “default” profile, and receive the configuration defined for that profile.

XMS-Cloud—performs zero-touch provisioning. Your new APs appear in XMS even before you receive your 
equipment. When the email arrives with your login information, use XMS-Cloud to specify the initial settings 
for your APs. A Guided Tour will walk you through the basic steps of creating a profile containing 

1.

Connect the cable that carries power and data to 

GIG1/PoE

 (shown in red). If you 

use a Xirrus-supplied injector, its CONNECT LED should light (for 70W and 
higher injectors, it is OK if it blinks). If power is being properly supplied, the AP’s 
LEDs will light and then commence blinking in their rotating boot pattern. A 
second data connection may be plugged into 

GIG2 

(optional). 

2.

If using panel antennas, connect the cables as indicated in the table on 

page 1


3.

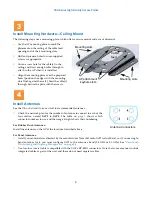
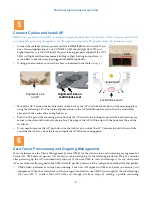
Mount the AP: Position the keyhole studs on the back of the AP over the keyhole slots on the mounting plate 
using the following aid—line up the alignment line on the AP (small bump located on the AP as indicated 
above) with the vertical line on the lock lever. 

4.

Push the AP against the mounting plate and slide the AP towards the locking lever until the keyhole slugs are 
secure in the slots and the lever locks in place. The edge of the AP will line up with the horizontal line on the 
lock lever. 

5.

If you need to remove the AP, push down on the lock lever to unlock the AP. Continue to hold it down while 
you slide the AP away from the lever and pull the AP off the mounting plate. 

5

POE

Alignment Lines on 

Lock/Unlock Lever

Alignment Line

on AP

Alignment Lines on 

Lock/Unlock Lever

Lock/Unlock Lever

Installed AP

6

Summary of Contents for XA4 Series

Page 1: ...tors OK If you are not using recommended antennas the XA4 s output power setting must be reduced by 1 dB for every dB above 6dBi gain the selected antenna may produce OK DFS Zero wait DFS dynamic freq...

Page 2: ...mounting site The AP attaches to the mounting plate with four keyhole studs that are pre installed on the back of the AP Choose a Suitable Location Choose an indoor location that is central to your us...

Page 3: ...g of the cable feed opening and of the 4 mounting slots 2 Drill and prepare holes for user supplied screws as appropriate 3 Cut an access hole for the cable s in the ceiling and draw enough cable thro...

Page 4: ...containing 1 Connect the cable that carries power and data to GIG1 PoE shown in red If you use a Xirrus supplied injector its CONNECT LED should light for 70W and higher injectors it is OK if it blink...

Page 5: ...irrus devices deployed in your network Create and configure a default profile for newly added APs then set up discovery for the APs subnetwork New devices will automatically receive the configuration...

Page 6: ...e Warranty Agreement on page 572 Notices Wi Fi Alliance Certification www wi fi org This Appendix contains Notices Warnings and Compliance information for the XA XD and XR500 600 Series only For Notic...

Page 7: ...f the FCC rules These limits are designed to provide reasonable protection against harmful interference in a residential installation This equipment generates uses and can radiate RF energy and if not...

Page 8: ...exposure limits set forth for an uncontrolled environment To ensure compliance with FCC and Industry Canada RF exposure requirements this device must be installed in a location where the antennas of t...

Page 9: ...LE LAN Devices Operation is subject to the following two conditions 1 this device may not cause interference and 2 this device must accept any interference including interference that may cause undes...

Page 10: ...0 MHz sont r serv s uniquement pour une utilisation l int rieur afin de r duire les risques de brouillage pr judiciable aux syst mes de satellites mobiles utilisant les m mes canaux Users should also...

Page 11: ...the antenna types listed below with the maximum permissible gain indicated Antenna types not included in this list having a gain greater than the maximum gain indicated for that type are strictly proh...

Page 12: ...a gain permitted for devices in the band 5725 5850 MHz shall be such that the equipment still complies with the e i r p limits specified for point to point and non point to point operation as appropri...

Page 13: ...terference to co channel mobile satellite systems ii high power radars are allocated as primary users i e priority users of the bands 5250 5350 MHz and 5650 5850 MHz and that these radars could cause...

Page 14: ...in a location where the antennas of the device will have a minimum distance of at least 30 cm 12 inches from all persons Using higher gain antennas and types of antennas not certified for use with th...

Page 15: ...hzeni je v souladu se z kladnimi po adavky a ostatnimi odpovidajcimi ustano veni mi Sm rnice 1999 5 EC Dansk Danish Dette udstyr er i overensstemmelse med de v sentlige krav og andre relevante bestemm...

Page 16: ...vos nuostatas Nederlands Dutch Dit apparant voldoet aan de essentiele eisen en andere van toepassing zijnde bepalingen van de Richtlijn 1995 5 EC Malti Maltese Dan l apparant huwa konformi mal htigiet...

Page 17: ...n Marking For the Xirrus XR 500 XR 520H XR 2000 and XR 4000 Series Wireless APs the approval mark is affixed to the equipment Slovensko Slovenian Ta naprava je skladna z bistvenimi zahtevami in ostali...

Page 18: ...e appropriate take back systems will reuse or recycle most of the materials of this equipment in a way that will not harm the environment The crossed out wheeled bin symbol in accordance with European...

Page 19: ...authorities for the current status of their national regulations for both 2 4 GHz and 5 GHz wireless LANs The following countries have additional requirements or restrictions than those listed in the...

Page 20: ...s a general authorization Please check with www communicazioni it it for more details Questo prodotto conforme alla specifiche di Interfaccia Radio Nazionali e rispetta il Piano Nazionale di ripartizi...

Page 21: ...he compliance of Xirrus products or you cannot find the information you are looking for please contact us at Xirrus Inc 2101 Corporate Center Drive WARNING In order to comply with radio frequency RF e...

Page 22: ...less AP family of products The compliance information contained in this section is relevant to the listed countries outside of the European Union and other countries that have implemented the EU Direc...

Page 23: ...nings Read all user documentation before powering this device All Xirrus interconnected equipment should be contained indoors This product is not suitable for outdoor operation Please verify the integ...

Page 24: ...he XA XD and XR500 600 Series only For other models see the notes at the beginning of this appendix S curit Lisez l ensemble de la documentation utilisateur avant de mettre cet appareil sous tension T...

Page 25: ...lease see http www xirrus com support eula Foudre N utilisez pas les Wireless APs et ne branchez pas ou ne d branchez pas de c bles en cas de foudre Disjoncteur Les Wireless APs d pend de l installati...

Reviews: