X2 and XD2 Two-Radio Access Points
3
Install Mounting Hardware and AP
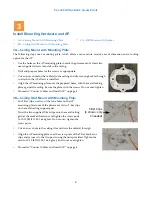
3A—Ceiling Mount with Mounting Plate
The following steps use a mounting plate, which offers a more secure mount, ease of dismount, and a locking
option for the AP.
3B—Ceiling Grid Mount with Mounting Plate
1.
For T-Bar clips, use two of the four holes on the AP
mounting plate to mark the placement of two T-bar clips
on the metal ceiling support grid.
Twist the two supplied T-bar clips onto the metal ceiling
grid at the marked locations and tighten the screw posts
to 10-12 lbf.ft (1.38-1.66 kgf.m). Do not over- tighten the
screw posts.
2.
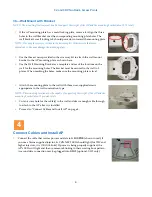
Cut an access hole in the ceiling tile and draw the cable(s) through.
3.
Align the AP mounting plate over the screw posts of the T-Bar bracket or
clips and secure it to the two posts using the nuts provided. Tighten the
nuts to 10-12 lbf.ft (1.38-1.66 kgf.m), but do not over tighten.
4.
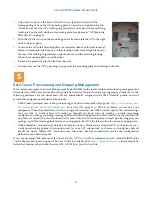
Proceed to “Connect Cables and Install AP” on page 4.
3A—Ceiling Mount with Mounting Plate
3B—Ceiling Grid Mount with Mounting Plate
3C—Wall Mount with Bracket
1.
Use the holes on the AP mounting plate to mark the placement of at least two
user-supplied screws to install in the ceiling.
2.
Drill and prepare holes for the screws as appropriate.
3.
Cut an access hole for the cable(s) in the ceiling and draw enough cable through
to attach to the AP after it is installed.
4.
Align the AP mounting plate over the prepared holes, with the metal locking
plate against the ceiling. Secure the plate with the screws. Do not over-tighten.
5.
Proceed to “Connect Cables and Install AP” on page 4.
3
T-Bar Clips
(4 shown; only
2 needed)


