background image

Installation

14

Xerox© LCD Monitor User’s Manual

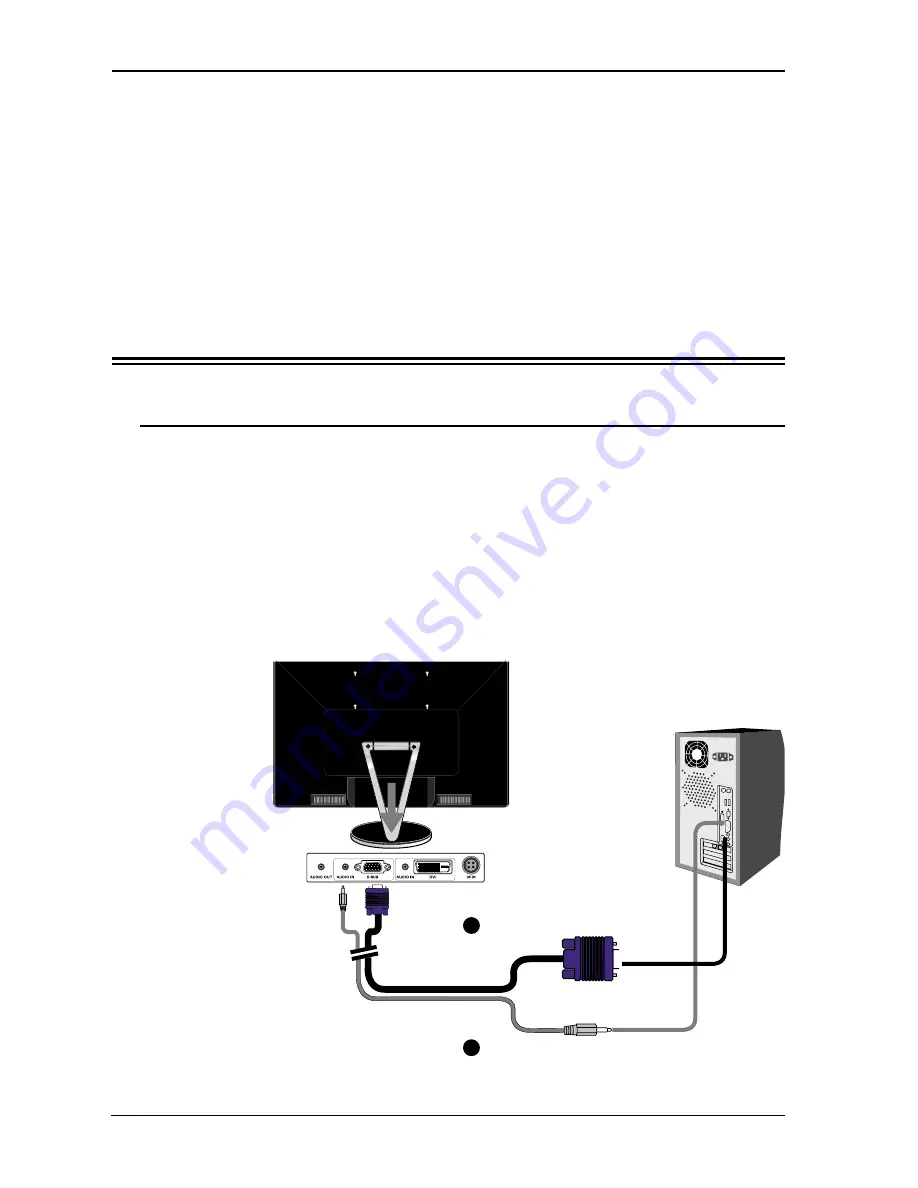
Turn off the computer and unplug the power cable.

Connect the D-SUB signal cable to the D-SUB port on the 

back of the computer.

Connect the audio cable to the line-in port on the back of the 

computer.

Refer to the owner’s manual of the computer for connections.

In the process of connecting external equipment, do not connect 

any AC power cords to wall outlets until all other connections 

are completed.

Connect to the D-SUB port 

2  Installation

Connecting Your LCD Monitor to a Computer 

Connect to the Line-in port

Method 1: Analog (D-SUB) Connection

2

3

Summary of Contents for XM9-23w

Page 1: ...User s Guide XA7 19i LCD Monitor XA7 17i XA7 19i XM9 23w XA7 17i XA7 19i XA7 17i...

Page 2: ...out limitation material generated from the software programs which are displayed on the screen such as icons screen displays looks etc XEROX and all Xerox product names mentioned in this publication a...

Page 3: ...UB Connection 14 Method 2 Digital DVI Connection 16 Using Your LCD Monitor 18 Installing the Speaker optional to Your LCD Monitor 19 Installing the Wall Mount optional to Your LCD Monitor 21 3 OSD MEN...

Page 4: ...ability Energy Energy saving mode after a certain time bene cial both for the user and the environment Electrical safety Emissions Electromagnetic elds Noise emissions Ecology The product must be prep...

Page 5: ...ax 32 2 725 2513 Email rma proview repair com leo starckx proview repair com ASIA When disposing of Proview products in Asia please contact the following location to make arrangements for recycling Pr...

Page 6: ...EC Low Voltage Directive as amended by Directive 93 68 EEC The electro magnetic susceptibility has been chosen at a level that gives correct operation in residential areas business and light industria...

Page 7: ...installation If this equipment does cause harmful interference to radio or television reception which can be determined by turning the equipment off and on the user is encouraged to try to correct the...

Page 8: ...he manufacturer This equipment and recommended cart or stand should be handled with care Quick stops excessive force and uneven surfaces may cause the equipment and cart stand to overturn Do not disab...

Page 9: ...ty Refer service to quali ed personnel Always remove the power cord from the outlet before cleaning the equipment Never use liquid or aerosol cleaners on the equipment Clean only with a soft dry cloth...

Page 10: ...product s display is abnormal DISPOSAL OF WASTE ELECTRONIC EQUIPMENT BY PRIVATE HOUSEHOLDS WITHIN THE EUROPEAN UNION This sign indicates that this product may not be disposed of with your regular hou...

Page 11: ...to ACE by simply pressing the enhance button or make any ne color adjustments from on screen menu Precise XtouchTM Buttons Tap the touch sensitive XtouchTM buttons to access the the on screen menu fo...

Page 12: ...e sure to save original box and all packing material for future transport of monitor Power cord specification H05 VV F 3G 0 75mm2 Package Contents Right Left Detachable Speakers Optional Parts VESA Mo...

Page 13: ...tor User s Manual Introduction Front View and Controls 1 Press the POWER button located on the bottom side of the main unit 2 Press the MENU button located on the bottom side of the main unit to displ...

Page 14: ...ight indicates when the LCD monitor is activated blue light indicates power on and amber ash indicates power saving Turns the LCD monitor on and off Press once to display the OSD On Screen Display and...

Page 15: ...ble to the line in port on the back of the computer Refer to the owner s manual of the computer for connections In the process of connecting external equipment do not connect any AC power cords to wal...

Page 16: ...DC 24V port at the rear of the monitor Connect the power cord to the AC DC adapter and wall outlet 6 Press the button located on the bottom side of the main unit to turn the monitor on then turn the...

Page 17: ...4 If you would like to listen to PC audio with a headphone connect the audio out port to the headphone 5 Connect the DC plug of the AC DC adapter to the DC 24V port at the rear of the monitor Connect...

Page 18: ...Installation ENGLISH 17 Xerox LCD Monitor User s Manual Connect to power source 5 Connect to the Headphone 4 2 Connect to the DVI port Connect to the Line in port 3...

Page 19: ...monitor s angle of the stand NOTE The button is used for switching the LCD monitor on and off it does not disconnect the device from the main voltage To completely disconnect the main voltage please...

Page 20: ...optional speakers 1 Attach the speaker onto both sides of the LCD monitor as shown 2 Hold the optional speaker and place it on the two hooks and speaker plug on the unit as shown Speaker hooks Instal...

Page 21: ...Once the hooks are matched with the LCD monitor unit pull the speaker down to complete the attachment Push the speaker unplug button of the speaker in the direction of the arrows and pull away from t...

Page 22: ...Mount optional to Your LCD Monitor 2 Use the screws to x the VESA mount two type 75x75mm 100x100m on the rear of the display monitor Be sure the screws are rmly xed in place 3 Af x the VESA mount to...

Page 23: ...ous settings and options by following the steps below 1 Press the button to display the OSD The OSD main menu provides an overview of the selection of controls available 2 Press the or button to highl...

Page 24: ...t item 4 Press the or button to change the value of the selected item 5 Select the icon to exit the OSD 6 Repeat steps 1 through 5 to make further adjustments All changes are stored immediately PICTUR...

Page 25: ...URE SETUP Adjusts picture settings such as brightness contrast 2 SOUND SETUP Allows selection of the sound options and effects The OSD Options MAIN MENU SOUND SETUP BASS TREBLE BALANCE MUTE OFF MOVE S...

Page 26: ...justs the position of the picture left and right in the window V POSITION Adjusts the position of the picture up and down in the window CLOCK Adjusts the width of the picture PHASE Adjusts signal phas...

Page 27: ...be independently adjusted COOL Inclines colors toward the blue end of the spectrum Fixes the red green and blue component levels at factory settings they cannot be independently adjusted WARM Incline...

Page 28: ...ched sounds TREBLE Controls the relative intensity of higher pitched sounds BALANCE Adjusts the relative volume of the speakers in a multiple speaker system MUTE Mutes and restores your monitor sound...

Page 29: ...time of the on screen menu TRANSPARENCY Controls the translucence of the on screen menu s background DISPLAY Press the or buttons to display the current of vertical refresh rate and resolution RESET...

Page 30: ...ine Horizontal Frequency kHz Vertical Frequency Hz 640 x 350 31 47 70 08 720 x 400 31 47 70 08 640 x 480 31 47 60 00 37 86 72 80 37 50 75 00 800 x 600 35 16 56 25 37 88 60 30 46 87 75 00 1024 x 768 48...

Page 31: ...TMDS Data 2 16 Hot Plug Detect 3 TMDS Data 2 4 shield 17 TMDS Data 0 4 18 TMDS Data 0 5 19 TMDS Data 0 5 shield 6 DDC Clock 20 7 DDC Data 21 8 Analog Vertical Sync 22 Clock shield 9 TMDS Data 1 23 Clo...

Page 32: ...nitor User s Manual PIN DESCRIPTION 1 Red 2 Green 3 Blue 4 Ground 5 Self Test 6 Red Ground 7 Green Ground 8 Blue Ground 9 5 VDC 10 Ground 11 Ground 12 SDA FOR DDC 13 H Sync 14 V Sync 15 SCL FOR DDC 1...

Page 33: ...e so there are about 4 million dots in total According to ISO 13406 2 Class II a maximum of 6 pixels and 7 subpixels may be defective i e a total of 25 faulted dots This corresponds to approx 0 002 of...

Page 34: ...l cable connecting the LCD monitor and the computer refer to page 14 17 Press the button to adjust the Brightness Contrast options in the OSD Adjust the Color Select option in the OSD Press the button...

Page 35: ...58mm x 0 258mm Max Resolution 1920x1200 Speakers Optional Input Connector DVI D x1 D SUBx1 AUDIO IN x2 AUIDO OUT x1 Power Source AC100 240V 50 60Hz Power Consumption 96W Dimension 542x438 8x210 mm Sta...

Page 36: ...andard Time TEXAS AUTHORIZED SERVICE CENTER 10849 KINGHURST SUITE 120 HOUSTON TX 77099 281 530 4100 281 530 4104 Fax Hours 8AM 6PM Central Time EUROPE AUTHORIZED SERVICE CENTER CONTACTS XOAL BVBA RAKE...

Reviews: