background image

7.9

U s e r   G u i d e

R E P L A C I N G   T H E   D R U M   C A R T R I D G E

7

Place the used cartridge into the empty bag,  
and seal the bag.

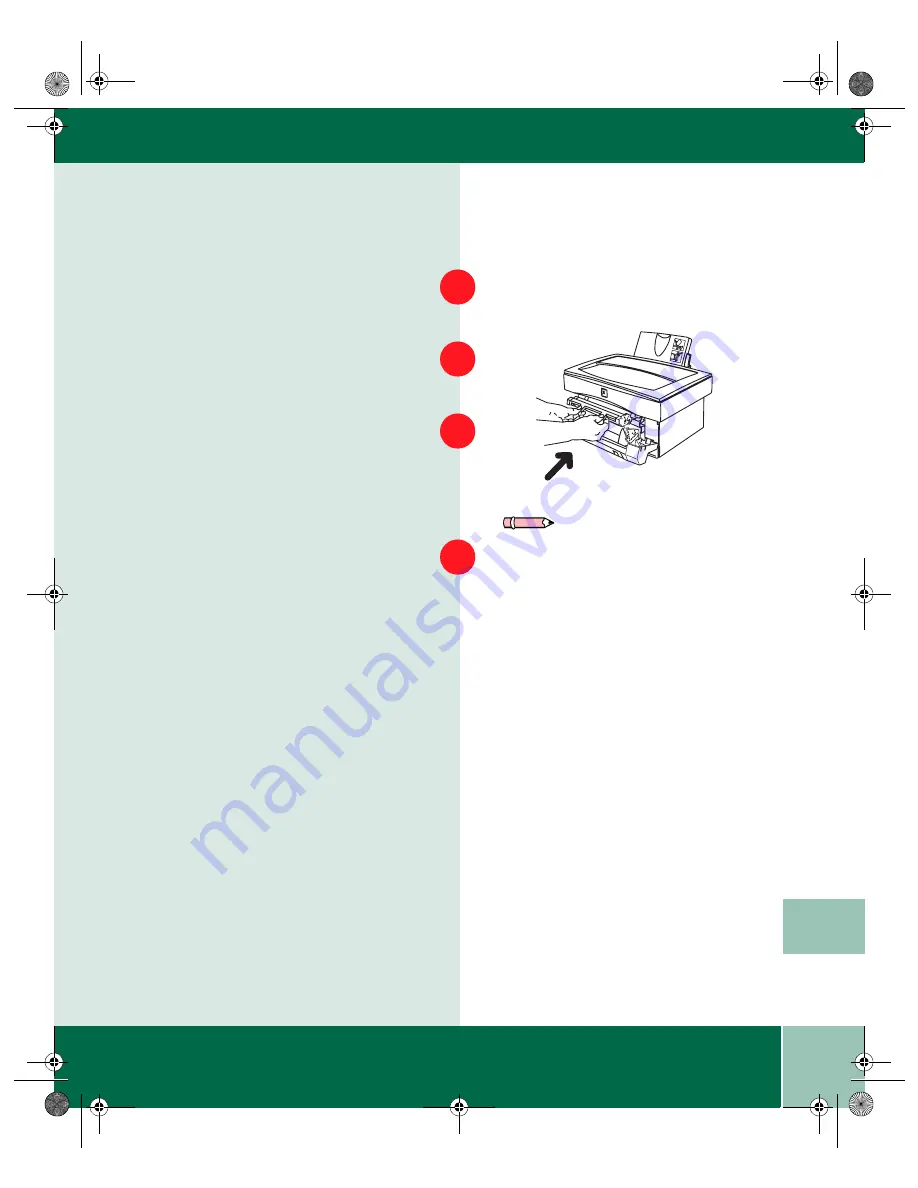
Hold the tabs on the new drum cartridge 
handle between your thumbs and index 
fingers. Slide the drum cartridge along the 
runners into the WorkCentre.
Carefully remove the sheet of black protective 
paper from the drum cartridge, making sure 
not to leave any torn pieces of paper in the 
WorkCentre.

Replace the toner cartridge.  Hold the handle 
of the toner cartridge so that the stamped 
markings on top of the cartridge are facing 
upward.

8

9

1

2

10

11

Note: Help the environment by 
recycling your used drum cartridge. 
Use the recycle sticker packed with the 
drum cartridge for instructions on 
returning the used drum cartridge to 
Xerox.

Xe88qrg.bk  Page 9  Thursday, February 17, 2000  4:25 PM

Summary of Contents for WorkCentre XE88

Page 1: ...User Guide 701P33173 W o r k C e n t r e X E 8 8 U S E R G U I D E Xe88qrg bk Page 1 Thursday February 17 2000 4 25 PM...

Page 2: ...tation material generated from the software programs which are displayed on the screen such as icons screen displays looks etc Xerox and all Xerox products mentioned in this publication are registered...

Page 3: ...ions 2 1 Loading Media 2 3 Control Panel 2 6 Copy Quality 2 6 Copy Contrast 2 7 Reduction Enlargement Presets 2 7 Reduction Enlargement 2 7 Indicators 2 8 On line Off line Button 2 9 Ready Indicator L...

Page 4: ...G 5 1 E1 Jams at the Paper Tray 5 2 E2 Jams Inside the WorkCentre 5 3 E3 Jams at the Paper Exit Area 5 4 WorkCentre Fault Codes 5 5 Problems and Solutions 5 6 6 CLEANING AND MAINTENANCE 6 1 Cleaning t...

Page 5: ...rd Warranty Information In addition to this User Guide your WorkCentre XE88 comes complete with a Getting Started Guide CD ROM and a Warranty Card If you do not see what you are looking for in this Us...

Page 6: ...U s e r G u i d e vi Xe88qrg bk Page vi Thursday February 17 2000 4 25 PM...

Page 7: ...and easy to use It is specially designed to provide you with high quality and high performance copying printing and black and white scanning This guide tells you how to set up operate maintain and ge...

Page 8: ...ding of paper envelopes label sheets and transparencies Some of the other advanced features which can be selected from the control panel of this WorkCentre include Copy ratio two reduction values two...

Page 9: ...ion and good copy print quality Xerox recommends that paper be stored appropriately on a flat surface in a closed container in a low humidity area tightly wrapped if the ream is partially used Note Pa...

Page 10: ...drum and damage other parts of the WorkCentre mechanism P a p e r I n p u t P a p e r T r a y Sizes 3 7 8 x 5 7 8 to 8 x 14 in 98 to 216 x 315 330 mm Weights Optimum Range 20 lb 80 g m 14 34 lb 52 130...

Page 11: ...raise the paper support to hold the paper once it has been inserted Place the paper into the paper tray with the side to be printed facing toward you Adjust the position of the paper so that its right...

Page 12: ...lbs Gently push the paper release lever back The paper will be clamped by the paper feed roller inside the printer If printing onto an envelope Ensure that the side to be printed on is facing upwards...

Page 13: ...ne windows peel off adhesive strips are heavily textured coated or embossed are cotton paper composed of more than 25 of recycled paper 6 Note Paper jams E1 may occur if the paper lever is not used th...

Page 14: ...e default to Text mode for darker copies Use Photo when the originals are photographs Toner Saver mode lowers the cost of copying by decreasing overall copy density on each page Use this feature when...

Page 15: ...etting There are 5 variations represented by 3 lights Reduction Enlargement Presets is preset at 50 and is customer programmable 78 129 and 200 are standard reduction enlargement options Refer to Prog...

Page 16: ...ks when a jam occurs and a fault code will appear The indicator light is red The drum indicator is on when the drum is near end of life and blinks when the drum is at end of life The indicator light i...

Page 17: ...utton can be pressed to interrupt a print job to run a copy job When the copy job is complete touch the On line Off line button to revert to print mode or the machine will revert to print mode automat...

Page 18: ...completing the copy being made Changes the copy quantity to one after the entire job is complete Displays copy count information refer to Copy Count Message display Indicators light up when there is a...

Page 19: ...hold the Copy Quality button for approximately 4 to 6 seconds The light next to Auto will light The lights within the WorkCentre Diagram will flash From the Programmable Features Chart on page 2 11 se...

Page 20: ...program will flash Press the 1 button until the option number you want is displayed Press Start to store the selection Press the Copy Quality button to return to the copy mode 4 Note To continue makin...

Page 21: ...ion or enlargement between 50 200 Select the Toner Saver by using the Copy Quality button Press again and hold the Copy Quality button for approximately 4 to 6 seconds The light next to Auto will ligh...

Page 22: ...ess the Variable Percentage buttons until the desired percentage is displayed Press Start to store the selection Press the Clear button to continue making other changes Press the Copy Quality button t...

Page 23: ...o l d 1 Auto Clear time out 0 Off 1 30 seconds 2 60 seconds 3 90 seconds 4 120 seconds 2 Time out to Power Save Part of Power Saver 0 Off 1 45 seconds 2 90 seconds 3 2 minutes 4 5 minutes 3 Time out...

Page 24: ...s slightly larger or smaller than the original or the same size 0 100 1 99 2 101 5 Default Copy Quality This feature allows you to select the default Copy Quality mode 0 Auto 1 Text 2 Photo 3 Toner Sa...

Page 25: ...Trail Edge Void 4 mm The trail edge void can be turned off to accommodate originals that have print to the very bottom edge When Off another 4 mm will copy however the image quality may deteriorate a...

Page 26: ...re power than the Power Save Mode but requires more time before copying can begin When the copier enters the power shut off the Ready Indicator will flash and the other indicators will turn off To cop...

Page 27: ...fication 100 Quantity Selected 1 Adjust the side guide within 1 32 in Two Sided Copying Place one original face down on the Document Glass with the TOP toward the LEFT Lower the document cover Select...

Page 28: ...ect a quantity of one Press Start Copying While Printing To copy a job while the machine is printing Set up the copy job while the machine is printing Press Start The current page will finish printing...

Page 29: ...application file menu choose Printer Setup or the equivilant Select the WorkCentre XE printer Click OK Click on the Print Button 1 Note ForhelpwithPrinterSetup refer to the documentation that came wi...

Page 30: ...r your personal computer for a description of this feature Look particularly for BIOS and or CMOS settings If necessary call the manufacturer of your personal computer Be prepared with the model and s...

Page 31: ...m software will operate the WorkCentre black and white scanner The TWAIN standard allows many software packages access to the same scanner Examples of some TWAIN compliant software packages are ScanSo...

Page 32: ...ides the following array of scanning controls and previewing options Image type Resolution Control brightness To access these features the WorkCentre TWAIN Scanner window opens when Acquire or a simil...

Page 33: ...TWAIN Scanner window will be displayed when you choose the WorkCentre to scan documents or photographs from the TWAIN compliant image editing application There are two ways to start the TWAIN Scanner...

Page 34: ...select Xerox WorkCentre TWAIN Click OK From the Process menu select Auto A Page Type dialog will be displayed Select the desired page type and select Scanner as the Page Source Click OK 1 2 Note For...

Page 35: ...ick the Prescan button The WorkCentre scans the image and a preview appears in the scanner window Adjust the scan options as desired on the Basic screen before initiating the final scan Click the Scan...

Page 36: ...art the TWAIN compliant image editing software In most programs choose the Select Source option from the File menu From the list select Xerox WorkCentre TWAIN Click OK Open the File menu and select Ac...

Page 37: ...eview scan of the image before making a final scan To launch a preview scan a Place the document on the document glass b Click the Prescan button The WorkCentre scans the image and a preview appears i...

Page 38: ...U s e r G u i d e 4 8 Xe88qrg bk Page 8 Thursday February 17 2000 4 25 PM...

Page 39: ...R O U B L E S H O O T I N G This section describes Troubleshooting procedures for Clearing jams Error Messages Refer to the specific subsection for a description of problems and associated solutions X...

Page 40: ...per tray Straighten the edges of the paper and then reinsert it into the paper tray Push the paper release lever back again to secure the paper Caution If the jammed paper will not come out easily do...

Page 41: ...the front door latches on each side of the front door and pulling towards you Lift the toner cartridge handle Remove the toner cartridge Caution Do not touch the shiny green surface of the drum Remove...

Page 42: ...ge Close the front cover E3 Jams at the Paper Exit Area To reduce the pressure on the paper open the front door by pushing in the latches on both sides of the front door With the front door partially...

Page 43: ...ont door CH The toner cartridge is not installed in the machine Install the toner cartridge Toner indicator light When the toner cartridge replacement indicator appears the toner cartridge will need t...

Page 44: ...t you can change the default copy quality to Text mode If the original is dark select the upper copy contrast position to lighten the background of the copies If the original is not light but copies c...

Page 45: ...m Toner The machine is in the program mode Press the Copy Quality mode button to exit Frequent copy paper jams E1 E2 E3 Ensure that the paper lever is pulled toward the front of the WorkCentre before...

Page 46: ...l Panel to make sure that the print job is being sent to the correct port For Example LPT1 Uninstall then reinstall the WorkCentre printing software Printing is too slow Try closing other applications...

Page 47: ...g them with a soft clean lint free cloth Keep the front cover closed when cleaning the outside of the WorkCentre You can dampen the cloth slightly with water but be careful not to let any water drip o...

Page 48: ...of each day and during the day as needed Caution Do not pour or spray water directly onto any part of the WorkCentre Slightly dampen a soft lint free cloth or paper towel with water Lift the document...

Page 49: ...nt quality Caution Because the drum surface is very sensitive you must take extreme care when cleaning it Do not let the drum surface come into contact with fingerprints water alcohol or other solvent...

Page 50: ...a prepared surface Replace the drum cartridge Replace the toner cartridge Service It is important that you speak with a service representative to resolve any persistent problem The service representa...

Page 51: ...riod of use these parts will need to be replaced The part numbers for these parts are as follows Toner Cartridge Part Number 6R916 Drum Cartridge Part Number 13R553 Note Replacement of drum cartridges...

Page 52: ...equates to 14 356 copies prints Toner Cartridge Yield The graph shows how the number of copies prints per cartridge decreases as the printed area increases Factors which can affect the toner cartridg...

Page 53: ...and the drum cartridge should be stored at temperatures between 0 C 32 F and 40 C 104 F Caution Do not store the toner cartridge and drum cartridge in the following places Direct sunlight Dusty places...

Page 54: ...ugh the cartridge If there are thin lines around the toner cartridge roller it is probably time to replace the toner cartridge The order number for the toner cartridge is 6R916 Open the front door by...

Page 55: ...the toner cartridge so that the stamped markings on top of the cartridge are facing upward Gently insert the toner cartridge inside the WorkCentre Push where indicated in the illustration until the to...

Page 56: ...rtridge Ensure that you follow steps 1 through 14 it is essential that you complete all 14 steps in order for the WorkCentre to operate If you have a J2 fault code and the drum indicator is blinking t...

Page 57: ...all the way out of the WorkCentre Hold the handle to support the toner cartridge and then pull it clear of the WorkCentre Place the toner cartridge on the scrap paper prepared in step 2 1 2 3 1 2 4 Wa...

Page 58: ...clear of the WorkCentre Caution The new drum cartridge is sealed with a sheet of black protective paper to shield the drum from light To prevent damage to thedrum surface do not remove the protective...

Page 59: ...et of black protective paper from the drum cartridge making sure not to leave any torn pieces of paper in the WorkCentre Replace the toner cartridge Hold the handle of the toner cartridge so that the...

Page 60: ...e the WorkCentre and the handle springs back Ensure that the WorkCentre power is on You must hold in the button indicated and close the cover at the same time Continue to hold the button for three sec...

Reviews: