background image

Xerox Corporation

Scan to PC Desktop Professional Workgroup Edition v8

Orientation Guide

5

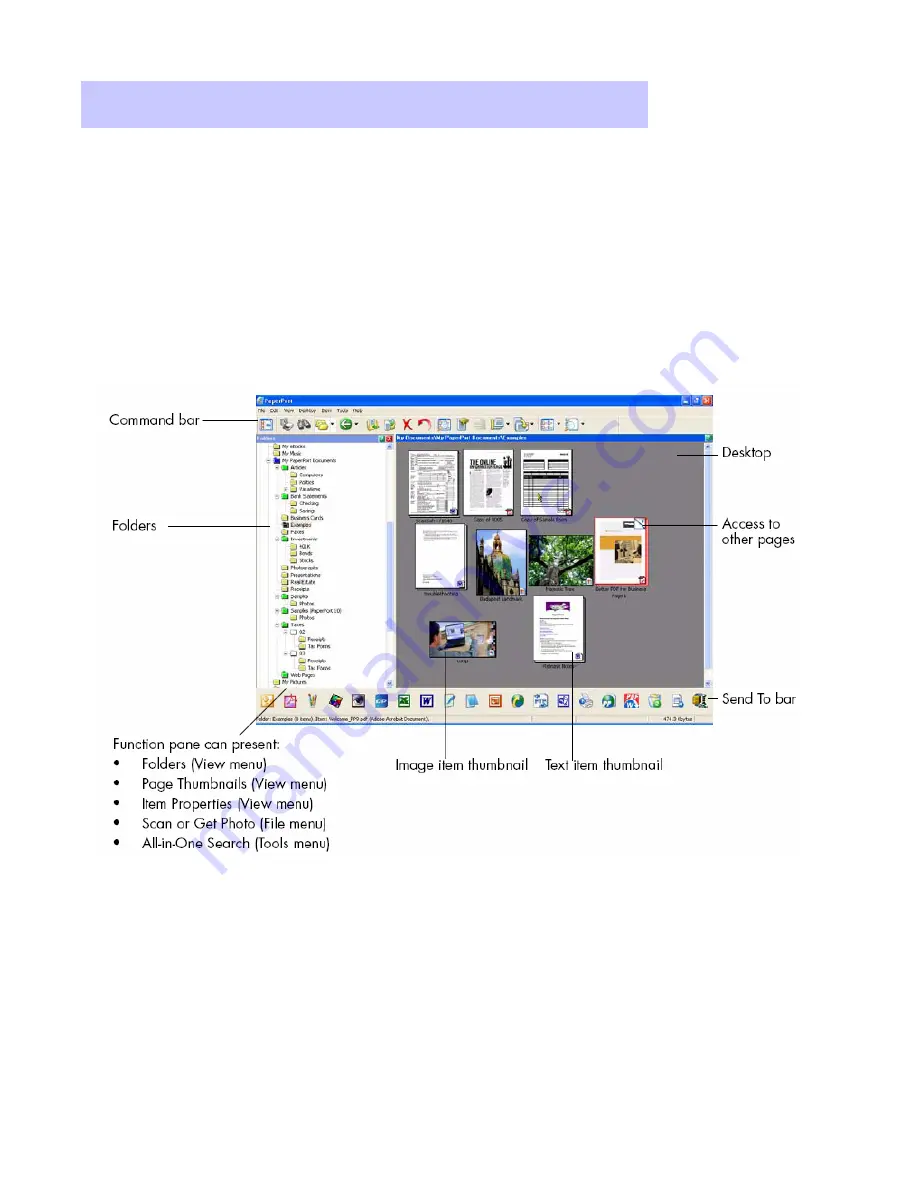
The PaperPort desktop appears with the Folders pane when you first
start the program. It displays your documents, as well as the tools you
can use to manage them. PaperPort offers all the tools necessary to
organize, find, and use documents, images, and PDF files.

Introducing the PaperPort Desktop

Introducing the PaperPort Desktop

Summary of Contents for Scan to PC Desktop Professional

Page 1: ...on the Desktop Combining Documents on the Desktop Maximizing Your Productivity with Scanning and Your Xerox WorkCentre Pro Multifunction Device Scan to PC Desktop Professional Scan to PC Desktop Professional Workgroup Edition v8 Workgroup Edition v8 Orientation Guide Orientation Guide Training Topics Creating PDF Files Creating Secure PDF Files Creating Text Searchable PDF Files PDF Editing Managi...

Page 2: ...dvanced Topics Advanced OCR Create Audio Documents from Paper and Digital Documents OCR Batch Processing Paper to Digital Forms Conversion PDF Batch Conversion Advanced Topics will not be covered in Nuance s web based Scan to PC Desktop End User Training Sessions unless specifically requested ...

Page 3: ...anning to the Desktop Scanning at the Xerox WorkCentre Pro 1 Load the paper into the document feeder on the Xerox WorkCentre Pro 2 Select Network Scanning from the control screen 3 Select your template from the list OR Use the scan to email feature to email the scanned images to yourself as an email attachment 4 Press the green Start button Walk back to your PC and Image Retriever will deliver the...

Page 4: ...rom the Image Retriever Settings window select the desired settings for the Image Retriever tool From the Watch Settings select if you would like Image Retriever to monitor your email inbox a network folder or both You can adjust the Image Retriever Settings to control how scanned images are delivered to your PC Starting Image Retriever Adjusting Image Retriever Settings Select the interval with w...

Page 5: ...sktop appears with the Folders pane when you first start the program It displays your documents as well as the tools you can use to manage them PaperPort offers all the tools necessary to organize find and use documents images and PDF files Introducing the PaperPort Desktop Introducing the PaperPort Desktop ...

Page 6: ...window Your newly added folder will appear at the bottom of the Folder Pane Folders can be color coded to aid in organization by selecting the folder in the Folder Pane right click on the mouse and selecting Properties from the drop down menu Working with Documents from Any Folder Working with Documents from Any Folder PaperPort folders are simply Windows folders that you want to use with PaperPor...

Page 7: ...lit Desktop A horizontal splitter will appear which is moveable 2 Place the cursor on the splitter and drag the splitter up and down to the desired location Page Thumbnails The Page Thumbnails pane displays the page thumbnails of a selected PDF file in Desktop View 1 Click once on the PDF file to select it 2 Go to View Page Thumbnails Each page of the PDF file will be displayed in the left pane 3 ...

Page 8: ...ecting the icons on the left vertical column of the Page View or by selecting Annotation from the Menu Bar 3 To save the annotations with your image just select the Desktop icon and select Yes to save the annotations Working with ePaper on the Desktop Working with ePaper on the Desktop ePaper is represented on the PaperPort desktop as PDF files The PaperPort desktop displays all files as visual th...

Page 9: ...Select documents or images that you want to combine using the mouse and holding down the Control key at the same time These items can be different file types For example you could select a MS Word and MS Excel file 2 Right click and select Combine Items into PDF Select both images you want to combine using the mouse and holding down the Control key at the same time Then select the Stack icon from ...

Page 10: ...ses 1 PaperPort Professional 10 includes a Print Driver that enables you to print a PDF file from any desktop application directly to the PaperPort desktop or to the location of your choice 2 From within the desired application go to File Print and then select ScanSoft PDF Create as your printer 3 To specify additional properties for the file when using ScanSoft PDF Create click the Properties but...

Page 11: ...her use of the file is possible without any restrictions PDF Security from the PaperPort Desktop 1 To control PDF Security Settings from the PaperPort Desktop right click on the PDF and select PDF Security 2 From the PDF Security window check the options to control opening printing or editing the PDF file 3 Click on OK to activate your security settings for the PDF file PDF Security from the PDF C...

Page 12: ...t File from the Menu Bar and Save As from the drop down menu 3 In the Save FileName As window select the location where you want to save the text searchable PDF file name the file select PDF Searchable Image as the file type and then click on Save Creating Text Searchable PDF Files Creating Text Searchable PDF Files 4 PaperPort and OmniPage will then automatically convert your scanned image into a...

Page 13: ... click on the file from the search results list and you will be taken to the thumbnail view of that file on your PaperPort Desktop Managing Documents at the Desktop Managing Documents at the Desktop With PaperPort Professional 10 you can organize and index all of your scanned image files and text based documents Using PaperPort s All in One Search tool finding the file that you need is as simple a...

Page 14: ...he SendTo Bar FormTyper will detect where the underlines are on the form and underline them in blue You can also add additional fields by selecting Place Manually from the Fields menu 3 Click on one of the blue underlines and begin typing in text To move to the next field press the Tab key 4 Save the form back to the PaperPort Desktop by going to Save to PaperPort Desktop As from the Form menu Nam...

Page 15: ...asic Text Capture from the Desktop In both Basic Text Capture and Document Conversion the text and paragraphs in the document will be retained When using Basic Text Capture all of the document s formatting and layout will be lost The formatting and layout will be retained in Document Conversion All embedded images will be removed when using Basic Text Capture Embedded images will be retained with ...

Page 16: ...Scan to PC Desktop Professional Workgroup Edition v8 Orientation Guide 16 Introducing the OmniPage Desktop Introducing the OmniPage Desktop Standard Toolbar Menu Bar OmniPage Toolbox Original Image View Text Editor View ...

Page 17: ...n from the OmniPage Toolbox 4 Select Finish Processing Existing Pages 5 OmniPage will now perform OCR on your image file and convert the scanned image into editable text 6 Use the OCR Proofreader to correct any words that OmniPage is not sure that it recognized correctly Select OK when Proofreading is complete 7 Select the Look In location File Name and Files of type MS Word from the Save As windo...

Page 18: ...an to PC Desktop Professional Workgroup Edition v8 Orientation Guide 18 Advanced Topics Advanced Topics will not be covered in Nuance s web based Scan to PC Desktop End User Training Sessions unless specifically requested ...

Page 19: ...e Text Editor 5 If OmniPage did not properly recognize some parts of the document use the tools in the Image Panel to adjust the size or change the type of Text Graphics and Table zones 6 When you have finished modifying the zones click on the 2 Automatic button to re recognize the document 7 Select Yes to re recognize the document 8 Click on the 3 Save to File button in the OmniPage Toolbox Repur...

Page 20: ...ave Audio Converter as the output format under Files of Type 6 Click the Options button to specify the speed and voice to be used for creating the audio file Please note that selecting a voice using a language other than that of the original document will not cause translation of the file to occur The audio created by mixing the text and the voice languages would sound like gibberish to a native s...

Page 21: ...rrent in the Start Time drop down menu and check the Delete Input Files checkbox Click Next 4 On the Job Recurrence window select the Start Time and your preferred Recurrence Pattern Click Next 5 Select Fresh Start Click Next 6 There are a number of options available for the input files In most cases these files will have been scanned to a local or a network folder In that case select Load Files O...

Page 22: ...lect Recognize Images Click Next 10 Set the appropriate languages and dictionaries for the documents to be processed Click Next 11 In this step the save location is selected Choose the appropriate location for the files The most common option is to select Save Click Next 12 From the File Type menu select PDF with Image on Text For naming options select Use input file names Select the entire list u...

Page 23: ...DF form PDF Batch Conversion PDF Batch Conversion Batch conversion to PDF 1 Open the PDF Create Assistant by going to Start All Programs ScanSoft PDF Create 2 0 PDF Create Assistant 2 Drag and drop documents and images into the PDF Create Assistant window 3 From the drop down menu select to Create One PDF per file or to Combine into one PDF document 4 Click on the PDF Create button and you will be...

Reviews: