Xerox PHASER Phaser 4400 Paper Manual Download Page 25

Specialty Printing

Phaser™ 4400 Laser Printer

19

Manual 2-sided printing

If the printer doesn’t have a duplex unit or if you need to duplex paper sizes or weights outside the 
duplex unit’s limits, you can still have the printer print on both sides of the paper. However, you must 
have the printer print all of the odd-numbered pages first, reinsert the printed pages in the tray, then 
have the printer print the even-numbered pages.

You can use Trays 1, 2, or 3 or the Multi-Purpose Tray for manual 2-sided printing.

Guidelines for manual 2-sided printing

The application you are printing from must provide an option for printing odd pages and even 
pages separately. 

The paper must have a weight of 60 – 216 g/m

2

 (16 – 80 lb.).

Do not use envelopes, labels, or transparencies.

Manual 2-sided printing using Trays 1, 2, or 3

Printing the odd-numbered pages

1. 

Insert a stack of paper into the tray. For more information, refer to the 

Trays

 section of the 

Trays and Paper Guide

 on the 

Interactive Documentation CD-ROM

.


The paper size can be 

Letter

Legal

Executive

US Folio

A4

B5 JIS

A5

, or 

Custom

 sizes 

between 98 – 216 mm (3.87 – 8.5 in.) wide and 148 – 356 mm (5.83 – 14.0 in.) long.

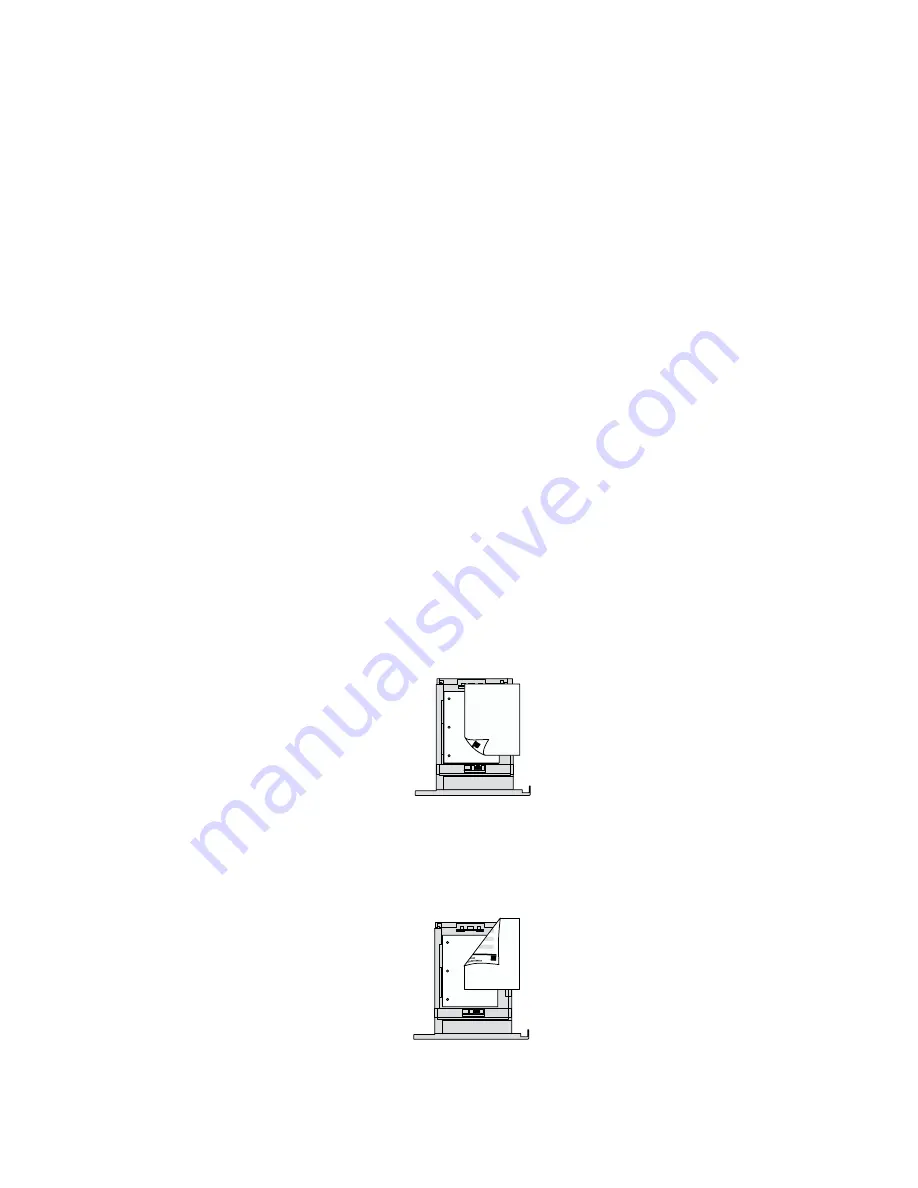
Portrait orientation: 
Place the side to be printed with odd-numbered pages 

facedown

 with the top of the page at 

the 

front

 of the tray. Prepunched holes should be toward the 

left

 of the printer.

Landscape orientation:
Place the side to be printed with odd-numbered pages 

facedown

 with the top of the page on 

the 

left

. Prepunched holes should be toward the 

left

 of the printer.

P4400-90

P4400-109

Summary of Contents for PHASER Phaser 4400

Page 1: ...P h a s e r L a s e r P r i n t e r 4400 Trays and Paper Guide ...

Page 2: ...by the Hoefler Type Foundry ITC Avant Guard Gothic ITC Bookman ITC Lubalin Graph ITC Mona Lisa ITC Symbol ITC Zapf Chancery and ITC Zapf Dingbats are registered trademarks of International Typeface Corporation Bernhard Modern Clarendon Coronet Helvetica New Century Schoolbook Optima Palatino Stempel Garamond Times and Univers are trademarks of Linotype Hell AG and or its subsidiaries MS DOS and Wi...

Page 3: ...utomatically using the Multi Purpose Tray 17 Manual 2 sided printing 19 Guidelines for manual 2 sided printing 19 Manual 2 sided printing using Trays 1 2 or 3 19 Manual 2 sided printing using the Multi Purpose Tray 22 Transparencies 25 Guidelines for printing on transparencies 25 Printing transparencies from Tray 1 2 or 3 25 Printing transparencies from the Multi Purpose Tray 26 Envelopes 27 Guide...

Page 4: ...nd at the bottom of the page Print these pages at the printer s front panel Accessing the Paper Tips page Access the Paper Tips page from the Printable Pages Menu 1 At the front panel scroll to the Printable Pages Menu using the Down Arrow or Up Arrow key and press the OK key 2 Scroll to Print Paper Tips Page using the Down Arrow or Up Arrow key and press the OK key Menu Map For a complete list of...

Page 5: ...opes Monarch 3 87 x 7 5 in C5 162 x 229 mm Transparencies Letter 8 5 x 11 in A4 210 x 297 mm Capacity 2 Multi Purpose Tray Envelope Feeder Standard Tray 500 Sheet Stacker Input Output 10 Commercial 4 12 x 9 5 in DL 110 x 220 mm B5 176 x 250 mm A4 210 x 297 mm Labels Letter 8 5 x 11 in 1 1 1 1 1 1 1 1 1 1 1 1 1 1 1 1 1 1 1 1 1 1 1 1 1 custom 1 custom 1 custom 1 custom 1 custom 1 custom 1 custom 1 c...

Page 6: ...es with windows or metal clasps Label media should be fanned prior to loading Do not print to label stock once a label has been removed Page 2 of 3 Simplex Duplex two sided 550 Sheet Tray 182 216 mm 257 356 mm 10 12 14 0 in Multi Purpose Tray 182 216 mm 7 16 8 5 in 257 356 mm 10 12 14 0 in Envelope Feeder Standard Tray 500 Sheet Stacker Length Width Length 148 356 mm 127 356 mm 148 254 mm 127 356 ...

Page 7: ...lio 8 5 x 13 in 3R725 Xerox 4024 DP legal Legal 8 5 x 14 in 3R727 Transparencies Xerox 3M Type L transparencies A4 210 x 297 mm 3R91334 Xerox Clear transparencies Letter 8 5 x 11 in 3R4446 Labels Xerox A4 24 up label A4 210 x 297 mm 3R96178 Xerox Multi purpose 30 up label Letter 8 5 x 11 in 3R12051 Replaceable Items Item Part Number Standard Capacity Print Cartridge 113R00627 High Capacity Print C...

Page 8: ...eptable papers transparencies envelopes and labels that can be used in each tray refer to the Supported Papers section of the Trays and Paper Guide on the Interactive Documentation CD ROM Note Do not load the tray that is currently being used for printing Videos are available with instructions for loading trays Videos are located on the Interactive Documentation CD ROM or the Xerox web site www xe...

Page 9: ...b Gently remove the tray from the printer while lifting up c Place the tray on a flat surface If you are loading paper of the same size skip to Step 5 2 Gently squeeze the length guide and slide it all the way to the rear of the tray Note If you change the type of paper or transparencies you MUST specify the type on the front panel of the printer P4400 011 P4400 13 ...

Page 10: ...Choose the one that is closest beyond the length of the paper a Press the square latch b Slide out the back of the tray to fit your paper 4 Gently squeeze the side guides and slide them all the way to the sides of the tray 5 To reduce the possibility of misfeeds and jams fan the stack of paper before inserting it into the tray P4400 14 a b P4400 15 ...

Page 11: ...ex instructions below Top view of tray A Simplex printing B Duplex printing 7 While squeezing the right side of the guides handle adjust the guides to the paper width Note To avoid misfeeds and jams make sure that the stack is placed at the center of the tray and adjust the side guides to the correct size P4400 16 P4400 17 B A P4400 18 ...

Page 12: ...gth Note To avoid paper jams or incorrect paper size sensing make sure the length guide stopper is firmly seated in the floor of the tray Also make sure the paper is under the retaining clip on the length guide 9 Insert the tray completely into the printer Make sure that it is properly seated P4400 19 P4400 20 ...

Page 13: ...ss the OK key to save your selection Loading paper in the Multi Purpose Tray To load paper in the Multi Purpose Tray 1 Open the Multi Purpose Tray door by pulling the latch at the top center Caution To prevent possible damage to the Multi Purpose Tray do not exert strong pressure on it or place any heavy objects on it Note If you change the type of paper or transparencies you MUST specify the type...

Page 14: ...he guides correctly and do not overload the tray 3 To reduce the possibility of misfeeds and jams fan the stack of paper before inserting it into the tray 4 Align the four corners of the paper and place it into the tray with the side to be printed facing up Note Be sure to insert the paper all the way in until it gently touches the stopper inside the printer P4400 24 P4400 25 ...

Page 15: ...ts you and you haven t changed the type or size of paper press the OK key to accept the current settings for type and size 6 If you have changed the type or size of paper a On the printer s front panel scroll to Change Paper Type by pressing the Down Arrow key and press the OK key b Scroll to the correct paper type and press the OK key to save your selection c Scroll to Change Paper Size and press...

Page 16: ...also be used to feed card stock such as A6 postcards Note Some envelopes may curl or wrinkle even with the envelope feeder For best results test a few envelopes to determine what works best for you 1 Pull out the envelope feeder tray if it is not already extended 2 Pinch the release tab on the right width adjuster and move the width adjusters to the outside P4400 27 P4400 28 ...

Page 17: ...ey can damage the printer Damage caused by using unsupported envelopes might not be covered by your printer s warranty 4 Lower the envelope holder onto the envelopes Note If you change the size or type of envelopes while the front panel displays a Load Envelope Feeder message the printer automatically sets the menus to the size and type in the Load message 5 If the front panel prompts you and you ...

Page 18: ...lopes a Press the Down Arrow key to scroll to Change Paper Type then press the OK key b Scroll to the correct paper type usually Envelope and press the OK key to save your selection c Scroll to Change Paper Size then press the OK key d Scroll to the correct envelope size and press the OK key to save your selection ...

Page 19: ...so can load custom sized paper in the Multi Purpose Tray and in the Envelope Feeder Loading custom size paper in Trays 1 2 or 3 1 Open the tray 2 Insert the custom size paper and adjust the guides to match the size of the paper Top view of tray A Simplex printing B Duplex printing 3 When the front panel prompts you to confirm the type of paper scroll to the correct paper type and press the OK key ...

Page 20: ...he trays contain size sensors that automatically inform the printer about the paper size However when you insert custom size paper in the tray and change Custom Size to On the size sensors are turned off and you must enter the X and Y values as described in Step 4 on the previous page If you later insert standard size paper in the tray you must turn on the tray sensors again by changing Custom Siz...

Page 21: ... Scroll to the correct paper type and press the OK key to save your selection a Scroll to Change Paper Size and press the OK key b Scroll to Custom and press the OK key c Scroll to Set Custom X and press the OK key d Press the Down Arrow or Up Arrow key to scroll to the value for X and then press the OK key The X value is the measurement from the left to the right of the paper in the tray e Scroll...

Page 22: ... 28 lb bond The paper size can be Letter Legal Executive US Folio A4 B5 JIS and Custom sizes between 182 216 mm 7 16 8 5 inches wide and 257 356 mm 10 12 14 0 inches long The paper type must be Plain Paper Card Stock not exceeding the weight limits listed above Letterhead Colored Paper or Special Caution DO NOT use transparencies envelopes or labels for automatic 2 sided printing Any damage caused...

Page 23: ...he printer 2 In the printer driver Select the tray containing the paper Select the orientation Select 2 sided printing Refer to the table on page 18 for instructions and the wording used in the printer drivers 3 Send the job to the printer Printing 2 sided pages automatically using the Multi Purpose Tray 1 Insert a stack of paper into the tray For more information refer to the Trays section of the...

Page 24: ...PostScript PCL5e PCL6 1 From the File menu select Print 2 Click the Properties button 3 On the Setup tab select Print on 2 Sides 4 Check or uncheck Bind on Top Edge Windows 2000 or Windows XP PostScript PCL5e 1 From the File menu select Print 2 Click the Properties button 3 On the Layout tab under Print on Both Sides Duplex select either Flip on Long Edge or Flip on Short Edge Windows NT PostScrip...

Page 25: ...er must have a weight of 60 216 g m2 16 80 lb Do not use envelopes labels or transparencies Manual 2 sided printing using Trays 1 2 or 3 Printing the odd numbered pages 1 Insert a stack of paper into the tray For more information refer to the Trays section of the Trays and Paper Guide on the Interactive Documentation CD ROM The paper size can be Letter Legal Executive US Folio A4 B5 JIS A5 or Cust...

Page 26: ...t place the last page odd numbered page back into the tray Portrait orientation long edge binding Place the printed side faceup with the top of the page at the front of the tray the side to be printed is facedown Prepunched holes should be toward the right of the printer Portrait orientation short edge binding Place the printed side faceup with the top of the page at the back of the tray the side ...

Page 27: ...age on the left of the tray the side to be printed is facedown 2 In the printer driver Select the tray containing the paper as the paper source Do not select the option for 2 sided printing 3 In the application select the option to print even numbered pages 4 Send the job to the printer so that the even numbered pages are printed P4400 112 ...

Page 28: ...ctive Documentation CD ROM Portrait orientation Place the paper to be printed with odd numbered pages faceup and the top of the page entering the printer first Prepunched holes should be toward the left of the printer Landscape orientation Place the paper to be printed with odd numbered pages faceup and the top of the page on the left Prepunched holes should be toward the left of the printer 2 In ...

Page 29: ...de facedown with the top of the page entering the printer first the side to be printed is faceup Prepunched holes should be toward the right of the printer Portrait orientation short edge binding Place the printed side facedown with the top of the page entering the printer last the side to be printed is faceup Landscape orientation long edge binding Place the printed side facedown with the top of ...

Page 30: ...left the side to be printed is faceup 2 In the printer driver Select Multi Purpose Tray as the paper source Do not select the option for 2 sided printing 3 In the application Select the option to print even numbered pages Select the option to print pages in reverse order 4 Send the job to the printer so that the even numbered pages are printed P4400 107 ...

Page 31: ... 2 or 3 1 Insert the transparencies into the tray For more information refer to the Trays section of the Trays and Paper Guide on the Interactive Documentation CD ROM Don t load transparencies above the indicated mark on the tray 2 When the front panel prompts you to set the paper type press the Down Arrow key to scroll to Transparency and press the OK key to save your selection 3 In the printer d...

Page 32: ...ve the indicated mark on the Multi Purpose Tray 2 When the front panel prompts you to confirm or change the paper type and size a Press the Down Arrow key to scroll to Change Paper Type then press the OK key b Scroll to Transparency and press the OK key to save your selection c Scroll to Change Paper Size then press the OK key d Scroll to the correct transparency size and press the OK key to save ...

Page 33: ...e wrinkling Envelopes may wrinkle depending on weight and stiffness of the envelope Many applications include a tool for creating an envelope document For example Microsoft Word includes an Envelopes and Labels feature in the Tools menu Be sure to Select faceup Clear Clockwise Rotation Select the feed method with the image centered and the stamp on the envelope to the upper left Caution Never use ...

Page 34: ...the front panel prompts you to confirm or change the paper type and size a Press the Down Arrow key to scroll to Change Paper Type then press the OK key b Scroll to Envelope and press the OK key to save your selection c Scroll to Change Paper Size then press the OK key d Scroll to the correct envelope size and press the OK key to save your selection 3 In the printer driver select Envelope Feeder a...

Page 35: ...p Menu where is the number of the tray and press the OK key e If you don t see a selection for Set Custom X scroll to Custom Size and press the OK key to change Custom Size to On f Scroll to Set Custom X and press the OK key g Press the Down Arrow or Up Arrow key to scroll to the value for X and then press the OK key The X value is the measurement from the left to the right of the paper in the tra...

Page 36: ... the front panel prompts you to confirm or change the paper type and size a Press the Down Arrow key to scroll to Change Paper Type then press the OK key b Scroll to Envelope and press the OK key to save your selection c Scroll to Change Paper Size then press the OK key d Scroll to the correct envelope size and press the OK key to save your selection 3 In the printer driver select Multi Purpose Tr...

Page 37: ...the printer Store unused sheets of labels flat in their containers Rotate stock frequently Long periods of storage can cause the labels to curl and jam the printer Print only on one side of the sheet of labels Printing labels from Tray 1 2 or 3 1 If your application has a setting for labels use it as a template 2 Insert the sheets of labels into the tray For more information refer to the Trays sec...

Page 38: ...e to be printed faceup The top of the sheet should enter the printer first 3 When the front panel prompts you to confirm or change the paper type and size a Press the Down Arrow key to scroll to Change Paper Type then press the OK key b Scroll to Labels and press the OK key to save your selection c Scroll to Change Paper Size then press the OK key d Scroll to the correct label size and press the O...

Page 39: ...ss the OK key 4 Scroll to Job Defaults Menu and press the OK key 5 Select Set Paper Destination and press the OK key 6 Select either Standard Output Tray or Stacker and press the OK key The output goes to the default tray unless specifically changed in the printer driver Standard Output Tray Default output destination Holds 500 sheets 500 sheet Stacker with offset Optional output device for your p...

Page 40: ...utput The 500 sheet Stacker offsets output but you must have a hard drive to have the printer offset collated sets You can switch job offsetting on or off on the front panel 1 With Menus highlighted press the OK key 2 Scroll to Printer Setup Menu using the Up Arrow or Down Arrow key and press OK 3 Scroll to Job Defaults Menu and press the OK key 4 Scroll to Job Offset 5 Select either On or Off by ...

Page 41: ...ecify paper type 7 9 front panel prompts custom size in Multi Purpose Tray 15 custom size in tray 13 29 L labels loading 31 loading envelope feeder 27 Multi Purpose Tray 7 Tray 1 2 or 3 3 M manual 2 sided printing 19 Multi Purpose Tray loading 7 orientation 9 O offsetting output 34 ordering supplies 1 orientation Multi Purpose Tray 9 Tray 1 2 or 3 5 output 500 sheet stacker 33 offset 34 Standard O...

Page 42: ...se Tray 26 loading in Tray 1 2 or 3 25 Tray 1 2 or 3 changing paper type 7 loading 3 orientation 5 paper specifics 3 tray sensors turning on 14 tray usage 2 two sided printing driver selections 18 manual 19 W weight range automatic 2 sided printing 16 manual 2 sided printing 19 ...

Reviews: