background image

Parts List

Phaser® 3500 Laser Printer Service Manual

5-22

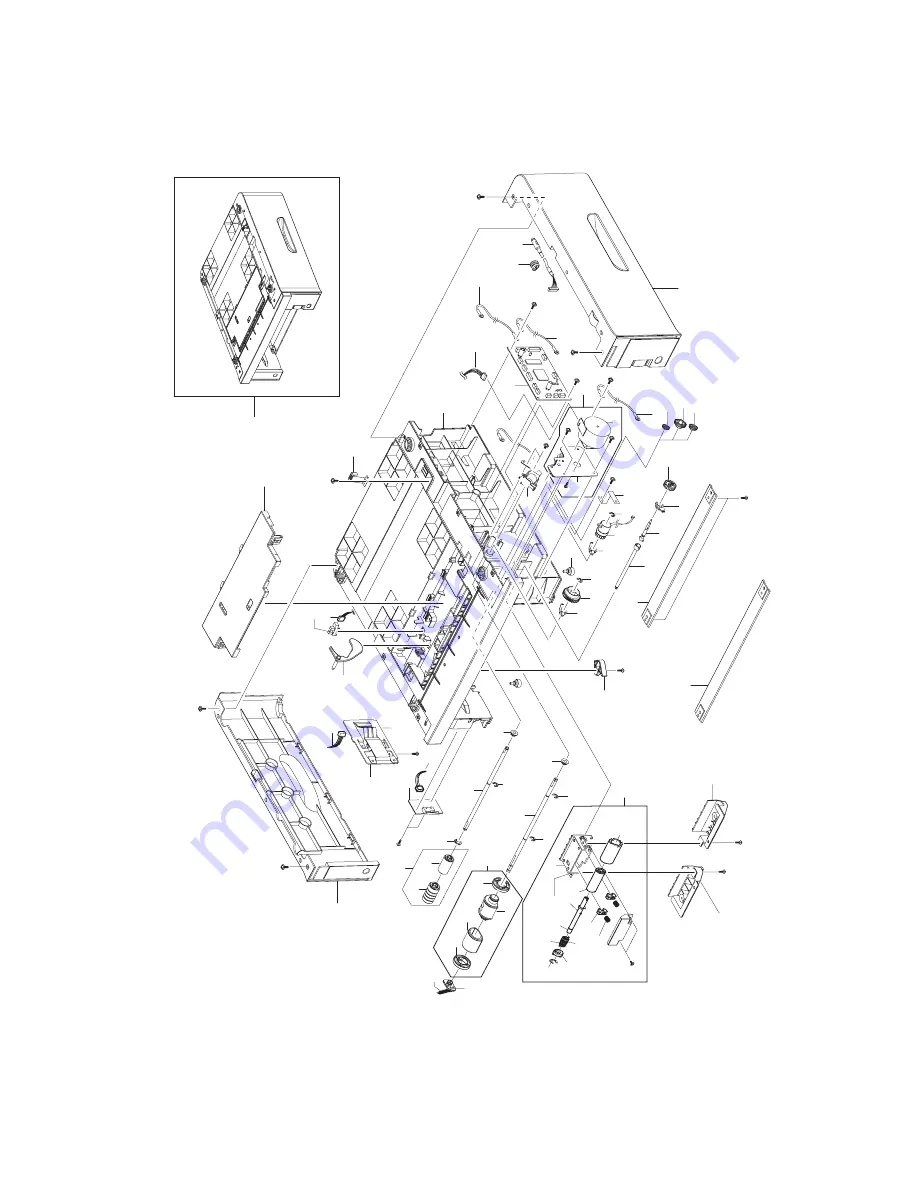
PL 8.10 Tray 3 Cassette

0

1

40

2

3

4

5

6

7

8

9

10

11

12

13

14

15

16

14

17

18

19

20

20

21

22

23

24

25

34-1

16

16

35

34-1

34-3

34-2

36

37

34

22-2

22-1

22-9

22-10

22-7

22-8

22-4

22-10

22

22-6

22-3

26

16

35

35

38-1

38-2

38

27

42

28

43

29

41

30

31

32

14

16

33

11

-2

11

-1

11

-5

11

-3

11

-4

22-1

1

Summary of Contents for PHASER 3500

Page 1: ...Phaser 3500 laser printer Service Manual ...

Page 2: ...naco New York and QuickDraw are trademarks of Apple Computer Inc in the United States and or other countries PCL and HP GL are trademarks of Hewlett Packard Corporation in the United States and or other countries IBM is a trademark of International Business Machines Corporation in the United States and or other countries Windows Windows NT and Wingdings are trademarks of Microsoft Corporation in t...

Page 3: ...tion Caution A caution statement indicates an operating or maintenance procedure practice or condition that if not strictly observed could result in damage to or destruction of equipment Warning A warning statement indicates an operating or maintenance procedure practice or condition that if not strictly observed could result in injury or loss of life Product Terms Caution A personal injury hazard...

Page 4: ...rface on or in the printer Use caution to avoid personal injury The surface is hot while the printer is running After turning off the power wait 30 minutes Avoid pinching fingers in the printer Use caution to avoid personal injury Use caution or draws attention to a particular component Refer to the manual s for information 0 30 min ...

Page 5: ...l a properly grounded outlet If the product loses its ground connection contact with conductive parts may cause an electrical shock Disconnecting Power Turning the power off using the On Off switch does not completely de engergize the printer You must also disconnect the printer power cord from the AC outlet Position the power cord so that it is easily accessible during servicing so that you may p...

Page 6: ...e the wrist strap before applying power to the unit to avoid potential shock After removing a static sensitive assembly from its anti static bag place it on a grounded conductive surface If the anti static bag is conductive you may ground the bag and use it as a conductive surface Do not use freon propelled chemicals as they can generate electrical charges that may damage some devices Do not remov...

Page 7: ...utlet between the supply conductors or between either supply conductor and ground A protective ground connection by way of the grounding conductor in the power cord is essential for safe operation Warning Labels Read and obey all posted warning labels Warning labels are displayed on potentially dangerous printer components As you service the printer check to make certain that all warning labels re...

Page 8: ... Warning Do not touch any electrical component unless you are instructed to do so by a service procedure Servicing Mechanical Components Caution When servicing mechanical components within the printer manually rotate drive assemblies rollers and gears Warning Do not try to manually rotate or manually stop the drive assemblies while any printer motor is running Warning This printer uses heat to fus...

Page 9: ... Tools 1 3 Cleaning 1 3 2 Repair Analysis Procedures Introduction 2 2 Accessing Fault History 2 2 Using the Troubleshooting Procedures 2 3 Service Diagnostics 2 4 Entering Service Diagnostics 2 4 Service Diagnostics Menu Map 2 5 Service Diagnostic Control Panel Button Descriptions 2 5 Troubleshooting Error Messages 2 10 Jam At Tray 1 2 3 Jam 0 2 11 Jam At Top Jam 1 2 11 Jam At Exit Jam 2 2 12 Jam ...

Page 10: ...surement Table 3 3 Control Panel Internal Test Print 3 4 Deletions 3 4 Fusing 3 4 Resolution 3 5 Registration and Skew 3 5 Skips or Smears 3 6 Image Quality Troubleshooting 3 7 No Image Blank Prints 3 7 Light Prints 3 7 Black Prints 3 8 Dark Image 3 8 Background Contamination 3 8 Ghosting 3 9 Non Uniform Image 3 9 Black Spots Marks 3 10 Spot or Vertical Deletions 3 10 Horizontal Bands 3 10 Charact...

Page 11: ...ve Assembly 4 25 Tray 1 Pick Up Assembly and Pick Rollers 4 26 Tray 1 Pick Roller Only 4 26 Pick Roller and Shaft Removal 4 27 Tray 2 Pick Up Assembly and Rollers 4 29 Feed 2 Unit 4 32 Developer Drive Assembly 4 33 Connector Board 4 34 Tray 1 MPT Solenoid 4 35 Main Solenoid 4 36 Fuser Assembly 4 37 Exit Solenoid Assembly 4 38 Exit and Duplex Rollers 4 39 Exit Gear 4 40 Tray Full Actuator 4 40 Dupl...

Page 12: ... Parts List Table 5 23 PL 8 11 Duplex Assembly 5 25 PL 8 11 Parts List Table 5 26 6 General Information and Specifications Printer Configurations 6 2 Printer Options and Supplies 6 2 Consumable and Service Part Life Expectancy 6 3 Parts of the Printer 6 4 Front View 6 4 Rear View 6 4 Control Panel 6 5 Menu Map 6 5 Error and Warning Messages 6 5 Printer Specifications 6 6 Printer Location and Clear...

Page 13: ...ons 8 6 Imaging 8 6 Print Cartridge 8 6 Laser Scan Unit LSU 8 7 Transfer Roller 8 7 Fuser Assembly 8 7 Sensor Functions 8 8 Paper Empty Sensor 8 8 Tray 1 Paper Empty Sensor 8 8 Registration Sensor 8 8 Fuser Exit Sensor 8 8 Cover Open Sensor 8 8 Duplex Unit Sensor 8 8 Printer Controls 8 9 Image Processor Function 8 9 Print Engine Control 8 9 Main Board 8 10 Power Supply 8 11 Paper Size Control 8 12...

Page 14: ...Phaser 3500 Laser Printer Service Manual 2 1 This section includes the following Servicing Instructions on page 1 2 Service Preventive Maintenance Procedure on page 1 3 Service Call Procedures ...

Page 15: ...ed properly 7 Remove the Print Cartridge and protect it from light then inspect the printer interior and remove any foreign matter obstructions or loose toner 8 Inspect the interior of the printer for damaged wires loose connections toner leakage and damaged or obviously worn parts Do not use solvents or chemical cleaners to clean the printer interior Do not use any type of oil or lubricant on pri...

Page 16: ... Tools Toner vacuum cleaner Clean water Clean dry lint free cloth Black light protective bag Cleaning Never apply alcohol to any parts in the printer Never use a damp cloth to clean up toner If you remove the Print Cartridge place it in a light protective bag Exposure to light can degrade its performance and result in early failure 1 Record number of sheets printed 2 Print several sheets of paper ...

Page 17: ...1 This section includes the following Introduction on page 2 2 Service Diagnostics on page 2 4 Troubleshooting Error Messages on page 2 10 General Troubleshooting on page 2 17 Power Supply Troubleshooting on page 2 18 Repair Analysis Procedures ...

Page 18: ...ol Panel 1 View the printer s fault history on the Control Panel a Go to Troubleshooting Service Tools Fault History or Jam History If the printer is connected to a network and has a TCP IP address you can view the printer s web page using a web browser b Open a web browser c Enter the printer s IP address as the URL d Select the Troubleshoot link and the fault history will be displayed Fault Hist...

Page 19: ...ng parts of the printer 4 The action is followed by a question If your response to the question is Yes then follow the instructions for a Yes reply If your response to the question is No then follow the instructions for a No reply 5 Troubleshooting Procedures may ask you to take voltage readings or test for continuity at certain test points within the printer For detailed diagrams see Section 7 Wi...

Page 20: ...s Service diagnostics are to be executed through the control panel by a certified service technician only The printer must be rebooted to enter Service Diagnostics Entering Service Diagnostics 1 Turn the printer power OFF 2 Hold down the OK button and turn the printer back ON 3 Continue to hold the button until the following mesage is displayed on the Control Panel Diagnostic Mode Press Menu Key a...

Page 21: ...tered by the user Main Menu Sub Menu Description Function Control Panel Display Optins Interface Tray 3 Interface Tests the interface between the main controller and the Tray 3 interface board Tray 3 Interface Pass Fail x x x Duplex Interface Tests the interface between the main controller and the duplex interface board Duplex Interface Pass Fail x x x Test Pattern Simplex Prints the test print pa...

Page 22: ...tton is pressed and stops when the Cancel button is pressed Main Fan Running Test ON OFF SMPS Fan SMPS fan runs when the OK button is pressed and stops when the Cancel button is pressed SMPS Main Running Test ON OFF Duplex Fan Duplex fan runs when the OK button is pressed and stops when the Cancel button is pressed Duplex Fan Running Test ON OFF Solenoid Clutch Tray 1 Solenoid When the OK button i...

Page 23: ... out Tray 1 and manually toggle the actuator Tray 1 W Out Paper or With Paper T2 NP Sensor Pull out Tray 2 and manually toggle the actuator Tray 2 W Out Paper or With Paper T3 NP Sensor Pull out Tray 3 and manually toggle the actuator When Tray 3 is not installed this function does not work Tray 3 W Out Paper or With Paper Tray 3 Not Installed Duplex Sensor With the rear cover open push a piece of...

Page 24: ...ON OFF Transfer Roll Positive Transfer Voltage 1200V is supplied when OK is pressed and goes off when Cancel is pressed d is the value of the ADC Transfer Roll d ON OFF Transfer Roll Negative Transfer Voltage 800V is supplied when OK is pressed and goes off when Cancel is pressed Measure voltage with a DMM if required Transfer Roll ON OFF Pre transfer Lamp PTL PTL turns on when OK is pressed and g...

Page 25: ... arrow buttons Press the OK button The target temperature and the real temperature will be displayed on the bottom line Default is T 190 Note You can adjust the temperature value while in diagnostics however once you exit the temperature will return to the default Target Current T 190 C XX Read OPC Cycle The total rotating number of the OPC drum is displayed on the bottom line of the control panel...

Page 26: ... sensor cannot be ON page 2 11 Jam At Exit JAM 2 The trailing edge of the paper passes the registration sensor but the paper does not pass the exit sensor in the specified time page 2 12 Jam at Rear Duplex JAM 1 The trailing edge of the paper passes the exit sensor but does not reach the duplex sensor in the specified amount of time page 2 12 Jam at Duplex Duplex JAM 2 The leading edge of the pape...

Page 27: ... 5 1 Use service diagnostics to checkthe operation of the tray solenoids 2 Do the tray solenoids operate correctly Go to Step 6 Replace the inoperative solenoid 6 1 Use service diagnostics to check the operation of the Regi Clutch and Feed Clutch 2 Do the clutches operate correctly Go to Step 7 Replace the defective clutch 7 1 If paper feeds into the printer and the Jam error message appears use s...

Page 28: ...ller Assembly Go to Step 3 3 1 Visually inspect the Fuser 2 Is there paper wrapped around the Fuser rollers Remove obstruction and clean Fuser rollers Go to Step 4 4 1 Is the Fuser Assembly operational 2 Do the Fuser gears rotates when the Main motor is on Go to Step 5 Replace the Fuser Assembly 5 1 Use the embedded diagnostics to check the Exit Sensor 2 Is the sensor operational Replace Main Boar...

Page 29: ...he sensor operate correctly Go to Step 6 Replace the exit sensor and or actuator 6 1 Inspect the exit and duplex roller assemblies 2 Are the rollers damaged or binding Replace the exit or duplex roller as necessary Go to Step 7 7 1 Inspect the duplex assembly for damage Replace the duplex assembly Go to Step 8 8 1 Does the Feed Roller Assembly operate properly without binding Replace Main Board Re...

Page 30: ...2 Does the problem still occur Replace the Main Board Replace the Power Supply Board Step Action and Questions Yes No 1 1 Open the top cover and ensure that the Print Cartridge is properly seated 2 Does the error clear after reseating the cartridge Complete Go to Step 2 2 1 Check the Print Cartridge for damage 2 Does the cartridge contain toner and appear to be operating properly Go to Step 3 Repl...

Page 31: ...ics to test the cover open sensor 2 Does the sensor function properly Replace the Main Board Replace the Sensor Step Action and Questions Yes No 1 1 Does the error report Fuser Failure Go to Step 2 Go to Step 3 2 1 Check the thermistor 2 Is the circuit open Replace the Fuser Replace the Main Board 3 1 Check the line voltages across the thermostats 2 Are they open Replace the Fuser Go to Step 4 4 1...

Page 32: ...place the Laser Unit Replace the Main Board Step Actions and Questions Yes No 1 1 Check the Output Tray sensor and actuator for obvious damage 2 Is the actuator damaged Replace the actuator Go to Step 2 2 1 Use diagnostics to test the output tray sensor 2 Does the sensor operate correctly Replace the Main Board Replace the Output Tray Sensor Step Actions and Questions Yes No ...

Page 33: ... plugged into both the printer and the grounded three prong AC outlet with the appropriate power available 2 Ensure that all covers are securely closed 3 Verify the Top Cover Print Cartridge and Fuser interlocks are functional 4 Verify voltages at the Main Board see Power Supply Troubleshooting on page 2 18 5 Replace the Power Supply Board 6 Replace the Main Board 7 Replace the Control Panel Contr...

Page 34: ...cord for defects damage or a loose connection 3 Check the AC switch harness for continuity 4 Verify the Power Supply is operating correctly Taking Voltage Measurements To locate connectors or test points refer to Wiring Data on page 7 1 for more information Unless otherwise specified the following voltage tolerances are used within this section Stated Measured 3 3 VDC 3 135 to 3 465 VDC 5 0 VDC 4 ...

Page 35: ...rinter Service Manual 3 1 This section covers the following Image Quality Problems Overview on page 3 2 Control Panel Internal Test Print on page 3 4 Image Quality Troubleshooting on page 3 7 Image Quality Troubleshooting ...

Page 36: ...bleshooting an image quality problem Use an unopened ream of approved media for evaluating image quality problems Note See the approved media list Media and Tray Specifications on page 6 9 for media that has been tested and approved for use with the Phaser 3500 Laser Printer Generate the Control Panel Internal Test Print on page 3 4 and see if the image quality problem still exists When analyzing ...

Page 37: ...ide of the printed page simplex mode Light Prints Repeating Defects Spots on Image Fuser Hot or Cold Offsetting Repeating Defects Voids Repeating Defects Measurement Table Assembly Component Distance between Defects Typical Defect Print Cartridge Developer Roller 50 mm 1 97 in Horizontal image band Drum 94 mm 3 70 in White spots on black image or black spots on white Drum Charge Rollers 38 mm 1 50...

Page 38: ...se guidelines when generating the test print Use supported paper from a fresh unopened ream Print five copies of the test print Discard the first two prints and retain the remaining prints for image quality analysis Deletions Inspect the test print for the presence of deletions or unprinted spots If these are found see Spot or Vertical Deletions on page 3 10 Fusing Rub the image three times at the...

Page 39: ...tches should be uniform in appearance If the image does not meet the criteria see Non Uniform Image on page 3 9 or Character Defects on page 3 10 Registration and Skew Fold the paper from two consecutive test prints in half first side edge to side edge and then top edge to bottom edge Observe the fold lines with reference to the crosshairs of the printed target The fold line should be aligned perp...

Page 40: ...ual 3 6 Skips or Smears Check the test print in the indicated areas for loss stretching or distortion of the image in bands across the process direction that make the image seem distorted blurred or compressed If these faults are observed see Skips Smears on page 3 11 ...

Page 41: ...me 4 Ensure the feed solenoid is functioning properly 5 Replace in the following order Print Cartridge Main Board Power Supply Board Laser Assembly Light Prints All areas of the print are light with no ghosting Unsupported Media paper Seal tape or shipping restraint was not removed from the cartridge Incorrect Control Panel settings Low toner Transfer Roller Laser contamination or obstruction Inco...

Page 42: ...or the Print Density menu is not set to dark 2 Verify that the high voltage contacts are operational and make good contact with the print cartridge 3 Replace the following in order Print Cartridge Power Supply Board Laser assembly BackgroundContamination Uniform toner contamination in non image area Media paper Operating environment Print Cartridge Transfer Roller Incorrect High Voltage outputs 1 ...

Page 43: ...ly Board Non Uniform Image The Line darkness and solid area density image vary across the print Print Cartridge Print Cartridge grounding Unstable high voltage output Transfer Roller contamination Laser Window or optic contamination 1 Ensure that Cartridge is not out of toner Inspect Drum for deterioration or contamination 2 If defective replace the Print Cartridge 3 Verify Print Cartridge ground ...

Page 44: ...y 94 mm replace Print Cartridge NOTE See Repeating Defects on page 3 3 for defect pitch 4 Remove the Transfer Roller and clean dust off If deletions repeat every 56 mm replace Transfer Roller Horizontal Bands Dark bands appearing in the horizontal direction Print Cartridge Fuser Assembly Transfer Roller Incorrect high voltage outputs Laser Assembly 1 Replace the Print Cartridge 2 Inspect clean rep...

Page 45: ...4 Inspect paper transportation areas for proper operation 5 Inspect clean replace Fuser assembly as necessary Skips Smears Skips loss or stretching of the image in bands across the process direction Smears the distortion of the image in bands across the process direction Causes image to appear blurred or compressed Paper transportation Main drive motor assembly Fuser Assembly Print Cartridge 1 Ins...

Page 46: ...ly and Registration Feed Clutch on page 4 24 Tray 1 Pick Up Assembly and Pick Rollers on page 4 26 Tray 2 Pick Up Assembly and Rollers on page 4 29 Developer Drive Assembly on page 4 33 Connector Board on page 4 34 Tray 1 MPT Solenoid on page 4 35 Main Solenoid on page 4 36 Fuser Assembly on page 4 37 Exit Solenoid Assembly on page 4 38 Exit and Duplex Rollers on page 4 39 Laser LSU Assembly and L...

Page 47: ... to reinstall a part simply reverse the Removal Procedure shown In some instances the Replacement Procedure is included because it may contain special steps For specific assemblies and parts see Parts List on page 5 1 Standard Orientation of the Printer When needed the orientation of the printer is called out in the procedure for locating printer parts Refer to the printer orientation graphic for ...

Page 48: ...Phaser 3500 Product Training CD ROM Note Part names that appear in the disassembly procedures may not exactly match the names that appear in the Parts List For example a part called the Registration Transport Assembly may appear on the Parts List as Assembly Transport Regi Caution Many parts are secured by plastic tabs DO NOT over flex or force these parts Do not over torque the screws threaded in...

Page 49: ...the Duplex Unit 3 Remove the 2 rear screws securing the Right Cover to the rear of the printer Note In the next step ensure the power switch is in the OFF position in order to free the Right Cover 4 Slide the Right Cover towards the rear of the printer to release the 3 tabs and remove it from the printer Cover Right s3500 068 ...

Page 50: ... cord 2 Remove the Duplex Unit 3 Open the Rear Cover for access to the rear top screw 4 Remove 2 screws from the rear of the printer securing the Left Cover 5 Close the Rear Cover 6 Slide the left cover towards the rear of the printer to release the 3 tabs securing it to the printer Cover Left s3500 080 ...

Page 51: ...Repairs and Adjustments Phaser 3500 Laser Printer Service Manual 4 6 Rear Cover 1 Open the Rear Cover 2 Release the Restraining Strap tie stopper 2 1 Tie Stopper s3500 081 ...

Page 52: ...ter Service Manual 4 7 3 To release the 2 posts securing the Rear Cover Lift up on the left printer left hinge pin then slide the Rear Cover to the left to free the right hinge pin and remove the Rear Cover from the printer 2 1 Rear Cover s3500 082 ...

Page 53: ...Print Cartridge and protect it from light exposure 2 Remove Covers on page 4 4 Left Cover on page 4 5 Note Open the Rear and Top Covers for access 3 Remove the 2 screws located on the front of the Top Cover 4 On the rear left side of the printer remove 1 screw securing the Top Cover s3500 083 ...

Page 54: ...rinter Service Manual 4 9 5 Release 3 tabs one on the left one on the right and one on the rear of the Top Cover 6 Disconnect the Control Panel wiring harnesses from the Main Board note the connector location and routing for reassembly s3500 085 ...

Page 55: ...Display 1 Remove Top Cover on page 4 8 2 Remove the 6 screws securing the LCD and control panel and remove from the top cover 2 screws to the LCD Board 4 screws on the key panel board Note DO NOT remove the 3 screws securing the plastic portion of the LCD display LCD Panel Key Panel s3500 086 ...

Page 56: ...l 4 11 Open Cover 1 Remove Covers on page 4 4 Left Cover on page 4 5 Top Cover on page 4 8 2 Remove the 2 screws and stoppers from the Open Cover 3 Remove the Open Cover from the Top Cover by flexing the 2 tabs as shown below Stopper s3500 087 Open Cover s3500 088 ...

Page 57: ...Manual 4 12 Tray 1 MPT Assembly 1 Open Tray 1 2 Unhook the 2 springs connecting the Knock up Plate to the Pick Up Rack Note DO NOT unhook the springs from the Pick Up Rack Note In the next step if you exert too much pressure you can break the tracks s3500 058 ...

Page 58: ...gage the Knock Up Plate from the Tray 1 Assembly Caution Tray 1 and the Knock Up Plate contain unsecured plastic parts that fall off and are easy to lose 4 Slide Tray 1 to the right side of the printer to release the 4 pivot points securing the Tray then remove the Tray 1 Assembly from the printer Tray Link s3500 059 ...

Page 59: ...inks down slightly until they come free from the printer Note The tray links are marked L for the left and R for the right 3 To free the Knock Up Plate carefully spread the slotted hinge piece to release the post then remove the Knock Up Plate Note Tray 1 and the Knock up Plate contain unsecured plastic parts that fall off and are easy to lose Tray Link Knock Up Plate Ass y s3500 060 ...

Page 60: ...r Service Manual 4 15 Tray 1 Pick Up Rack 1 Remove 2 screws securing the Pick Up Rack and remove the rack 2 Separate the clips from the Pick Roller shaft and remove the Pick Up Rack Caution Do not remove or loose the springs MP Pick Up Rack s3500 118 ...

Page 61: ...r Service Manual 4 16 Inner Cover 1 Remove Tray 1 MPT Assembly on page 4 12 Top Cover on page 4 8 2 Open or remove Tray 2 for better access 3 Remove 2 screws securing the Inner Cover to the printer frame 4 Remove the Inner Cover Inner Cover s3500 089 ...

Page 62: ... on the left end of the Transfer Roller shaft is not secured in place Hold the gear when removing the roller to prevent it from falling into the printer Note The 2 bearing clips are not interchangeable and the levers face the rear of the printer The clip with the ground contact goes on the gear side of the Transfer Roller 5 Slide the roller slightly to the right so the end of the shaft clears the ...

Page 63: ...ssembly 1 Remove Tray 1 MPT Assembly on page 4 12 2 Squeeze the lock as shown below and take out the retard assembly Reassembly Notes Note When reassembling the retard roller insert the left end of the retard shaft through the retard roller first Retard Ass y s3500 065 s3500 066 ...

Page 64: ...age 4 14 Retard Assembly on page 4 18 2 Disconnect the connector from the Separator Pad Assembly Caution Be careful not to break the actuator flag There is a spring located behind the separator pad do not loose the spring 3 Remove the 3 screws shown below and then remove the Separator Pad Assembly from the printer Holder Pad Ass y Friction Pad MP Actuator s3500 063 s3500 062 ...

Page 65: ...vice Manual 4 20 Feed2 Idle Unit 1 Remove Tray 1 MPT Assembly on page 4 12 Retard Assembly on page 4 18 Tray 1 Separator Holder Pad Assembly on page 4 19 2 Remove 4 screws 2 for each of the feed idle units 3 Remove each idle unit Feed2 Idle Unit s3500 067 ...

Page 66: ... Service Manual 4 21 Registration Assembly 1 Remove Covers on page 4 4 Left Cover on page 4 5 Top Cover on page 4 8 2 Remove the Gear Cap located on the right side of the Registration Assembly the release is on the front of the cap Gear Cap s3500 115 ...

Page 67: ... Adjustments Phaser 3500 Laser Printer Service Manual 4 22 3 Remove the 4 screws securing the Registration Assembly to the printer 4 Remove the Registration Assembly from the printer s3500 114 REGI Ass y s3500 116 ...

Page 68: ... Service Manual 4 23 PTL Board 1 Remove Covers on page 4 4 Left Cover on page 4 5 Top Cover on page 4 8 Registration Assembly on page 4 21 2 Disconnect the wiring harness 3 Remove 1 screw and take out the PTL board PTL Upper Terminal PTL PBA s3500 117 ...

Page 69: ...e 4 4 Feed Clutch 1 Loosen the grounding bracket screw attached to the plate on the Main Drive Assembly and rotate the grounding bracket to gain access to the e ring 2 Remove the e ring securing the clutch to the feed roller shaft 3 Disconnect the connector to the connector board and remove the clutch from the printer Clutch E Ring s3500 073 ...

Page 70: ...bly 2 Remove the 6 screws securing the Main Drive to the printer 3 Remove the Main Drive from the printer Replacement Notes Note There are numbers for replacing each of the 6 screws in the appropriate order when reassembling the Main Drive Assembly There is a veristor that is secured underneath the number 3 screw Main Drive Ass y s3500 074 ...

Page 71: ...ler and not the shaft it may be necessary to rotate the shaft release the solenoid and then rotate the shaft gear clockwise to position the roller properly Caution Do not break the pick shaft by trying to force the pick roller off 1 Slide the idle gears outward Release the locking tab on the pick roll assembly and slide the roller to the right Idle Pick Roller 1 2 1 s3500 123 ...

Page 72: ... Left Cover on page 4 5 Top Cover on page 4 8 Tray 1 MPT Assembly on page 4 12 Inner Cover on page 4 16 Main Drive Assembly and Registration Feed Clutch on page 4 24 2 On the left side of the printer remove the locking bearing on the front of the shaft by rotating it in the direction of the arrows shown below Bearing s3500 119 ...

Page 73: ... right end of the shaft securing the bracket remove the bracket with the bearing 4 Remove the right side gear from the shaft 5 Lift the latch on the idle cam and slide the shaft to the right throught the cam to free it from the printer Gear ass y Bearing Bracket s3500 120 Idle Cam 2 1 s3500 121 ...

Page 74: ...rder to remove the Pick Rollers 1 Remove Covers on page 4 4 Left Cover on page 4 5 Top Cover on page 4 8 Tray 1 MPT Assembly on page 4 12 Inner Cover on page 4 16 Main Drive Assembly and Registration Feed Clutch on page 4 24 Tray 2 and Tray 3 if installed 2 Release the latch on the pick up cam and slide off the right side of the shaft 1 2 Gear Pick Up Cam s3500 124 ...

Page 75: ...p from the feed shaft 4 Remove the locking bearing rotating in the direction of the arrow as shown below 5 Remove the gear by sliding off the shaft 6 Turn the printer onto its left side 7 Remove the front crossbar secured by 2 screws Bearing Feed2 Gear s3500 125 Bottom Cross Bar s3500 127 ...

Page 76: ...ser Printer Service Manual 4 31 8 Slide the actuator down and remove it from the printer 9 Remove the 4 screws securing the pick assembly and manuever the pick assembly out of the printer Actuator 2 1 s3500 128 Pick Up Unit 1 2 3 s3500 129 ...

Page 77: ...2 Feed 2 Unit 1 Perform all steps for Tray 2 Pick Up Assembly and Rollers on page 4 29 2 Remove the pick up gear 3 Remove remove the locking bearing 4 Remove the 4 screws securing the Feed 2 Unit to the printer and remove the assembly Bearing 1 2 Pick Up Gear s3500 126 ...

Page 78: ...s on page 4 4 2 Disconnect the connector from the developer drive assembly 3 Remove 4 screws securing the developer drive to the printer Replacement Notes Note There are numbers for replacing each of the 4 screws in the appropriate order when reassembling the Developer Drive Assembly DEVE Drive Ass y s3500 075 ...

Page 79: ...00 Laser Printer Service Manual 4 34 Connector Board 1 Remove Covers on page 4 4 2 Disconnect all connectors to the connector board 3 Remove 1 screw securing the board to the chassis 4 Remove the connector board Connector PBA s3500 076 ...

Page 80: ...tments Phaser 3500 Laser Printer Service Manual 4 35 Tray 1 MPT Solenoid 1 Remove Covers on page 4 4 2 Disconnect the connector to the Tray 1 Solenoid 3 Remove 1 screw securing the Tray 1 Solenoid MP Solenoid s3500 078 ...

Page 81: ...haser 3500 Laser Printer Service Manual 4 36 Main Solenoid 1 Remove Covers on page 4 4 Feed Clutch on page 4 24 2 Disconnect the connector to the Main Solenoid 3 Remove 1 screw securing the Main Solenoid Main Solenoid s3500 079 ...

Page 82: ... and Adjustments Phaser 3500 Laser Printer Service Manual 4 37 Fuser Assembly 1 Remove Rear Cover on page 4 6 2 Pull the locking lever and take out the Fuser Assembly Thermistor Connector Fuser Ass y s3500 090 ...

Page 83: ...er on page 4 5 Top Cover on page 4 8 2 Disconnect the connector running to the main board 3 Remove 3 screws securing the solenoid to the printer 4 Remove the solenoid assembly Note There is a resistor attached by the upper right hand screw When reassembling the printer ensure the resistor is in place Exit Solenoid Ass y s3500 099 ...

Page 84: ...s 1 Remove Covers on page 4 4 Left Cover on page 4 5 Top Cover on page 4 8 Note When you remove the exit rollers the rollers underneath are spring loaded and can become lost if not careful 2 Remove the locking bearings from both ends of the shaft Bearing Rack Exit Roller Exit Roller s3500 101 ...

Page 85: ...nts Phaser 3500 Laser Printer Service Manual 4 40 Exit Gear 1 Remove the bearing in order to remove the gear Tray Full Actuator 1 Remove the actuator from the exit roller Exit Gear Bearing 2 1 s3500 102 Actuator s3500 100 ...

Page 86: ...s Phaser 3500 Laser Printer Service Manual 4 41 Duplex Roller 1 Using a small flatblade screwdriver spread apart the bearings on both side of the duplex roller and remove from the printer Holder Duplex Exit Roller s3500 103 ...

Page 87: ... 4 Left Cover on page 4 5 Top Cover on page 4 8 2 Remove the cover frame exit cover 3 Disconnect the connector from the LSU to the Main Board 4 Remove the 3 screws securing the LSU to the chassis 5 Remove the LSU from the printer Note The screws are numbered and need to be replaced and tightened in the correct order LSU s3500 106 ...

Page 88: ...4 43 LSU Lower Cover 1 Remove 1 screw securing the fan duct 2 Remove the fan and duct to access the screw in the next step 3 Remove 3 screws securing the LSU Cover and remove the cover 4 Disconnect all the connectors running to the LSU Cover LSU Lower Cover s3500 113 ...

Page 89: ...e Cooling Supply Fan and Duct 1 Remove Covers on page 4 4 Left Cover on page 4 5 Top Cover on page 4 8 Laser LSU Assembly and Lower Cover on page 4 42 2 Disconnect the connector to the Toner Sensor Board 3 Remove 1 screw to remove the fan from the printer Stopper DC Fan s3500 108 ...

Page 90: ...ge 4 4 Left Cover on page 4 5 Top Cover on page 4 8 Laser LSU Assembly and Lower Cover on page 4 42 2 Disconnect all connectors running to the toner sensor board 3 Remove 2 screws securing the toner sensor board to the LSU cover 4 Release the 2 locking tabs to remove the board Toner Sensor PBA HV Small Spring s3500 111 ...

Page 91: ...4 8 Laser LSU Assembly and Lower Cover on page 4 42 2 Remove 1 screw securing the cover open housing harness cover 3 Release the latching tab and remove the cover open housing harness cover 4 Disconnect the connector from the main board 5 Using a small flatbladed screwdriver release the 4 tabs to remove the cover open board Cover Open PBA Harness Cover Cover Open s3500 112 ...

Page 92: ...n page 4 4 2 Disconnect all connectors from the Main Board 3 Remove the NIC card or the dummy bracket from the main board 4 Remove the 6 screws 4 on the Main Board and 2 to the parallel connector securing the Main Board to the printer and then remove the Main Board 5 Position the retainers on the parallel port connector straight out from the connector for removal 6 Move the board toward the front ...

Page 93: ... 2 and Tray 3 if installed Covers on page 4 4 Rear Cover on page 4 6 Fuser Assembly on page 4 37 2 Turn the printer onto it s left side 3 Remove the rear crossbar secured by 2 screws 4 Remove the Tray 2 no paper actuator for better access 5 Remove the left and right duplex unit guides Guide Duplex L Guide Duplex R s3500 136 ...

Page 94: ...s from the power supply shield 7 Remove 1 grounding screw from the rear of the power supply shield 8 Pull out the shield slightly and disconnect all connectors to the power supply board 9 Remove the power supply from the printer Engine Shield Ass y s3500 135 Engine Shield Ass y s3500 137 ...

Page 95: ...embly 1 Remove Print Cartridge Tray 2 and Tray 3 if installed Covers on page 4 4 Rear Cover on page 4 6 Fuser Assembly on page 4 37 Exit Solenoid Assembly on page 4 38 Main Board and Shield on page 4 47 2 Remove the 3 screws securing the fuser gear train and remove it from the printer ...

Page 96: ...nter upside down Note The Paper Size Sensor can be removed and replaced without removing the rear crossbar However to provide improved access remove the crossbar screw above the Paper Size Sensor and loosen the screw on the other side so you can swing the crossbar out of the way 4 On the left side of the printer remove 2 screws one on either side of the rear crossbar that secure the Paper Size Sen...

Page 97: ...g the Parts List on page 5 2 PL 8 1 Main Assembly on page 5 3 PL 8 2 Cover Assembly on page 5 7 PL 8 3 Frame Assembly on page 5 9 PL 8 4 Fuser Assembly on page 5 17 PL 8 9 Tray 2 Cassette on page 5 20 PL 8 10 Tray 3 Cassette on page 5 22 PL 8 11 Duplex Assembly on page 5 25 Parts List ...

Page 98: ...s a parent assembly made up of the individual parts called out in parentheses 7 The notation with X Y following a part name indicates an assembly that is made up of components X through Y For example 1 with 2 4 means part 1 consists of part 2 part 3 and part 4 8 An asterisk following a part name indicates the page contains a note about this part 9 The notation NS next to a part indicates that pari...

Page 99: ...l 5 3 PL 8 1 Main Assembly 0 2 1 4 3 3 1 3 2 3 3 3 5 3 4 3 6 5 6 4 1 4 2 7 8 8 1 8 2 8 3 8 4 9 9 1 9 2 9 3 10 11 12 13 14 15 16 38 17 18 19 20 20 1 20 2 20 3 21 21 1 21 2 21 3 22 23 24 25 26 27 28 29 31 30 30 32 34 35 36 37 39 2 39 1 39 Network only 40 ...

Page 100: ... COVER MP XRX 002N02410 4 1 COVER M MP XRX 4 2 TRAY M EXTND MP 5 TRAY M LINK MP L 012N00521 6 TRAY M LINK MP R 012N00522 7 ROLLER TRANSFER 022E29520 8 ELA UNIT HOLDER TR R 019E63470 8 1 PMO BUSHING TR 8 2 SPRING ETC TR R HAWK 8 3 PMO TRANSFER HOLDER 8 4 IPR PLATE TR 9 ELA UNIT HOLDER TR L 019E63480 9 1 PMO BUSHING TR 9 2 SPRING ETC TR R HAWK 9 3 PMO TRANSFER HOLDER 10 PMO CAP TR 021N02248 11 GEAR ...

Page 101: ...ARING PICK UP 23 BRACKET P SHAFT MP 24 MEP CLUTCH FEED 121N01101 25 SOLENOID MAIN 121E19250 26 SOLENOID MP 121N01102 27 RING E 28 SHIELD P SMPS 29 SMPS V1 HVPS 110V SMPS V2 HVPS 220V 105N02059 105N02060 30 BAR P CROSS BOTTOM 31 FAN DC 127E14630 32 STOPPER M FAN80 34 ELA UNIT DEVE Print Cartridge 6K Toner Cartridge 12K Toner Cartridge 106R01148 106R01149 35 ELA UNIT CASSETTE Tray 2 109R00756 36 ELA...

Page 102: ...Parts List Phaser 3500 Laser Printer Service Manual 5 6 39 1 BRACKET NIC 39 2 PBA SUB NIC BOARD 40 STOPPER M NETWORK Main Assembly Continued Item No Description Qty Part Number ...

Page 103: ...arts List Phaser 3500 Laser Printer Service Manual 5 7 PL 8 2 Cover Assembly 0 1 1 1 1 2 1 X 1 3 1 4 1 4 1 5 1 5 1 6 1 7 1 8 1 14 1 9 1 10 1 11 1 12 1 13 2 5 7 6 6 1 6 9 6 2 6 3 6 5 6 4 6 6 6 7 6 8 3 4 8 ...

Page 104: ...C BRUSH ANTISTATIC 1 9 PBA SUB PANEL B D 123N00241 1 10 KEY M BUTTON XRX 1 11 KEY M CANCEL 1 12 CAP M LED XRX 1 13 WINDOW M LCD 1 14 GROUND TOP COVER 2 COVER M LEFT 002N02413 3 COVER M RIGHT 002N02414 4 COVER M CONTROL BOX 002N02419 5 COVER M FRONT INNER 002N02415 6 MEA UNIT COVER REAR 002N02416 6 1 COVER M REAR 6 2 PMO STACKER REAR 6 3 ICT BRKT REAR COVER 6 4 GUIDE M EXIT 6 5 PMO STRIPE 001N00462...

Page 105: ... 1 2 2 2 2 2 4 2 5 2 4 1 2 4 2 2 4 3 3 3 1 3 2 3 3 3 4 3 5 3 6 3 7 3 7 3 7 4 4 1 4 2 4 3 4 4 4 5 4 6 4 7 4 8 5 5 1 5 2 5 3 5 4 6 8 9 10 11 11 1 11 2 11 2 12 12 13 14 14 1 14 2 14 3 15 16 17 17 18 18 19 20 21 22 23 24 25 26 27 28 29 30 31 32 33 34 35 36 37 38 39 40 39 41 42 43 44 45 0 43 ...

Page 106: ... 3 49 4 49 5 49 6 49 7 49 8 49 7 49 9 49 10 49 11 50 1 50 2 50 3 50 4 50 9 50 5 50 6 50 7 50 8 51 52 53 54 59 9 59 6 58 59 10 59 8 59 60 59 4 59 5 1 59 5 2 59 5 59 7 55 56 59 1 59 2 1 59 2 2 59 2 3 59 2 59 3 57 60 1 60 2 60 2 60 4 60 3 60 5 61 62 63 64 65 66 67 68 69 70 71 72 73 76 77 78 79 80 81 82 100 83 83 84 85 86 87 88 89 90 91 92 93 94 95 96 97 98 99 ...

Page 107: ...4 3 RUBBER PICK UP MP 2 5 CAM M SHAFT 3 MEA UNIT GEAR IDLE 007N01362 3 1 BRACKET P GEAR IDLE 3 2 GEAR FUSER IDLE 3 3 3 GEAR M FUSER IDLE 2 3 4 GEAR M FUSER DRV IN 3 5 CLUTH M HUB 3 6 GEAR RDCN FUSER OUT 3 7 RING E 4 ELA HOU BASE HOLDER 022N02173 4 1 FRAME M HOLDER PAD 4 2 HOLDER M PAD 4 3 RPR FRICTION PAD MP 4 4 SPRING ETC PAD 4 5 PMO ACTUATOR EMPTY MP 4 6 SPRING ETC EMPTY 4 7 PHOTO INTERRUPTER 4 ...

Page 108: ... GEAR M EXIT DUP Z21 007N01363 14 ELA HOU CST SENSOR 110K14290 14 1 PBA SUB CASSETTE 14 2 IPR PLATE SENSOR 14 3 IPR BRACKET SENSOR 15 CBF HARNESS PSIZE 16 GUIDE P REGI UPPER 17 SPRING ETC LEVER 18 HOLDER M BUSHING TX 19 GUIDE PLATE PAPER 20 IPR P GROUND PLATE PAPER 21 PHOTO INTERRUPTER 110K14300 23 CBF HARNESS THERM 24 PMO HOUSING TERMINAL 25 IPR TERMINAL FU 26 CBF HARNESS FUSER 27 CAP M HOUS TERM...

Page 109: ... SHAFT 47 MEA UNIT FRAME LSU LOW 140N63017 47 1 FRAME M LSU LOWER 47 2 PBA TONER SENSOR 47 3 TERMINAL P DEVE 47 4 CBFHARNESS TONER SENSOR 47 5 CAP M COVER OPEN 48 ELA UNIT FEED 3X5 022N02174 48 1 HOLDER M SAW 48 2 GUIDE P TRANSFER FRONT 48 3 PLATE P SAW 48 4 SHAFT M ROLLER BELT 48 5 ROLLER M IDLE BELT 48 6 IEX SHAFT IDLE F UP 48 7 RUBBER BELT FEED 48 8 GUIDE M SHAFT BELT 49 ELA UNIT RETARD 022N021...

Page 110: ...50 5 SHAFT IDLE FEED2 50 6 RING E 50 7 ROLLER M IDLE FEED2 50 9 SHAFT HUB IN 51 STOPPER M KNOCK UP MP L 52 STOPPER M KNOCK UP MP R 53 RAIL M LEFT DUPLEX 032N00441 54 RAIL M RIGHT DUPLEX 032N00442 55 PMO BEARING SHAFT 56 GEAR REGI E25 57 BEARING PICK UP 58 PMO ACTUATOR EMPTY 120E26090 59 ELA UNIT PICK UP 022N02183 59 1 SHAFT PICK UP 59 2 MEA UNIT P UP HOUSING PICK ROLLER 022N02177 59 2 1 PMO M IDLE...

Page 111: ... 3 SHAFT M FEED2 60 4 BEARING PICK UP 60 5 RUBBER ROLLER FEED2 61 PBA SUB JOINT 140N63022 62 CBF HARNESS TRAY OUT 63 CAP M POWER 64 CBF HARNESS INLET 152N11619 65 SHAFT M BELT GEAR 66 PMO BEARING SHAFT 67 GEAR M EXIT Z17 68 CAP M DEVE MOTOR 69 CBF HARNESS DUPLEX 71 CAP M WIRE PTL LOWER 021N02249 72 TERMINAL P PTL 116N00243 73 CBF HARNESS PTL 74 PBA SUB COVER OPEN 130N01399 76 PBA SUB EXIT SENSOR 1...

Page 112: ... P TR KESTREL 86 TERMINAL SPRING TR 87 PBA MAIN ZENER 88 CBF HARNESS EARTH 89 GROUND P ZENER 90 GROUND P FUSER 91 TERMINAL P HV CARDINAL 92 MEA UNIT TERMINAL TR 93 CBF HARNESS HVPS 94 IPR P GROUND OPC 95 PBA SUB EMPTY SENSOR 140N63023 96 CBF HARNESS SENSOR 97 PBA SUB FEED SENSOR 140N63024 98 CAP M HV 99 CAP M SENSOR FEED 100 DUCT M FAN Frame Assembly Continued Item No Description Qty Part Number ...

Page 113: ...3 1 1 1 7 1 10 1 8 1 9 1 11 1 15 1 26 1 2 1 29 1 12 2 1 2 2 2 3 2 4 3 1 3 2 3 2 3 3 3 3 3 4 3 15 3 5 3 6 3 7 3 9 3 6 3 8 3 7 3 9 3 14 3 14 3 10 3 11 3 12 3 13 1 21 1 16 1 17 1 13 1 19 1 17 1 18 1 19 1 20 1 22 H 1 3 1 14 1 14 1 6 1 4 4 4 1 4 2 4 4 4 6 4 3 4 5 1 27 1 28 1 23 1 24 1 5 1 25 ...

Page 114: ...PRING TS 1 6 SPRING SEPARATION 1 7 MEC BRUSH ANTISTATIC 1 8 ELECTRODE P FU R 1 9 HOLDER M IDLE ROLLER 1 10 PMO ROLLER UPPER DP 1 11 HOLDER M LEVER L 1 12 HOLDER M LEVER R 1 13 ELECTRODE P SUPPORT 1 14 SCREW 1 15 SCREW 1 16 ROLLER HEAT 1 17 BALL BEARING 1 18 CAP M END 1 19 BUSH HR 1 20 GEAR M FUSER Z49 1 21 STOPPER SPACER 1 22 ELECTRODE FU 1 23 SPRING ETC GUIDE DEVE 1 24 CAP M ACTUATOR UP 1 25 COVE...

Page 115: ...2 BUSH M PR 3 3 SPRING PR ROLL 3 4 COVER M FUSER LOWER 3 5 LEVER P RELEASE L 3 6 SPRING CS 3 7 CAP M FUSER LOCK 3 8 LEVER P RELEASE R 3 9 HOLDER M PR SHAFT 3 10 GROUND P HR 3 11 SPRING ETC ACTUATOR 3 12 PMO ACTUATOR EXIT 3 13 CAP M ACTUATOR 3 14 SCREW TAPTITE 4 MEA UNIT GUIDE REAR 4 1 GUIDE M REAR 4 2 PMO BUSHING TX 4 3 SHAFT M EXIT F UP 4 4 GEAR M EXIT DUP Z21 4 5 RUBBER EXIT F UP Fuser Assembly ...

Page 116: ...Parts List Phaser 3500 Laser Printer Service Manual 5 20 PL 8 9 Tray 2 Cassette 0 1 2 3 4 5 6 7 8 9 10 11 12 13 14 15 16 17 18 19 20 20 1 21 20 2 20 3 20 4 25 26 27 ...

Page 117: ...7 CAP M GUIDE SIDE L 8 GUIDE P SIDE L 9 GUIDE M SIDE LOCK 10 GUIDE P SIDE R 11 GUIDE M REAR 12 GUIDE P REAR PAPER 13 SPRING ETC GUIDE PAPER 14 GUIDE M LOCK 15 GUIDE M REAR 16 GUIDE M EXTENTION 17 BRACKET P EXTENTION 18 GUIDE M PAPER 19 HOLDER M PAD HOUSING 20 MEA UNIT HOLDER PAD 019N00831 20 1 HOLDER M PAD 20 2 SHEET HOLDER PAD R2 20 3 RPR FRICTION PAD 20 4 IPR PLATE PAD 21 SPRING EXIT ROLL FD 25 ...

Page 118: ...3 Cassette 0 1 40 2 3 4 5 6 7 8 9 10 11 12 13 14 15 16 14 17 18 19 20 20 21 22 23 24 25 34 1 16 16 35 34 1 34 3 34 2 36 37 34 22 2 22 1 22 9 22 10 22 7 22 8 22 4 22 10 22 22 6 22 3 26 16 35 35 38 1 38 2 38 27 42 28 43 29 41 30 31 32 14 16 33 11 2 11 1 11 5 11 3 11 4 22 11 ...

Page 119: ...FACE 152N11620 10 SOLENOID MAIN 11 ELA UNIT MOTOR SCF 127N07392 11 1 BRACKET P SCF MOTOR 11 2 MOTOR STEP 7 5 DEG 11 3 GEAR M SCF RDCN RETARD 11 4 GEAR M SCF RDCN FEED 11 5 GEAR M SCF RDCN PICK UP 12 CBF HARNESS OPE 13 IPR GROUND SPRING FEED 14 PMO BEARING SHAFT 15 MEP CLUTCH FEED SCF 121N01104 16 RING E 17 SHAFT M COUPLING RETARD S 18 SHAFT M GEAR RETARD 19 GEAR REGI Z25 20 BAR P CROSS BOTTOM 21 P...

Page 120: ...SCF 27 PBA SCF COVER OPEN 28 ELA HOU CST SENSOR 29 PHOTO INTERRUPTER 30 PMO ACTUATOR EMPTY SCF 120E26100 31 GEAR SCF PICK UP CAM 007N01366 32 FOOT ML80 33 IPR GROUND TOP 34 MEA UNIT PICK UP HOU 34 1 PMO M IDLE PICK UP 34 2 RUBBER PICK UP 34 3 HOUSING M PICK UP 35 PMO BUSHING FEED 36 PMO M DUMMY SHAFT 37 SPRING ES 38 HOUSING M FEED1 39 RUBBER FEED1 40 CBF HARNESS MOTOR 41 CBF HARNESS SCF EMPTY 42 C...

Page 121: ...Parts List Phaser 3500 Laser Printer Service Manual 5 25 PL 8 11 Duplex Assembly 0 1 5 2 3 6 7 8 16 9 10 11 12 13 14 15 17 18 19 20 21 22 23 33 32 30 27 26 25 26 24 4 28 30 34 31 28 29 ...

Page 122: ...FT IDLE ROLL DUP 4 3 ROLLER M IDLE DUP 4 4 PCT SLIP WASHER 4 5 SPRING ETC DUP 4 6 PULLEY M 18 DUMMY DUP 4 7 PULLEY 18 DUP 4 8 BUSH M FEED DUP 4 9 BELT TIMMING 4 10 ROLLER FEED DUP 4 11 RING C 4 12 ICT STUD PAPER GUIDE DP 5 CAP M CONNECTOR DUP 6 DUCT M FAN DUP 7 FAN DC HAWK 8 PBA SUB DPX SCF 9 CABLE CLAMP 10 IPR TERMINAL GND DUP 11 LOCKER M DUP 12 SHEET FRAME DUP 13 SPRING TS 14 PMO ACTUATOR FEED D...

Page 123: ...aser 3500 Laser Printer Service Manual 5 27 18 BRACKET P MOTOR DUP 19 PULLEY M 30 DUP 20 BELT TIMING GEAR 21 PULLEY M 30 DUMMY DUP 22 RING E 23 CBF HARNESS D JOINT Duplex Assembly Item No Description Qty Part Number ...

Page 124: ...n covers the following Printer Configurations on page 6 2 Parts of the Printer on page 6 4 Control Panel on page 6 5 Control Panel on page 6 5 Printer Specifications on page 6 6 Media and Tray Specifications on page 6 9 General Information and Specifications ...

Page 125: ...00 dpi 500 Sheet Feeder Tray 3 Optional Optional Optional Network Interface Optional Standard Standard Automatic 2 Sided Printing Separate Duplex Unit Optional Optional Standard USB Parallel Interface Yes Yes Yes Options and Supplies Item Part Number 64 MB additional RAM memory 097S03389 128 MB additional RAM memory 097S03390 256 MB additional RAM memory 097S03391 Network Interface Card NIC 097S03...

Page 126: ...life messages Life ratings are based on 5 coverage and an average 4 page job length Note The service parts are not tracked with an NVRAM counter and there is no replace or low warnings associated with these service parts Consumables Print Life Print Cartridge High Capacity 12 000 pages Standard Capacity 6 000 pages Service Parts Fuser Assembly 150 000 pages Transfer Roller 150 000 pages Feed Rolle...

Page 127: ... View Control Panel Control Board cover On Off Switch Paper Gauge Tray 2 Tray 1 MPT Release Tray 1 MPT Paper Output Support Output Tray Print Cartridge s3500 013 Rear Door Duplex Unit optional Power Cord Receptacle Tray 3 Optional Cable Connector IEEE 1284 Parallel Port USB Port Network Port optional for 3500B s3500 014 ...

Page 128: ...Menu Map is a visual representation of the Control Panel settings and information pages All Menu Map settings are documented in the User Guide Error and Warning Messages When there is a problem with the printer the Control Panel LED 3 blinks orange for an error and a warning An error or warning message is displayed in the Alphanumeric Display 5 s3500 012 1 Cancel Button 2 Return Button 3 On line D...

Page 129: ...eration and servicing See the clearance graphic below Do not block or cover the slots and openings on the printer The printer can overheat without adequate ventilation For altitudes under 2 050 meters 6 726 feet use the Low Altitude setting For altitudes over 2 050 meters 6 726 feet use the High Altitude setting Do not place the printer near a heat source Do not place the printer in direct sunligh...

Page 130: ...edium Monochrome Resolution Addressability True 600 x 600 dpi Addressable 1200 x 1200 dpi Operating Modes Running Mode Print engine capable of making prints immediately Ready Mode 20 seconds from completion of a print Sleep Low Power Power Saver Mode Entered after a specified period of Print Engine inactivity since completion of the last print Continuous Operating Printing Speed ppm pages per minu...

Page 131: ...ency range 100 135 V Printer 50 60 Hz 3 Hz 220 240 V Printer 50 60 Hz 3 Hz Power consumption Printing 550 Watts average Sleep under 10 Watts Characteristic Specification Optimal Temperature 10 30 degrees C 50 60 degrees F Optimal Humidity 20 80 Relative Humidity Altitude Operating Low Altitude Setting High Altitude Setting Transportation 0 2 500 meters 8 200 ft 0 2 050 meters 6 726 ft 2 050 2 500 ...

Page 132: ...els Transparency A4 Letter Legal Folio Executive ISO and JISB5 A5 16 lb 28 lb 60 176 gsm Tray 2 Paper Cardstock Min 76 mm x 127 mm 3 in x 5 in Max Legal A4 Letter Legal Folio Executive ISO and JISB5 A5 A6 Statement Monarch COM 10 C5 DL 3 x 5 16 lb 43 lb 60 105 gsm 65 Cover Tray 3 Paper A4 Letter Legal Folio Executive ISO and JISB5 A5 16 lb 28 lb 60 105 gsm Duplex Paper A4 Letter Legal Folio 20 lb ...

Page 133: ...Phaser 3500 Laser Printer Service Manual 7 1 Wiring Data ...

Page 134: ...G I 15 15 CART_DP UT DIN 16 16 P_EM PTY 1 1 2 2 4VS 3 3 4 4 5 DGND 6 VCC 7 nMAIN_M OT_ON 8 MAIN_MO T_READY 9 MAIN_MOT_CLK 10 10 NC 1 24VS 2 MAIN_CLUTC H 3 MP_C LUTCH 4 REGI_CLUTC H 5 MP_EMPT Y 6 3 3V 7 C ASE TTE_DETECT 8 DGND 9 TEMP_1 CN 12 1 Control 2 24VS 1 Cont rol 2 24VS 1 Cont rol 2 N C 3 24VS 1 3 3V 2 SIGNAL 3 DGND CN10 CN11 CN14 CN13 PC PC Pa ralle l P ort 36 pin U S B P ort 4pin 1 5V 2 3 3...

Page 135: ...E L C O VER O PE N D U PLE X SO LE N I D LSU TO N ER SEN SO R PCIN W CARD O pt i on Em bedded N W CARD O pt i on C N 7 U SB P1284 8 Pi n 3 t h_Casset t e N W M EM ORY OPTI O N CN14 7 Pi n 2 Pi n C N 19 C N 20 C N 18 C N 16 C N 17 C N 21 C N 22 28 Pi n Joi nt B d M ai n M ot or Exi t Sensor 3 Pi n 10 Pi n 9 Pi n DEV M ot or PTL PO W ER DUPLEX Uni t C N 9 8 Pi n s3500 149 ...

Page 136: ...I N L ET POWER SWITCH AC wire F G 110V for USA 240V for EU SMPS LD LSU Motor 1 Thermistor 1 2 Thermistor 2 1 HOT 2 Neutral 1 OUT1A 2 OUT1B 3 OUT2A 4 OUT2B 1 L SU_CL K 2 nL READY 3 nPMOTOR 4 DGND 5 24VS2 1 nHSYNC 2 5V 3 DGND 4 DAC_OUT 5 VDO 6 L SU_READ DCU Serial J4e debugging 1 5V 2 DCU_CUT 3 DCU_CLK 4 DGND 1 3 3V 2 RXD 3 T XD 4 DGND 1 T CLK 2 T DI 3 1 8V 4 3 3V 5 DGND 6 nT RST 7 PROGRAM 1 24VS2 2...

Page 137: ...ion covers the following Overview of the Phaser 3500 Laser Printer on page 8 2 Printer Paper Path on page 8 4 Major Assemblies and Functions on page 8 6 Sensor Functions on page 8 8 Printer Controls on page 8 9 Power Supply on page 8 11 Theory of Operation ...

Page 138: ...olled by the metering blade The developer roller turns against the drum and the toner particles are attracted to the relatively positive latent image The toner forms a visible image on the drum surface Pre Clean The pre transfer lamp exposes the developed suface of the drum lowering the surface potential and thereby providing enhanced transfer efficiency Transfer The finished toner image on the dr...

Page 139: ...Draft mode Uses a combination of reduced toner output and the lowest resolution 300 x 300 dpi to extend print cartridge life 300 Used for printing with a resolution of 300 x 300 dpi 600 Used for printing with a resolution of 600 x 600 dpi Enhanced mode Used for printing on plain paper with an addressable resolution of 1200 x 1200 dpi ...

Page 140: ...ents of the printer are explained in greater detail under Printer Controls on page 8 9 Duplex Paper Path When 2 sided printing is selected side two is printed first the image being printed is the first image After the first image is being printed the paper is reversed and is fed through the duplexer and back up to the feed roller with side one positioned for printing with the second image Tray 1 P...

Page 141: ...r is heated by a heat element and the paper passes in between the heat roller and the pressure roller where toner is melted onto the paper forming a permanent image The temperature of the heat roller is monitored by a thermistor that sends signals to the Main Board The Fuser drives the paper into the exit rollers and the exit rollers drive the paper into the output tray When printing the first sid...

Page 142: ...ves image data in the form of pulsed laser light from the Laser Scan Unit and creates the image via the xerographic process The Print Cartridge contains the following components Charge Roller Drum Developer Roller D R Supply Roller S R Metering Blade Cleaning Blade Cleaning Roller 680V 0 20mW 1 5 1 30KV 400 500 20V 500 600 20V 100V 4 2kV 620V Doctor Blade Charging Roller Cleaning Blade OPC Drum Ze...

Page 143: ...Roller The PTL exposes the drum surface after the latent image has been developed to lower surface potential of the drum This provides enhanced transfer efficiency The transfer roller provides a high positive potential on the back of the print media This potential attracts the negatively charged toner image from the drum and deposits it on the surface of the print media Fuser Assembly The Fuser As...

Page 144: ...ain Board that the paper is almost at the transfer area and it is time to start the xerographic process It is important that the leading edge of the paper enters the transfer area at the same time as the leading edge of the developed image on the drum Fuser Exit Sensor The Exit Sensor monitors paper exit and detects the Jam at Exit error if the paper takes too long getting to the sensor or it stay...

Page 145: ...es image data from the host computer converts this to a bitmap image and then sends the current image to the Laser Scanner Assembly Print Engine Control The engine control section provides all of the principle operating voltages and control signals for the following printer operations Main Drive Motor Fuser Assembly High Voltage Power Supply HVPS Laser Scanner Unit LSU Sensors Solenoids Thermistor...

Page 146: ...e Image Processor and Engine Control functions It contains a 32 bit RISC processor and comes with a standard memory capacity of 32 Mbytes of RAM and 4 Mbytes of flash memory The board provides one expansion slot that allows available memory to be expanded up to 288 Mbytes by adding an additional RAM DIMM ...

Page 147: ...g voltages Transfer Voltage Charge Voltage Bias Voltage Supply Voltage The Bias Supply and Charge voltages are used by the Print Cartridge The power distribution section receives AC voltage and creates the required DC outputs 3 3 VDC 5 VDC and 24 VDC to power the printer components It also supplies AC voltage to the Fuser Assembly ...

Page 148: ... Tray 1 use the Control Panel controls to select the media type Paper Pick Auto Select The default paper pick selection at power ON is Tray 2 Auto Select ON is also default If the default tray is empty the printer will automatically switch to any other tray that contains paper unless Auto Select is set to OFF Toner Control Print Cartridge installation and Toner Level are detected by the Print Cart...

Page 149: ...sult is low the heater lamp is turned ON The fuser control circuit keeps the Fuser temperature at 185º C during printing and at 145º C during standby When the power voltage for the printer is too high or too low the Fuser is stopped to protect the Fuser When the AC voltage is not applied to the Fuser control circuit the fuser will not work and a Fuser Low Heat Error will occur When the temperature...

Page 150: ...071 0877 00 ...

Reviews: