background image

166

7 Maintenance

7.12

Adjusting the Altitude

When installing the printer in a high-altitude location or a location with low air pressure, 
adjust the altitude setting. The altitude can be set to 0 m, 1000 m, 2000 m, or 3000 m. Select 
the value that is closest to the altitude of the printer. The default is 0 m.

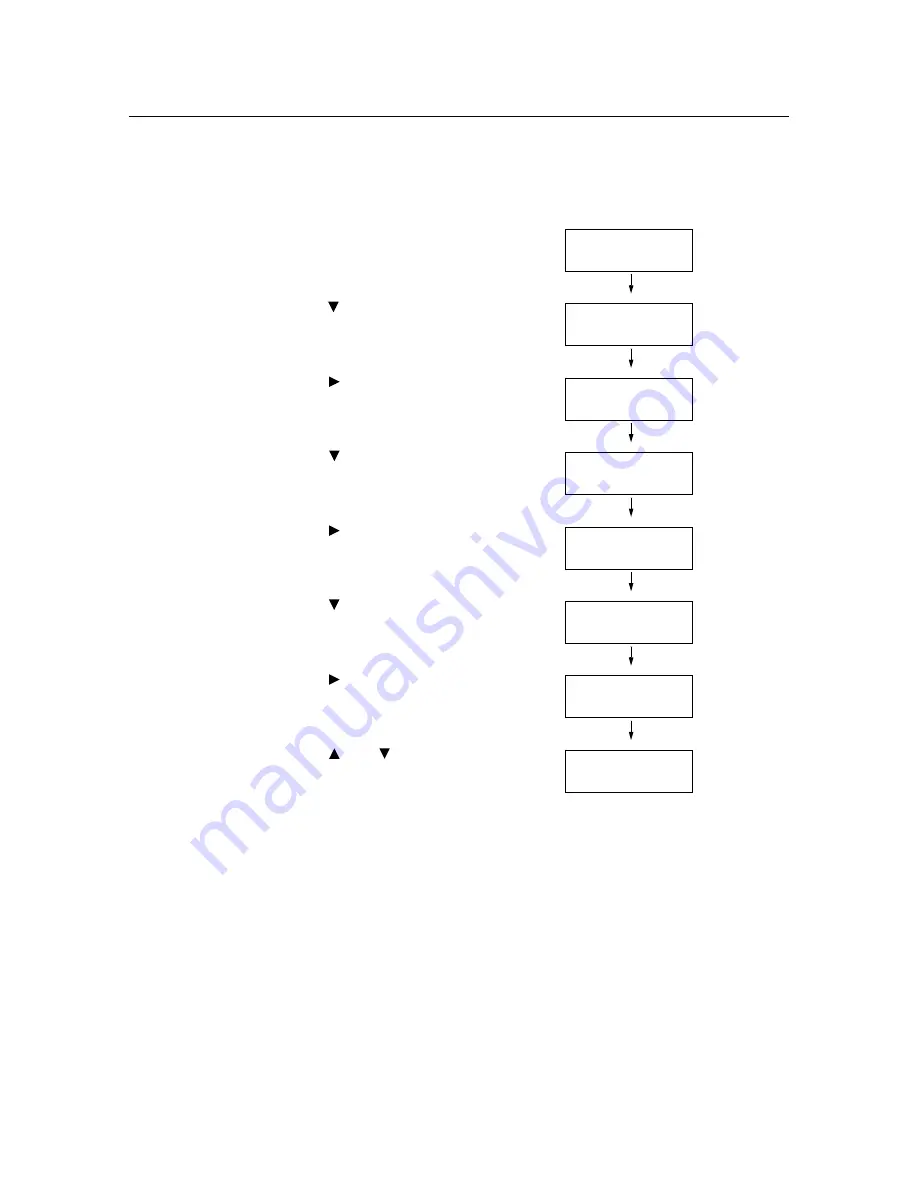
Use the following procedure to adjust the altitude.

1.

Press the <Menu> button on the control 
panel to display the menu screen.

2.

Press the <

> button until [Admin Menu] is 

displayed.

3.

Press the <

> or <Eject/Set> button to 

accept the selection.
[Wired Network] is displayed.

4.

Press the <

> button until [Maintenance 

Mode] is displayed.

5.

Press the <

> or <Eject/Set> button to 

accept the selection.
[Adjust PaperType] is displayed.

6.

Press the <

> button until [Adjust Altitude] 

is displayed.

7.

Press the <

> or <Eject/Set> button to 

accept the selection.
[0m] is displayed.

8.

Press the <

> or <

> button to set the 

value, then press the <Eject/Set> button.
(Example: 1000 m)

9.

Press the <Menu> button to return to the 
print screen.

Menu

 Report / List

Menu

Admin Menu

Admin Menu

 Wired Network

Admin Menu

Maintenance Mode

Maintenance Mode

Adjust PaperType

Maintenance Mode

 Adjust Altitude

Adjust Altitude

0m *

Adjust Altitude

1000m *

Summary of Contents for DocuPrint C1110

Page 1: ...DocuPrint C1110 C1110 B User Guide...

Page 2: ...uct network expansion card optional includes RSA BSAFE Cryptographic software from RSA Security Inc In this manual safety instructions are preceded by the symbol Always read and follow the instruction...

Page 3: ...environmental conservation and has integrated that concern in its business activities from research and development to disposal We have implemented a number of programs to lessen the burden on the en...

Page 4: ...ormed using the manual 2 sided printing feature 2 Additional memory optional must be installed 3 The network expansion card optional must be installed The data encryption feature is not supported on t...

Page 5: ...Power 37 2 3 About the Earth Fault Interrupter 38 2 4 Setting Exiting the Power Saver Modes 39 2 5 Cancelling Checking a Print Job 40 Cancelling a Print Job 40 Checking the Status of a Print Job 40 3...

Page 6: ...ay Settings 99 6 Troubleshooting 100 6 1 Clearing Paper Jams 100 Paper Jams in the Manual Feeder 101 Paper Jams in the Tray 1 103 Paper Jams in the Fuser Unit 104 6 2 Hardware Problems Power Failure A...

Page 7: ...Adjusting the Image Transfer Voltage 164 7 11 Adjusting the Fuser Temperature 165 7 12 Adjusting the Altitude 166 7 13 Toner Cartridge Refreshing 167 7 14 Drum Cartridge Refreshing 168 7 15 Cleaning...

Page 8: ...int features It also covers the control panel menus troubleshooting tips and maintenance information This guide is on the CD ROM of the Driver CD Kit PDF Document CD ROM Documentation HTML Describes h...

Page 9: ...environment 2 Basic Operation Provides the names and functions of the printer s components and the basic operating procedures such as switching the power on off and cancelling print jobs 3 Print Desc...

Page 10: ...as follows Short Edge Feed SEF Loading with one of the short edges of the paper Long Edge Feed LEF Loading with one of the long edges of the paper 5 The illustrations and screen shots used in this gu...

Page 11: ...with a plug that has a protective earth pin The plug fits only into an earthed electrical outlet This is a safety feature If the plug doesn t fit to the outlet contact an electrician to replace the o...

Page 12: ...ot use it for any other product Do not damage or alter the power cord Damage and alteration may generate heat and eventually cause electric shock or a fire accident If the power cord is damaged or ins...

Page 13: ...areas provided on both sides of the machine Never lift it by gripping any other areas It will avoid you from dropping the product and getting back ache or injuries Locate this product on the level an...

Page 14: ...shock or a fire accident Do not use conductive paper such as carbonic paper or coated paper When paper jam occurs it may cause short circuit and eventually a fire accident When cleaning this product u...

Page 15: ...atch fire by electric sparks inside the vacuum cleaner and cause explosion If you spill a large volume of toner contact your local Fuji Xerox representative Never throw a toner cartridge into an open...

Page 16: ...tes Warning and Caution Labels Be sure to follow the warning and caution labels placed on the machine Do not touch areas with labels indicating high voltage or temperature This can cause an electric s...

Page 17: ...ations Act 1992 in Australia New Zealand These limits are designed to provide reasonable protection against harmful interference in a residential installation This product generates uses and can radia...

Page 18: ...les of items that may be illegal to copy or print in your country Currency Banknotes and checks Bank and government bonds and securities Passports and identification cards Copyright material or tradem...

Page 19: ...ed only as a local printer When used as a local printer the printer is connected directly to a computer When used as a network printer the printer is connected to a computer over a network To use the...

Page 20: ...Port 9100 Ether Talk 1 FTP WSD 1 Protocol TCP IP TCP IP IPX SPX Net BEUI TCP IP TCP IP TCP IP Apple Talk TCP IP TCP IP Windows 2000 O O O O O O O O O Windows XP x32 x64 O O O O O O O O Windows Server...

Page 21: ...ng DHCP Autonet Thus when the printer is connected to a network that has a DHCP server the printer automatically obtains its IP address from the server Print the Printer Settings list to see if the pr...

Page 22: ...ontrol panel to display the menu screen 2 Press the button until Admin Menu is displayed Note If you went past the desired item return to the item by pressing the button 3 Press the or Eject Set butto...

Page 23: ...e button to display IP Address 13 Press the or Eject Set button to accept the selection The current IP address is displayed 14 Enter the value in the first field using the or button and press the butt...

Page 24: ...s the button to display Gateway Address 22 Press the or Eject Set button to accept the selection The current gateway address is displayed 23 Enter the gateway address in the same way you entered the I...

Page 25: ...network Some of the control panel settings can be set also on the service s Properties tab Note CentreWare Internet Services cannot be used when your printer is a local printer Supported Operating Env...

Page 26: ...ng or disabled In such case the buttons are displayed as URL links For information on how to set up your web browser refer to the online help for the web browser If you want to change the display lang...

Page 27: ...d certificates and enables SSL TLS communication This item appears only when the network expansion card optional is installed StatusMessenger The printer can notify its status via e mail to users who...

Page 28: ...changed under the Properties tab Protocol Settings HTTP If you change the port number you must enter a colon and then the port number after the address When SSL TLS server communication is enabled en...

Page 29: ...bled enter either the IPv6 link local address or the IPv6 global address You can check the IPv4 address and the IPv6 link local address by printing out the Printer Settings list Printing the Printer S...

Page 30: ...the left click TCP IP under Protocol Settings The TCP IP page is displayed 4 Under IP Mode if you want to enable both IPv4 and IPv6 communications select Dual Stack default If you want to enable only...

Page 31: ...tion HTML also when installing ContentsBridge Utility or other software Uninstalling a Print Driver and Other Software To Uninstall a Print Driver Your print driver can be uninstalled using the uninst...

Page 32: ...ms This can be opened using the side button 3 Manual feeder Load paper here when printing using the manual feeder Manually insert one sheet of paper at a time into the manual feeder 4 Tray 1 Load pape...

Page 33: ...ff the power circuit automatically in the event of current leakage 4 Power switch Switches the printer on off Pressing this to the position switches the power on and pressing it to the O position swit...

Page 34: ...it becomes very hot during printing 2 Drum cartridge Consists of a photosensitive drum drum and a development unit An electric charge is first projected on the drum and develops a print image on the d...

Page 35: ...Sleep mode This button lamp lights when the printer is the Power Saver mode Sleep mode 5 Cancel Job button Pressed to stop printing 6 button Pressed to advance to the next menu item or option The butt...

Page 36: ...tions installed Print Screen When the printer is printing or waiting for data the print screen is displayed on the display The following is an example of the print screen of when the printer is printi...

Page 37: ...t If an error message is displayed refer to Error Messages in Alphabetical Order P 116 to remedy the error Switching Off the Power Important Do not switch the power off when the display reads Please w...

Page 38: ...inter and then press the RESET button If the insulation condition of the printer is not recovered the interrupter trips again immediately In such case contact our Customer Support Center or your deale...

Page 39: ...W or less AC 220 240V or 7W or less AC 110V in the Sleep mode and returns to the ready to print state in about 25 seconds when re activated Note You can program your printer to disable the Sleep mode...

Page 40: ...document on the control panel Cancelling a Print Job being Printed Received on the Printer Press the Cancel Job button on the control panel This operation however does not cancel the page that was bei...

Page 41: ...lication click Print 2 Select the printer from the Select Printer list box and then display the Properties dialog box On Windows XP WordPad clicking Preferences displays the dialog box 3 Click the des...

Page 42: ...t and print the entire copies after verifying the print result Favorites You can apply the print setting by simply selecting an item from the drop down list box This feature also allows you to program...

Page 43: ...the sealed position have deckle edges or creased corners have rough cockled or laid finishes Loading Envelopes in the Tray 1 When loading envelopes in the tray 1 the orientation and handling of the fl...

Page 44: ...Important When inserting the tray be careful not to get your fingers caught between the tray and the printer 4 Set the size and type of the envelopes on the control panel Note For information on how...

Page 45: ...loaded the envelope s 4 From Paper Type select Envelope Note When Manual Feeder is selected select the paper type from Paper Type for Manual Feeder 5 From Paper Size select the size of the document t...

Page 46: ...t Poster Mixed Document Rotation and in the displayed dialog box set Image Rotation 180deg 8 Click OK to close the dialog box 9 Click OK to close the Printing Preferences dialog box 10 Click Print in...

Page 47: ...use printer failure Note On Windows 2000 Windows XP Windows Server 2003 or Windows Vista only users with administrator level access can change the settings Users without administrator level access can...

Page 48: ...rt edge cannot be longer than the long edge and that the long edge cannot be shorter than the short edge even within the specified ranges 6 If giving a name to the paper size select Name Paper Size an...

Page 49: ...n being used Consult the documentation for your application 1 On the File menu click Print 2 Select the printer from the Select Printer list box and click Preferences 3 The Paper Output tab appears Fr...

Page 50: ...int 6 Click the Layout tab and from Output Size select the custom output size you registered 7 Click OK to close the Printing Preferences dialog box 8 Click Print in the Print dialog box to start prin...

Page 51: ...lains how to perform manual 2 sided printing Note To use the manual 2 sided printing feature set Electric Sort to Off under the Detailed Settings tab Other Settings on your print driver When performin...

Page 52: ...rocedure uses a six page document as an example Note When printing on curled paper straighten the paper and then insert it into the manual feeder You cannot print on both sides of the paper if the doc...

Page 53: ...lains how to print a 2 sided job using the tray 1 The procedure uses a six page document as an example Note You cannot print on both sides of the paper if the document consists of various sizes of pap...

Page 54: ...the tray 1 3 Push the tray 1 all the way into the printer Important When inserting the tray be careful not to get your fingers caught between the tray and the printer 4 Press the Eject Set button to p...

Page 55: ...e control panel For more information refer to Operations on the Control Panel P 57 To use the Secure Print feature configure the following settings Set RAM disk to Available on the Options tab in the...

Page 56: ...cument Name select Enter Document Name or Auto Retrieve When Enter Document Name is selected enter the desired document name in Document Name within 12 bytes When Auto Retrieve is selected the documen...

Page 57: ...reen that allows you to enter a password is displayed 5 Enter your password using the and buttons Use the button to move the curser Note Enter the password set under Password in the Secure Print dialo...

Page 58: ...disk after printing press the button display Print and Save and proceed to Step 9 9 Press the or Eject Set button to accept the selection A screen that allows you to enter the print quantity is displ...

Page 59: ...g box that is displayed by clicking the printer icon For details refer to Changing the Accessory Configuration on the Print Driver P 188 Set Admin Menu System Settings RAM disk to On on the control pa...

Page 60: ...Retrieve Document Name select Enter Document Name or Auto Retrieve When Enter Document Name is selected enter the desired document name in Document Name within 12 bytes When Auto Retrieve is selected...

Page 61: ...The document name is the name of up to 12 bytes set under Document Name in the Sample Print dialog box on your print driver When more than one document is stored in the printer you can also select Al...

Page 62: ...ocuments in Step 6 select either Use PC Settings the printer prints in the print quantity specified on the print driver or xxx sets you must enter the print quantity 10 Press the Eject Set button to p...

Page 63: ...y refer to the manual included on the CD ROM of the Driver CD Kit Using commands such as lpr and ftp DocuPrint C1110 only When using commands such as lpr and ftp refer to Printing PDF Files without Us...

Page 64: ...t To print PDF files using lpr or ftp command you must enable the printer s LPD or FTP port on the control panel or CentreWare Internet Services default Enable Refer to Protocol P 90 To Print PDF File...

Page 65: ...mple A command for printing event pdf when the printer s IP address is 192 168 1 100 C ftp 192 168 1 100 Enter key Connected to 192 168 1 100 220 FUJI XEROX DocuPrint C1110 User 192 168 1 100 none Ent...

Page 66: ...les attached to e mails This feature is called E mail Print Setting the E mail Print Feature To use the E mail Print feature you must configure the servers on your network such as SMTP and POP3 server...

Page 67: ...thentication Set the authentication method to be used on the SMTP server Login Name Set the login user name for the SMTP server Password Set the login password for the SMTP server POP3 Server Address...

Page 68: ...ge The following commands can be specified in the body message The subject can be whatever you like Example Follow these guidelines when entering commands on e mails Commands are not case sensitive If...

Page 69: ...mple Here we suppose that the printer s e mail address is printer1 example com and Password for Print Job is prtuser 1 To print the text in the body message 2 To print the document attached to the e m...

Page 70: ...Properties tab E mail E mail Send Authentication is set to Invalid default on CentreWare Internet Services When E mail Send Authentication is valid the printer will not send confirmation e mails For...

Page 71: ...er does not bill you a flat rate or if you do not have full time access to the Internet you will be charged every time the printer retrieves data from the e mail server Make sure to connect the printe...

Page 72: ...ettings can cause paper jams Moisture such as water rain and humidity can cause print images to come off from paper For more information contact our Customer Support Center or your dealers Paper Tray...

Page 73: ...f using general paper commercially available paper make sure that it meets the following specifications To achieve the best print quality however we recommend you to use the standard paper introduced...

Page 74: ...g m2 Recycled 100 recycled pulp paper with the whiteness of bond paper FX Green 100 paper 67 g m2 Recycled 100 recycled pulp paper with minimum whiteness Recycled Color 100 paper 67 g m2 Recycled 100...

Page 75: ...h surface treatments Paper that is coated with anti set off white powder micro powder Paper that has perforations Paper that uses ink that deteriorates with heat Photosensitive paper Carbon paper Pape...

Page 76: ...Use the following guidelines when storing paper Paper Storage Environment Temperature 10 30 C Relative humidity 30 65 Paper Storage Guidelines Re wrap partly used packages of paper and store them awa...

Page 77: ...the paper with the print side facing down close to the manual feeder and push it into the printer until it automatically feeds Important Insert the paper straight into the manual feeder slot correctly...

Page 78: ...ze of the paper To load A4 or smaller size paper Pinch the length guide clip and slide it to the size of the paper Pinch the width guide clip and slide it to the size of the paper To load Legal 13 or...

Page 79: ...of the Tray 1 on the Control Panel When loading paper in the tray 1 you must set the size and type of the paper on the control panel The default paper type and size for the tray 1 are Plain Paper and...

Page 80: ...s the or Eject Set button to accept the selection Paper Type is displayed 5 Press the or Eject Set button to accept the selection The current setting is displayed 6 Press the button until the correct...

Page 81: ...ress the button until Paper Size is displayed 6 Press the or Eject Set button to accept the selection The current settings is displayed 7 Press the button until the correct paper size and orientation...

Page 82: ...en the flaps are in the sealed position have deckle edges or creased corners have rough cockled or laid finishes Feed Orientations for an Envelope in the Manual Feeder When loading an envelope in the...

Page 83: ...tray extension prevents printed output from falling off the printer When printing documents extend the output tray extension Monarch DL COM 10 C5 Load envelopes with the address side facing up and the...

Page 84: ...isplay the number of printed pages to date on the control panel Admin Menu Wired Network DocuPrint C1110 only Use this menu to configure the wired network settings USB Settings DocuPrint C1110 only Us...

Page 85: ...s before becomes invalid Resetting a Value to Its Default To reset a value to its default display the value and press the and buttons simultaneously The value changes to its factory setting To accept...

Page 86: ...previous screen by pressing the button To start over from the beginning press the Menu button 4 Press the button until System Settings is displayed 5 Press the or Eject Set button to accept the select...

Page 87: ...ont List DocuPrint C1110 only Lists the supported PostScript fonts and samples of these fonts PDF Font List Lists the supported PDF fonts and samples of these fonts Job History Lists the last 20 print...

Page 88: ...pecifies printer settings affecting jobs sent to the printer through a network port Note The settings in Wired Network cannot be set when entering this menu during printing You must reboot the printer...

Page 89: ...tically DHCP Uses DHCP to set the IP address automatically Panel Sets the IP address manually by entering it on the control panel IP Address Subnet Mask Gateway Address Allows you to verify or manuall...

Page 90: ...ion DocuPrint C1110 only P 147 HTTP SSL TLS does not appear on the model available in China IPX SPX Specifies IPX SPX Frame Type Auto default Automatically selects the frame type Ethernet II Uses the...

Page 91: ...hen the communication protocol are both in ASCII and binary formats and switches between the two using control codes Binary Select this when no special processing is required for data Note Select an a...

Page 92: ...tones that indicate various printer conditions such as errors You cannot adjust the sound volume Control Panel default On Sets whether or not to generate an audio tone when the correct button is press...

Page 93: ...ight corner of paper Bottom Left Prints a user ID on the bottom left corner of paper Bottom Right Prints a user ID on the bottom left corner of paper Print Text Sets whether the printer outputs PDL da...

Page 94: ...Number of pages is not limited When a print job from the scanner interrupts the current print job print data already in the printer s buffer memory continues to print until there is enough space for...

Page 95: ...the developer may solve this printing problem Refer to Cleaning the Developer P 169 Toner Refresh Refreshes the toner cartridges by forcing to consume toner in the toner cartridges When the printed i...

Page 96: ...ut layout Auto default Automatically selects the output size A4 A5 B5 Legal or Letter depending on the size of your PDF file and calculates the zoom ratio to print the file as large as possible on the...

Page 97: ...1 to 999 default 1 Image Enhance Sets whether to perform image enhancement Image enhancement is a feature that makes the boundary line between black and white smoother to decrease jags and enhance the...

Page 98: ...Default Color Sets the color mode This settings is used when the color printing mode setting is not specified for the print job that is sent to the printer Black Prints in black and white mode Color d...

Page 99: ...yweight 1 Heavyweight 2 Labels Coated 1 Coated 2 Coated 3 Envelope Refer to Setting the Paper Type of the Tray 1 P 80 Paper Size Sets the paper size of the paper loaded in the tray 1 A4 Portrait defau...

Page 100: ...ocedure provided for each jammed area See the following diagram for the reference pages to the jam clearance procedures CAUTION Do not attempt to remove a paper jammed deeply inside the product partic...

Page 101: ...the control panel The error will not clear unless you open and close the front cover 1 Pull the jammed paper out of the manual feeder If no jammed paper can be found or it is hard to remove the paper...

Page 102: ...e minutes print quality may deteriorate 5 Remove any jammed paper Make sure no torn pieces remain inside 6 Close the front cover Important When closing the front cover be careful not to get your finge...

Page 103: ...the jammed paper and any paper that is wrinkled 3 If paper is jammed in the printer gently remove the paper carefully without tearing If it is still hard to remove the paper go on to the next step 4...

Page 104: ...rinter Paper Jams in the Fuser Unit Important The fuser is hot Do not touch areas with labels indicating high temperature and those surrounding the labels Otherwise you can get burnt To protect the dr...

Page 105: ...step 3 Hold the fuser cover by the part shown in the figure and open the cover Then remove the jammed paper 4 Place the green levers on both sides of the fuser unit to their original positions 5 Close...

Page 106: ...utlet and reboot the printer If the problem still persists the printer may be at fault Contact our Customer Support Center or your dealers The printer makes odd noise Is the printer installed on a lev...

Page 107: ...rint driver The Ready lamp is blinking but the printer does not print The data is in the print buffer Cancel or force eject the job If cancelling the job press the Cancel Job button If force ejecting...

Page 108: ...ple if Paper Type is set to Heavyweight 1 try changing it to Heavyweight 2 Did not you forget to remove the yellow tapes from the drum cartridge Properly remove the eight yellow tapes from the drum ca...

Page 109: ...or the printer Load appropriate paper Refer to Supported Paper P 72 The fuser unit or drum cartridge is damaged or deteriorated The fuser unit or drum cartridge may need replacement depending on its c...

Page 110: ...with its power on After about an hour the condensation disappears due to the heat inside the printer Refer to Sleep mode System Settings P 92 The drum cartridge or fuser unit is damaged or deteriorat...

Page 111: ...Double printing with appropriate margins The fuser temperature is may not be set properly Adjust the fuser temperature on the control panel Refer to 7 11 Adjusting the Fuser Temperature P 165 Ghost T...

Page 112: ...rueType fonts with the built in fonts Change the printing method of TrueType fonts under the Detailed Settings tab Font Settings on your print driver Refer to Online help for the print driver Images a...

Page 113: ...Paper P 72 Check if the paper type setting on the print driver or control panel is set correctly Refer to Paper Type P 99 Online help for the print driver The toner save feature is enabled or the res...

Page 114: ...aper on top of paper that is still in a paper tray Fan the paper loaded in the tray and reload it into the tray Add paper to the tray only when the tray is out of paper Are you trying to print on post...

Page 115: ...printed to reprint them Refer to A 6 Handling Paper Jams When Performing 2 sided Printing P 189 Important If you set Handling paper jams for manual duplex to Print default Do Not Print on the print dr...

Page 116: ...A paper jam occurred in manual feeder Remove the jammed paper from the manual feeder Then push the side button and open and close the front cover Open the front cover even when there is no jammed pape...

Page 117: ...Load Tray 1 XXXXXXXX Load Tray 1 YYYYYYYY The paper is not loaded in the tray 1 or the size of the paper loaded in the tray 1 does not match the paper size specified by the print driver Load the size...

Page 118: ...ose the front cover Refer to 6 1 Clearing Paper Jams P 100 Out of Memory Press SET The job cannot be printed due to insufficient memory Cancel the job by pressing the Eject Set button on the control p...

Page 119: ...ing the Drum Cartridge P 130 Types of Consumables P 125 Remove paper from Manual Feed The paper is loaded into the manual feeder but the job requested the tray 1 Remove the paper from the manual feede...

Page 120: ...Cartridge X Mismatch X Y M C or K The X toner cartridge is not appropriate for the printer Use an appropriate toner cartridge and install it correctly in the printer Wrong Paper Size Reload Tray 1 Loa...

Page 121: ...es activated Print out the Printer Settings list to see if Internet Services is activated Is the URL entered correctly Check the URL If you still cannot access the service enter the printer s IP addre...

Page 122: ...settings we suggest you to record the current settings by printing out the Printer Settings list The service does not accept the user ID or password If you fail to log in four times in a row after sw...

Page 123: ...3 8 Printing Using E mail E mail Print DocuPrint C1110 only P 66 7 6 Checking the Printer Status via E mail DocuPrint C1110 only P 144 Are the SMTP server and POP3 server running normally Consult your...

Page 124: ...uarantee The continuous use of the Non genuine mode can also cause the printer to break down and any repair charges for such break down will be incurred by users Note To disable the Non genuine mode s...

Page 125: ...nsumable varies depending on print requests documents printed and how often the power is switched on off For more information refer to Life of Consumables P 182 Toner cartridges The printer has toner...

Page 126: ...that uses heat and pressure to fuse toner onto paper The fuser unit becomes very hot when the printer is in use so do not touch it When you replace the fuser unit also replace the feed roller for the...

Page 127: ...al Fuji Xerox representative for its disposal CAUTION Never heat the drum cartridge or scratch its surface It may cause health hazard Keep the drum cartridge and toner cartridges out of the reach of c...

Page 128: ...C When a toner cartridge is near or reaches the end of its life the following messages appear on the printer s control panel Important Make sure that the power is on when replacing the toner cartridg...

Page 129: ...and then pull out the toner cartridge Important Be careful not to get your hands or clothes dirty with toner If toner gets on your hands or clothes wash it off immediately 4 Remove a new toner cartrid...

Page 130: ...ory Do not expose the drum cartridge to direct sunlight or strong light To protect the drum cartridge against bright light close the front cover within three minutes If the front cover remains open fo...

Page 131: ...colored film of the belt unit Scratches dirt or oil from your hands on the film of the belt unit may reduce print quality 3 Hold the drum cartridge by the tabs at both ends and slide the cartridge to...

Page 132: ...cartridge by both ends as shown in the figure and then slide the cartridge along the guides inside the printer until it stops Note Make sure to insert the drum cartridge into the printer until the li...

Page 133: ...same time For information on how to replace the feed roller refer to Replacing the Feed Roller P 136 CAUTION Fuser Safety When removing the fuser unit always switch off first and wait for 3040 minutes...

Page 134: ...the front cover 3 Hold the gray tab on the right side of the fuser unit and the turn the right side of the fuser unit towards the front of the printer 4 Hold the fuser unit by both ends and slightly l...

Page 135: ...e control panel 1 Press the and Eject Set buttons simultaneously Consumables Menu is displayed 2 Press the button Counter Reset is displayed 3 Press the or Eject Set button to accept the selection Fus...

Page 136: ...to Cleaning the Feed Roller P 171 Replacement Procedure Use the following procedure to replace the feed roller for the tray 1 1 Pull the tray 1 out of the printer 2 Remove all the paper from the tray...

Page 137: ...ections fit completely into the slots and the roller hook reseats into the groove in the axle 6 Load the paper removed in Step 2 into the tray 1 7 Push the tray all the way into the printer Important...

Page 138: ...information about the PCL macros downloaded to the printer PostScript Font List PS Font List O Lists the supported PostScript fonts and samples of these fonts PDF Font List PDF Fonts List O O Lists th...

Page 139: ...nabled selecting Print Meter prints this report This report lists the number of pages sheets printed to date by each user Refer to Authentication and Auditron Administration Features DocuPrint C1110 o...

Page 140: ...ication being used and the print quantity setting the application may insert a blank page into the job In such case the blank page is counted as 1 page and will be included in the meter count Use the...

Page 141: ...rinting of this report is also counted in Report List the last row in the report Pages Color 8 5 x 14 Total number of pages printed in color on 8 5 x 14 size paper Pages Color A4 Total number of pages...

Page 142: ...Monitor can perform the following If an error occurs while processing a print job SimpleMonitor displays a window on your computer informing you of the error SimpleMonitor displays the following windo...

Page 143: ...ature is called CentreWare Internet Services CentreWare Internet Services can be used also to check the status of consumables and the paper level of the tray 1 Note For information on how to use Centr...

Page 144: ...tatus the printer sends you the information by e mail The printer can send e mail notification of errors paper jams consumable status etc to the specified e mail addresses The recipients can periodica...

Page 145: ...SMTP Server Address SMTP Server Port Number E mail Send Authentication Login Name SMTP Password SMTP POP3 Server Address POP3 Server Port Number Login Name POP3 Password POP3 POP3 Server Check Interva...

Page 146: ...s not start with will be ignored Place only one command per line and separate each command or parameter with a space or a tab When the same command is entered more than one time in one e mail only the...

Page 147: ...ocument in the printer and print it after entering a password on the control panel Note To use this feature additional memory optional of 256 MB or above must be installed Printing Confidential Docume...

Page 148: ...me invalid If using the network expansion card on another printer create a certificate again for the new printer 1 Launch your web browser and access CentreWare Internet Services Note For information...

Page 149: ...ows you to reboot the printer is displayed On the page click the Reboot Machine button 8 After rebooting the printer refresh your browser window 9 From the menu on the left click SSL TLS Server Commun...

Page 150: ...rt number enter a colon and then the new port number after the address Example https printer s IP address port number Enabling Data Encryption To encrypt print data sent to the printer you must use an...

Page 151: ...IP_Address ipp where IP_Address is the IP address of the printer Click Next 6 Click Have Disk 7 In the dialog box displayed enter the path for the print driver Click OK 8 Select the print driver and t...

Page 152: ...left click Protocol Settings and then LPD or Port9100 4 Click IP Filter 5 Enter the IP addresses address masks you want to control access from and select the type of access Reject Permit or Off The IP...

Page 153: ...t printing from a specific network address reject printing from a particular address within the network but permit printing from a particular user within the rejected address Example 1 Permit printing...

Page 154: ...and manage and count the number of sheets printed by each user Restricted Features The Authentication and Auditron Administration features control the use of the following features Printing from Comp...

Page 155: ...ion features initializes the meter counts If you perform 2 sided printing in this printer 1 page is counted as 1 sheet For example if printing 4 pages with 2 sided printing the printed sheets are coun...

Page 156: ...ccess CentreWare Internet Services refer to Configuring the Printer Using CentreWare Internet Services P 25 If you are prompted to enter the administrator s ID and password enter the ID and password a...

Page 157: ...on Administration Features DocuPrint C1110 only 157 8 Verify that User Account is displayed on the Print Auditron page 9 Click Edit User Account 10 On the Edit User Account page enter User Account Num...

Page 158: ...isplayed page enter each field and click the Save button Note The user ID and password set on this page will be used also on your print driver 12 If registering more than one user click the back butto...

Page 159: ...dure explains how to set the login information on your print driver The procedure uses Windows XP as an example Note For information on each setting item on your print driver refer to the online help...

Page 160: ...to accept the selection Wired Network is displayed 4 Press the button until Maintenance Mode is displayed 5 Press the or Eject Set button to accept the selection Adjust PaperType is displayed 6 Press...

Page 161: ...and the colored line are most closely aligned for each color Y M and C If the straightest line is identified make a note of the value 9 to 9 for each color When the value is 0 for each color you do no...

Page 162: ...the selection Adjust PaperType is displayed 6 Press the button until Adjust ColorRegi is displayed 7 Press the or Eject Set button to accept the selection Auto Adjust is displayed 8 Press the button...

Page 163: ...nd buttons Use the button to move the curser Example M 2 16 After entering the values press the Eject Set button to confirm your entry The display returns to the screen shown on the right 17 When you...

Page 164: ...played 4 Press the button until Maintenance Mode is displayed 5 Press the or Eject Set button to accept the selection Adjust PaperType is displayed 6 Press the button until Adjust BTR is displayed 7 P...

Page 165: ...ress the button until Maintenance Mode is displayed 5 Press the or Eject Set button to accept the selection Adjust PaperType is displayed 6 Press the button until Adjust Fuser is displayed 7 Press the...

Page 166: ...ess the or Eject Set button to accept the selection Wired Network is displayed 4 Press the button until Maintenance Mode is displayed 5 Press the or Eject Set button to accept the selection Adjust Pap...

Page 167: ...Press the button until Maintenance Mode is displayed 5 Press the or Eject Set button to accept the selection Adjust PaperType is displayed 6 Press the button until Toner Refresh is displayed 7 Press t...

Page 168: ...cept the selection Wired Network is displayed 4 Press the button until Maintenance Mode is displayed 5 Press the or Eject Set button to accept the selection Adjust PaperType is displayed 6 Press the b...

Page 169: ...Wired Network is displayed 4 Press the button until Maintenance Mode is displayed 5 Press the or Eject Set button to accept the selection Adjust PaperType is displayed 6 Press the button until Clean...

Page 170: ...h off and unplug it Access to a live machine interior may cause electric shock Cleaning the Exterior Clean the exterior of the printer monthly or more often if needed To clean the exterior surfaces wi...

Page 171: ...Important Make sure that nothing touches or scratches the surface black colored film of the belt unit Scratches dirt or oil from your hands on the film of the belt unit may reduce print quality When...

Page 172: ...levers clockwise by 90 degrees to lock the drum cartridge Important Do not turn the lock levers by more than 90 degrees with an excessive force 9 Close the front cover Important When closing the fron...

Page 173: ...osition 2 Unplug the power cord from the power outlet and the printer 3 Push the side button right side and open the front cover 4 Identify the location of the CTD sensor inside the printer and clean...

Page 174: ...moving them The toner may spill Be careful not to get your hands or clothes dirty with toner If toner gets on your hands or clothes wash it off immediately Note For information on how to remove the to...

Page 175: ...dust and humidity 10 If the tray is extended push the extended portion back into the tray by holding the right rear side of the tray 11 Push the tray all the way into the printer Important When inser...

Page 176: ...in 2 1 The print speed may decrease due to factors such as paper types paper sizes and print requirements of print jobs The speed may decrease also when the printer is performing image quality adjustm...

Page 177: ...16 g m2 Labels Coated 1 60 105 g m2 Coated 2 106 163 g m2 Coated 3 164 216 g m2 Envelope Recycled Important Use only the recommended paper Using paper other than that recommended for the printer can c...

Page 178: ...Standard DocuPrint C1110 USB2 0 Hi Speed Ethernet 100BASE TX 10BASE T DocuPrint C1110 B USB2 0 Hi Speed Supported protocol DocuPrint C1110 only TCP IP LPD Port9100 IPP 1 SNMP HTML HTTP DHCP FTP SMB 1...

Page 179: ...the power is switched off even when the power cord is plugged in Dimensions 400 W 394 D 1 389 H mm Important 1 When the paper tray 1 is not extended Weight 17 0 kg 1 Important 1 Including consumables...

Page 180: ...180 A Appendix Printable Area Note The actual printable area may vary depending on the printer control language Top 4 mm Left 4 mm Bottom 4 mm Right 4 mm Unprintable Area Printable Area...

Page 181: ...al memory of 256 MB or above This also allows you to use the Secure Print Sample Print feature For information about the features and situations that require additional memory refer to A 5 Installing...

Page 182: ...ay be less than one half of the reference value If Color Auto is selected on the print driver the color drum is consumed even when printing in monochrome Product Life The life of the printer is as fol...

Page 183: ...he CD ROM of the Driver CD Kit included with the printer To access the web site click Fuji Xerox Web Site on the startup window of the CD ROM The URL of the driver download service page is as follows...

Page 184: ...Print feature When using the electronic sort function Additional memory may be required also when printing large data such as complex graphics Note For more information about additional memory and how...

Page 185: ...y to the printer The printer has one slot for installing a memory card If you want to add memory when the slot already has a memory card replace the memory card with the one with larger capacity Impor...

Page 186: ...r the memory card pops up pull it out at an angle 6 Hold the new memory card so that the notch on the card comes below the center of the card 7 Align the notch on the new memory card with the projecti...

Page 187: ...ose the rear cover and tighten the screw loosened in Step 2 12 Plug in the power cord and switch on the power by pressing the power switch to the position The installation is now complete Note You can...

Page 188: ...print driver as an example 1 On the Windows Start menu click Printers and Faxes Select to highlight the printer and select Properties from the File menu 2 The Properties dialog box appears In the dia...

Page 189: ...for clearing paper jams refer to 6 1 Clearing Paper Jams P 100 For information on how to load paper in the manual feeder or tray 1 refer to Loading Paper in the Manual Feeder P 77 or Loading Paper in...

Page 190: ...ed on the print driver the printer does not reprint the jammed page but continues printing the rest of the job after the jam is cleared Example If page 3 is jammed 1 After the jam is cleared the messa...

Page 191: ...gain from the application to reprint only the pages When Print is Selected If you selected Print on the print driver when requesting a job the printer reprints the jammed page and continues printing t...

Page 192: ...tinues printing the rest of the job 3 When all pages are finished printing the display returns to Ready to Print Since the reverse side page 4 of the jammed page where the jam occurred is blank reload...

Page 193: ...job 2 sided depending on the application being used and the print quantity setting the application may automatically insert a blank page into the job In such case the blank page is counted as 1 page W...

Page 194: ...trap Protocol It is a protocol that allows a client on a TCP IP network to automatically acquire network configuration information from a server Click A single action of pressing and releasing a mouse...

Page 195: ...eight in grams of one square meter of paper HTTP A protocol used to communicate with a web browser over the Internet ICM An acronym for Image Color Matching and is color management software that runs...

Page 196: ...n To gain access to a resource on a computer system such as hard disk or printer on a network To end a session on a computer system refers to to log out off Multiple up A feature that allows you to pr...

Page 197: ...ch dpi The higher the dpi the higher the resolution Server A computer in a network that stores data files accessed by other computers Client is a computer that demands service from a server SMB A netw...

Page 198: ...to switch off the computer Web browser Software that is designed to view information from the Internet on computers Mozilla Firefox and Internet Explorer are the two most popular web browsers WINS An...

Page 199: ...A 8 Glossary 199...

Page 200: ...125 replacing consumables 125 replacing the fuser unit 133 replacing the toner cartridges 128 toner cartridge 125 types of consumables 125 ContentsBridge Utility 63 control panel 32 35 locking the co...

Page 201: ...ro List 138 PDF 96 printing PDF files directly 63 PDF Bridge Feature 63 PDF Font List 138 Poster 42 PostScript 98 PostScript Font List 138 power problems 106 107 switching on off the power 37 Power Sa...

Page 202: ...printer status on a web browser 143 StatusMessenger feature 144 problems 123 Stored Document List 139 subnet mask 24 supported operating environment 19 System Settings 92 T toner cartridge 34 125 Tray...

Page 203: ...Print Menu Secure Print Select User ID User01 Enter Quantity Use PC Settings Enter Quantity xxx sets Enter Quantity xxx sets Password SET key xxxxxxxxxxxx Select Document All Documents Select Documen...

Page 204: ...us Main menus Items that appear do not appear depending on the options installed in the printer The network expansion card is not available for the model in China Tray Settings PS Error Report Tray 1...

Page 205: ...X IPX SPX Auto Ethernet II Ethernet 802 3 Ethernet 802 2 Ethernet SNAP IP Filter Initialize NVM Adobe Protocol No n Address No n Mask 000 000 000 000 Ready to Init No n Mode Off Accept Reject n 1 5 Au...

Page 206: ...f On Print Text Off On RAM Disk Off On Print Priority A4 8 5 x 11 DefaultPaperSize On Off Interrupt Print Millimeters mm Inches mm inch Off Top Left Top Right Bottom Left Bottom Right Print ID Off Lar...

Page 207: ...ta Cyan Black Are you sure Toner Refresh Color Regi Chart Enter Adjustment From E previous page Maintenance Mode continued PDF F Normal High Quality High Speed Print Mode Auto 100 No Zoom Booklet 2 Pa...

Page 208: ...Custom Size Length Y Width X xxxmm xxxmm Select from 81 fonts Select from 36 sets 4 00 50 00 increment 0 25 pt 6 00 24 00 increment 0 01 cpi 5 128 increment 1 1 999 increment 1 Plain Paper Adjust Pap...

Page 209: ...DocuPrint C1110 C1110 B User Guide ME4073E2 1 Edition 1 October 2007 Fuji Xerox Co Ltd Copyright 2007 by Fuji Xerox Co Ltd...

Reviews: