background image

SETTING THE SYSTEM CONFIGURATION

4-4

XEROX DOCUPRINT 4850/4890 IPS GUIDE TO CONFIGURING AND MANAGING THE SYSTEM

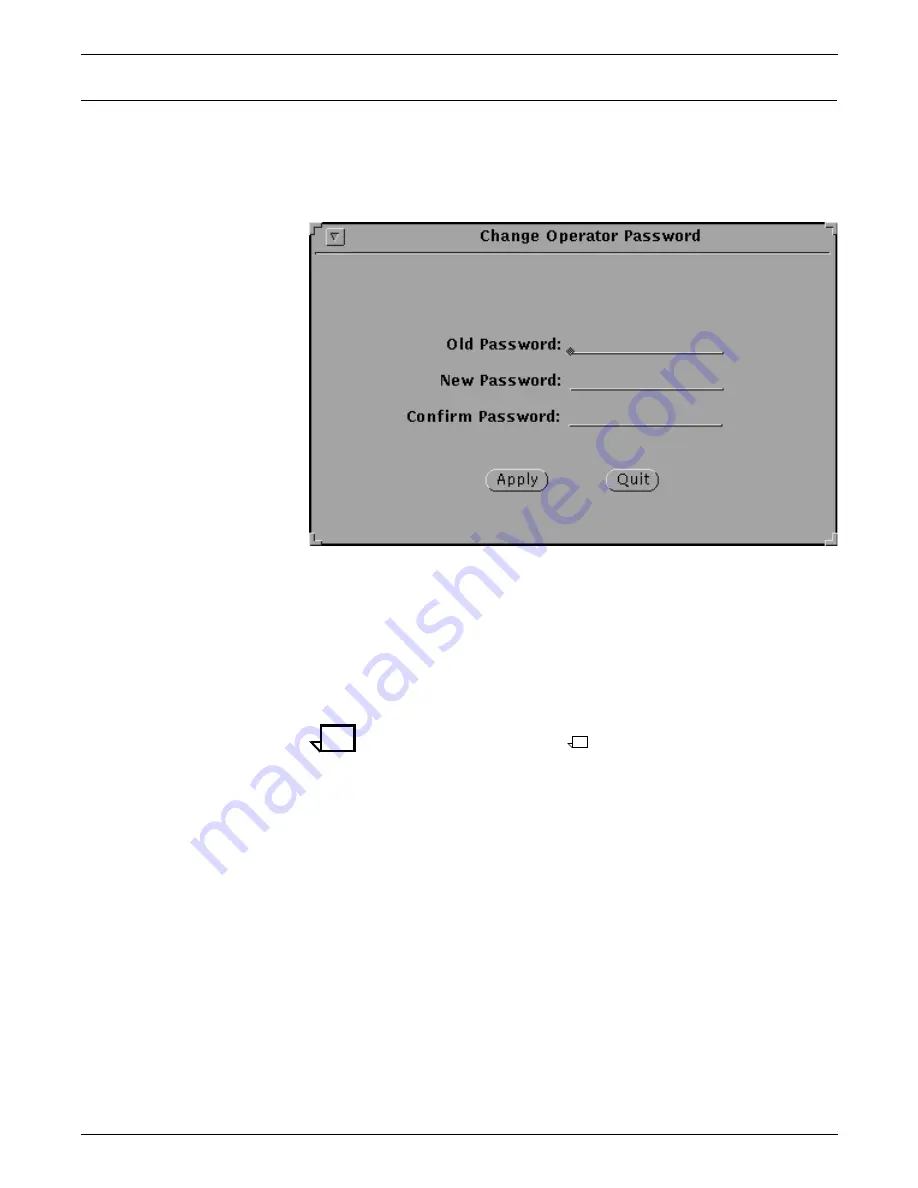
Changing the password for a Privilege Mode

To change the password for a Privilege Mode (Operator or 
Administrator):

1. From the Administration menu, select Privilege Mode, then 

Change Operator Password. The Change Operator Password 
window displays.

2. In the Old Password field, enter your old password.

3. In the New Password field, enter your new password. A 

password may consist of digits, letters, punctuation and special 
characters. It may not use control characters.

4. In the Confirm Password field, reenter your new password.

5. Click Apply.

Note:

If the old password or the confirmed password is invalid, a 

notice window will display.

Summary of Contents for DocuPrint 4850

Page 1: ...Xerox DocuPrint 4850 4890 IPS Guide to Configuring and Managing the System Version 7 1 August 2000 721P89080...

Page 2: ...after granted including without limitation material generated from the software programs which are displayed on the screen such as icons screen displays looks etc Printed in the United States of Ameri...

Page 3: ...m is completely enclosed during all modes of customer operation The laser danger labels on the system are for Xerox service representatives and are on or near panels or shields that must be removed wi...

Page 4: ...Xerox equipment Use of unsuitable materials may result in poor performance and may create a hazardous situation Never move either the printer or the Printer Controller without first contacting Xerox...

Page 5: ...1 5 Moving a window or icon 1 7 Reducing a window 1 7 Entering text 1 8 Exiting a window 1 9 IPS main window 1 10 Menus 1 11 Configuration menu 1 11 Diagnostics menu 1 13 Administration menu 1 14 Sys...

Page 6: ...resident fonts 3 8 Displaying resident fonts 3 8 Adding resident fonts 3 9 Loading the IPS software license text string 3 11 Switching modes Dual Mode 3 13 4 Setting the system configuration 4 1 Privi...

Page 7: ...a icon 4 41 Deleting a media icon 4 41 Editing the media defaults 4 41 Adding a new input configuration 4 43 Changing an input configuration file 4 49 Deleting an input configuration file 4 50 Correct...

Page 8: ...TABLE OF CONTENTS viii XEROX DOCUPRINT 4850 4890 IPS GUIDE TO CONFIGURING AND MANAGING THE SYSTEM...

Page 9: ...the other documents listed in the Related publications section Before using this guide become familiar with its contents and conventions Contents This section lists the contents of this guide Chapter...

Page 10: ...library names are shown in italics for example the Xerox DocuPrint 4850 4890 IPS Guide to Configuring and Managing the System Capitalization of graphical user interface GUI window titles matches the t...

Page 11: ...elpful Facts About Paper Installation Planning Guide Master Index Messages Guide Solutions Guide System Overview Guide Troubleshooting Guide Xerox Standard Font Library Font User Guide The documentati...

Page 12: ...INTRODUCTION xii XEROX DOCUPRINT 4850 4890 IPS GUIDE TO CONFIGURING AND MANAGING THE SYSTEM...

Page 13: ...w displays the current system setup the current system status and any jobs that are running This window also provides access to menus and subwindows from which you can configure and operate your syste...

Page 14: ...GRAPHICAL USER INTERFACE 1 2 XEROX DOCUPRINT 4850 4890 IPS GUIDE TO CONFIGURING AND MANAGING THE SYSTEM Figure 1 1 Printer Controller monitor with IPS main window IPS Console window and IPS Print Eng...

Page 15: ...le box or oval to the right of the menu name Figure 1 2 Example of a pull down menu title button from the IPS main window Types of pull down menus You will encounter two types of pull down menus on th...

Page 16: ...ou drag the cursor to the option you want 3 Release the mouse button when the cursor is on your selection The menu disappears and the screen for your selection is displayed Notes on pull down menus He...

Page 17: ...pin buttons An incremental spin button consists of a line displaying a numeric value with buttons next to it containing arrows Figure 1 7 Example of incremental spin buttons To select an item that has...

Page 18: ...red by other windows or icons you do not want to close If the title bar of the window you want is completely covered use the Front key on the keyboard or drag and drop the other windows away to expose...

Page 19: ...in front of the triangle To highlight or select text in a text field 1 Position the cursor at the beginning or the end of the text you are selecting 2 Holding down the left mouse button drag the curs...

Page 20: ...s there is a small button in the shape of a push pin in the upper left corner on the title bar illustrated in the following examples If the pin is out Figure 1 8 Window with pin button out You can exi...

Page 21: ...ns menus and to the Input and Output Configuration subwindows You return to this window from each of the subwindows after you have made your selections Caution When you are using the mouse on the IPS...

Page 22: ...he Refresh option redisplays or redraws the window The title bar pull down menu is generated by the Windows system on your Sun workstation and does not apply to the IPS software You should not have oc...

Page 23: ...tics when needed by your service representative Maximum Simplex For jobs containing both duplex and simplex pages the Maximum Simplex option allows you to specify the maximum number of simplex pages t...

Page 24: ...ble to Service privilege mode users only Debug Level Displays different levels of debug messages to be stored in log message files This function is available to Administrator and Service privilege mod...

Page 25: ...s enabled This is usually done by your service representative Billing Information Displays the meter readings for the system Privilege Mode Enables changing of The privilege mode The password for a se...

Page 26: ...IPS online and offline and shut down the system Figure 1 14 System Options pull down menu The System Options pull down menu contains the following items Online Places the system online Offline Takes t...

Page 27: ...s DFA personality profiles and media icons IPDS Trays Graphically shows the stocks that the current configuration has associated with the input trays that are called out in the job IPDS data stream Th...

Page 28: ...stacker trays Figure 1 16 Output Configuration section of IPS main window This section the lower part of the larger left column contains the following fields Output Configuration pull down menu Allow...

Page 29: ...ching is selected from the Output Configuration window For information on specifying finishing attributes refer to the section Creating a new output configuration in the chapter Setting the system con...

Page 30: ...n Shows the resolution in dpi of the fonts used in the current or most recent job sent to the IPS This field reflects the value entered on the Resolution window accessible through the Configuration pu...

Page 31: ...ll down menu are activated and then canceled To display the correct status access the item s that were previously activated and canceled and select only the Cancel button Trace Indicates whether a tra...

Page 32: ...lick this button before you can click the Cancel Job button to cancel printing Continue Allows you to resume job processing Note If you use the screen Stop button to stop a job you must use the screen...

Page 33: ...the Ask for File Name window where you are prompted to give the new file a name Apply Update Saves changes you make to an input or output configuration file and puts the changed configuration into ef...

Page 34: ...the icon s original saved attributes Clear On the Output DFA windows signals the printer to disable the selected DFA profile name Resets all profile parameters in printer memory to zero You would use...

Page 35: ...t connected make sure the printer and Printer Controller are powered off Then connect the cable Caution Do not connect the printer cable to the Printer Controller when either the Printer Controller or...

Page 36: ...onfiguration remains on the screen Either Wait for the printer to warm up and the message to disappear which takes a varying amount of time or Use the following procedure to reduce the amount of boot...

Page 37: ...he system Always power off the system before you do any of the following Remove or install a processor part Remove or install an external drive unit or monitor Unplug the processor power cord Recover...

Page 38: ...round area of the screen not in a window or on an icon press the right mouse button On the workspace menu that displays select Shutdown With the pointer in the IPS main window select Shutdown System f...

Page 39: ...the Powering on the IPS system section above Communicating with the host computer An IPS is either channel attached to a host computer or receiving data via TCP IP over Ethernet or Token Ring It rece...

Page 40: ...e print job 2 Make any changes necessary to the system configuration using the procedures contained in this chapter Jobs are printed in the order they are sent Note If you are printing samples you mus...

Page 41: ...ng over a channel reboot the Sun workstation and the HCU Job recovery restarts and resumes at the last checkpoint held by the host Rebooting the Printer Controller To reboot your Printer Controller wi...

Page 42: ...button The workspace menu displays 2 Do one of the following Select Eject disk from the workspace menu or Open a command tool and enter the eject command a Place the cursor on the blue background of...

Page 43: ...main window require the Printer Controller to be rebooted to put the new settings into effect The procedure for rebooting the Printer Controller is in the Starting and stopping the system chapter You...

Page 44: ...ou can select the language in which the GUI panel and labels will display 1 From the Configuration pull down menu select Language The Language window displays 2 From the pull down menu select the lang...

Page 45: ...ll down menu select Interface The Interface window displays 2 From the Select Interface pull down menu use the right mouse button to select the interface you want Your selection displays in the lower...

Page 46: ...channel modes specify the operation of the channel signals determine the data speed and specify whether the channel interface mode is interlock or data stream Single Tag Single tag interlock mode Thi...

Page 47: ...ber follow these steps 1 Select TCP IP from the Interface window pull down menu The TCP IP Interface window displays displaying the default port number that PSF is already using for your system Figure...

Page 48: ...presentative To enable or disable the modem follow these steps 1 Select Modem Enable Disable from the Configuration pull down menu The Modem Enable Disable window displays Figure 3 5 Modem Enable Disa...

Page 49: ...allocation will no longer be available for system operation If you wish to change the memory allocation to provide more memory for resources follow these steps 1 Select Resource Limits from the Confi...

Page 50: ...ent fonts You can display the resident fonts currently loaded on your system or add resident fonts as needed Displaying resident fonts To display the currently loaded resident fonts select Resident Fo...

Page 51: ...you want to add reside on a CD or a diskette skip this step Otherwise copy the fonts to the following location var db fonts input 2 Display the Resident Fonts User Interface window Refer to the sectio...

Page 52: ...s the Apply button is no longer grayed out click Quit 9 Optional Specify the default code page a Select a font to use as the default code page for Human Readable Information HRI then click the Default...

Page 53: ...t ID on the Sun 1 Open a Unix command tool using this procedure a Click the right mouse button on the blue user interface screen background to display the workspace pull down menu b Select Command Too...

Page 54: ...r case Here is an example of a license string CB1ED0F1D80EEE534335 4 Click Apply when finished Note If a message pops up indicating that an invalid license was entered your license string text entry w...

Page 55: ...he host this stops the host from sending jobs from the queue Follow procedures for your own host system 3 At the host take the printer offline 4 Place the pointer on the background area of the screen...

Page 56: ...SETTING UP THE PRINTER CONTROLLER 3 14 XEROX DOCUPRINT 4850 4890 IPS GUIDE TO CONFIGURING AND MANAGING THE SYSTEM...

Page 57: ...dures are described in sequence as they appear on each menu Note During an upgrade to the system all data on the system disks is deleted Therefore it is important to save the following system configur...

Page 58: ...not accessible Operator Mode In this mode service related options on the Configuration and Diagnostic menus as well as the Trace and Debug Level options on the Diagnostics menu are not accessible Admi...

Page 59: ...NAGING THE SYSTEM 4 3 1 From the Administration menu select Privilege Mode then Change Privilege Mode The Change Privilege Mode window displays 2 From the Privilege Mode pull down list select the Priv...

Page 60: ...ivilege Mode then Change Operator Password The Change Operator Password window displays 2 In the Old Password field enter your old password 3 In the New Password field enter your new password A passwo...

Page 61: ...selections within a menu depend on the user s privilege level Refer to the section Privilege Modes for more information Caution When you are using the mouse on the IPS main window it is possible to d...

Page 62: ...nt resolution in your host input data stream Conflicts between the input font resolution and the IPS configuration may result in inability to print the job or in blank output pages To indicate the res...

Page 63: ...es to simplex mode Until the number of simplex pages you specify is sent any simplex pages are printed in duplex mode with a blank page on the back thus providing the appearance of simplex Note When y...

Page 64: ...print in a shade or tint of the color loaded in the printer The IPDS data stream allows eight colors to be specified in a job 1 Red 2 Green 3 Blue 4 Cyan 5 Magenta 6 Yellow 7 Brown 8 Black However th...

Page 65: ...ich you select the extraction color The Printer Color option selects whatever color ink is loaded in the printer as the extraction color Executive Black selects black as the extraction color that is a...

Page 66: ...oximately what shades tints and solids will be produced by the possible combinations of the printer inks the job specified colors and the extraction colors Caution These appendix pages show an approxi...

Page 67: ...figuration menu select Extraction Color The Extraction Color for Highlight Printing window displays 2 From the color pull down menu select your desired extraction color Figure 4 5 Extraction Color win...

Page 68: ..._palette trace Shades and tints palettes The following palettes show the range of shades and tints that can be printed with each of the highlight color inks and gives the percentages of color black an...

Page 69: ...that was designed for a continuous forms printer you can enable the job to print on the cut sheet IPS printer by rotating its page origin 90 degrees When you do this the IPS emulates a continuous for...

Page 70: ...890 IPS GUIDE TO CONFIGURING AND MANAGING THE SYSTEM Follow these steps 1 Select Continuous Forms Emulation from the Configuration pull down menu 2 On the Continuous Form Selection window click Enable...

Page 71: ...t to use for weight and size The specified units are used on the IPS main window To specify the weight and or size units 1 From the Configuration menu select Media Units The Media Units window display...

Page 72: ...on removes large areas of black from IM images to save printer consumables Use replicate and trim Enables or disables the Replicate and Trim option This option is used to image large areas by using a...

Page 73: ...DOCUPRINT 4850 4890 IPS GUIDE TO CONFIGURING AND MANAGING THE SYSTEM 4 17 Figure 4 8 Optional Processing Parameters window 5 Reboot the system to put your settings into effect except for Alternate ma...

Page 74: ...ce Printing a trace file Setting of the debug level Updating the software using a diskette or a CD Updating the software remotely Printing samples This section describes the procedure for setting up a...

Page 75: ...has DFA the Sample Prints window contains two additional fields Number of Sets and Finishing Function Figure 4 10 Sample Prints window for the a system with DFA shown is a DocuPrint 4635 IPS Sample Fi...

Page 76: ...GUIDE TO CONFIGURING AND MANAGING THE SYSTEM Note The following screen shows a sampling of the files that are available Your system may have different sample files or you may choose to have some added...

Page 77: ...red Mode Specifies whether the sample is printed in simplex or duplex mode Simplex is the default If you select duplex the same sample is printed on both sides of each sheet Printer Tray Specifies the...

Page 78: ...ple This initiates an automatic print quality adjustment if needed While the PQA is in progress a PQA status window displays giving status messages on the adjustment When the PQA is complete the windo...

Page 79: ...rd protected Capturing a trace To capture a trace in preparation for a service call 1 Drain the printer at the host Follow procedures for your host system 2 Restart the Printer Controller by selecting...

Page 80: ...e Note This option displays only if Channel was selected from the Interface window Refer to the Setting up the Printer Controller chapter IPDS TCP IP Specifies that the trace will capture the TCP IP c...

Page 81: ...t Normal Operation from the Trace Options pull down menu 10 Click Quit Executing a captured trace To execute a trace to assist with system diagnostics 1 Capture the trace following the steps described...

Page 82: ...default values for those parameters that are not supplied The defaults are Paper size USLetter 8 5 by 11 inch Resolution r 300 Directory current directory To print a file from a directory other than t...

Page 83: ...u can set the level of debug messages to be stored in log message files To set the debug level 1 From the Diagnostics menu select Debug Level The Debug Level window displays 2 Select the debug level o...

Page 84: ...vided by your service representative To update the software 1 Insert the CD or the diskette containing the software update into your diskette drive 2 From the Diagnostics menu select Update from CDROM...

Page 85: ...9 Updating the software remotely You can update the printing system software remotely as follows 1 From the Diagnostics menu select Install Remote Update The Install Remote Update window displays 2 En...

Page 86: ...4 16 System Options pull down menu Online Places the system online Offline Takes the system offline Shutdown System Shuts down the system This option stops all processes running on the Printer Contro...

Page 87: ...ays specified for a given IPDS tray It stops and requests more paper only when all those trays are empty You can create input configurations by organizing the stocks you will use in a certain applicat...

Page 88: ...ify the 20 pound white stock in the IPDS Tray 1 cell and the 60 pound blue in the IPDS Tray 2 cell In the Printer Trays row specify the 20 pound white paper in the cells for Printer Trays 1 3 and 4 Sp...

Page 89: ...to be printed from IPDS trays with duplex icons Jobs that need to print in simplex only such as label stock or transparencies should be printed from IPDS trays with simplex icons Refer to the section...

Page 90: ...tributes of the IPDS trays Also each IPDS tray can be defined with different margin values To set the margin values of an IPDS tray follow these steps 1 In the Input Configuration section of the main...

Page 91: ...tocks media that you have available for loading in your IPS feeder trays To create an input tray configuration you copy by dragging and dropping media icons from this Library to the tray cells on the...

Page 92: ...t configuration of your choice The IPS Input Configuration window displays Note The first time you see this window it displays your Default input tray configuration which your Xerox representative set...

Page 93: ...the Library Edit Displays the Edit a Media Type window which allows you to change media icons in the Library Delete Deletes a media icon from the Library Edit Defaults Displays the Edit the Media Def...

Page 94: ...he bottom of this window shows the media icon with which you are currently working Each time you make a selection or change in any of the fields on this window that change is reflected in the display...

Page 95: ...t with the left mouse button You can create new stock types to add to this list by following these steps a Click the Add button located below the Form Type list box The following window displays Figur...

Page 96: ...refer to the Specifying the media units section earlier in this chapter Color Specifies the color of the stock represented by the media icon you are creating There are two ways to do this Select a st...

Page 97: ...the Media Library window For the procedure refer to the Creating a media icon section earlier in this chapter 2 On the Media Library window click the media icon you want to delete 3 Click the Delete...

Page 98: ...n the Media Library window The Edit the Media Defaults window displays Figure 4 28 Media Defaults window 3 Make changes to all desired fields For an explanation of these fields and the procedures for...

Page 99: ...he existing file you selected to build from will not be changed Figure 4 29 Input Configuration pull down menu If you wish you can use whatever input configuration was already displayed when you opene...

Page 100: ...e Input Configuration window specify the media that has been or will be loaded in the printer feeder trays Printer Trays field This field consists of a row of boxes called tray cells each of which rep...

Page 101: ...s for each tray you are configuring a On the Media Library window position the cursor over the media icon you are selecting for that tray b Holding down the left mouse button drag the icon to the IPS...

Page 102: ...consists of a row of eight tray cells each of which represents an input tray that a job might specify Mapping IPDS input trays By placing copies of the same media icon in a printer tray cell and an I...

Page 103: ...or parts of the job calling for IPDS tray 2 3 or 4 because all of them are also mapped to printer trays 1 and 2 for this configuration The paper that should be loaded in printer trays 1 and 2 is 20 po...

Page 104: ...ob Note The display of eight IPDS tray cells means eight IPDS trays are reported to the host when the printer is started Any IPDS tray not containing a media icon is flagged to the host as disabled If...

Page 105: ...you need in the Media Library Refer to the Setting up the Media Library section earlier in this chapter 3 Make the necessary changes to the media icons displayed in the IPDS and Printer Tray cells Fo...

Page 106: ...he input configuration you want to delete Figure 4 35 Input Configuration pull down menu Note The Default input configuration cannot be deleted Attempts to do so produce an error message 3 Click Delet...

Page 107: ...n it and the size paper that was specified for it in its corresponding tray cell The Input Configuration window remains open and the configuration you are working on is not updated Figure 4 37 Feeder...

Page 108: ...t configuration you specify one or more stacker trays for each IPDS output bin specified in a print job The printer delivers the printed output to the trays specified for a given IPDS bin it stops and...

Page 109: ...r at the beginning of the row beside the same bolded icon you can see which IPDS bins have been mapped to which printer bins Following is an example of an output configuration Figure 4 38 Example of a...

Page 110: ...1 From the Output Configuration pull down menu on the IPS main window select any name to use as the base for the new output configuration Figure 4 39 Output Configuration pull down menu You will rena...

Page 111: ...ob on the host Note Output is delivered to the default bin if one of the following conditions applies Use Default Bin is selected as the Bin Selection Mode Allow Host Control is selected as the Bin Se...

Page 112: ...h IPDS bin called out in the job to the stacker s that will receive the parts of the job in which that IPDS bin is specified IPDS Bins Each horizontal row of rectangular buttons represents an IPDS bin...

Page 113: ...IPDS bin 3 contains a highlighted bin button for Stacker 2 This means that all parts of the printed job calling for IPDS bin 3 will go to stacker 2 When stacker 2 is full printing will stop until it...

Page 114: ...The Finishing Attributes window displays Figure 4 45 Finishing Attributes window systems with DFA 2 On the Finishing Attributes window make selections or enter values in the fields described below Se...

Page 115: ...sheets that can be in a set The range for DFA sets is 10 to 60 Maximum Set Size Exceeded Specifies the action to take if the maximum set size is exceeded Normal Pages print as if the Finishing Attribu...

Page 116: ...or Face Down Page Order within Set Specifies the order in which pages in a set will be delivered to the output bin first to last or last to first 1 to N Output sheets are delivered to the output bin i...

Page 117: ...or Apply Save if you want to put the changed configuration in effect immediately A confirmation window displays 5 On the confirmation window click Update to save the new settings 6 Click Quit to retu...

Page 118: ...ecified in the job by your applications programmer To create a new DFA profile 1 Locate the DFA Profile pull down menu on the IPS main window below the Output Configuration pull down menu Figure 4 48...

Page 119: ...een Sheets ms p1 Specifies the time required by the third party finishing device from the top of the sheet to the bottom of the sheet The printer inserts skips to enforce this timing You can specify f...

Page 120: ...y from 0 to 13000 milliseconds Recovery Control Specifies the action to take in case of system recovery You can select one of the following Let DFA device select sheet or set recovery Override always...

Page 121: ...ery signal You can enter the value or set it with the incremental spin boxes This value corresponds to the width of the sheet You specify this value only when you select Trail Edge for the Delivery Si...

Page 122: ...chapter for explanations of the items in this window 3 Click Save to save the updated DFA profile 4 If you want to put the updated profile into effect immediately click Apply Save 5 Click Quit to ret...

Page 123: ...profiles for DFA systems only Input tray groups Output tray groups System configuration files Media library files Note Configuration files created with software versions lower than 5 4 cannot be save...

Page 124: ...diskette for storage or transfer follow this procedure 1 Insert a PC formatted diskette into the drive 2 From the Administration pull down menu select Backup Configuration Files Figure 4 52 Backup Con...

Page 125: ...is procedure 1 Insert the diskette used for a backup of the configuration files into the drive 2 From the Administration pull down menu select Restore Configuration Files 3 On the Restore Configuratio...

Page 126: ...SETTING THE SYSTEM CONFIGURATION 4 70 XEROX DOCUPRINT 4850 4890 IPS GUIDE TO CONFIGURING AND MANAGING THE SYSTEM...

Page 127: ...lor pull down menu 4 9 communicating host computer 2 5 2 6 configuration changes requiring reboot 3 1 input specifying 4 31 4 50 output specifying 4 52 4 66 configuration files backing up 1 14 backing...

Page 128: ...1 1 IPS main window buttons 1 22 1 23 components 1 10 1 23 described 1 1 Host Job Control section 1 21 menus 1 11 1 15 setup and status information 1 19 1 20 using 1 10 IPS mode switching 3 13 IPS Ou...

Page 129: ...DS bins mapping 1 17 resuming 2 7 stacker trays configuring 1 17 status 2 6 stopping 2 6 Printer Bins display field 1 17 Printer Controller rebooting 2 7 setting up 3 1 3 13 printer tray cells 4 45 Pr...

Page 130: ...15 slumber mode timer 1 12 SMM Value for Finishing Function field 4 64 software license text string loading 3 11 3 12 software updates from CD 1 13 4 28 from diskette 1 13 4 28 remotely 1 13 4 29 stac...

Page 131: ...xiting 1 7 Extraction Color 4 9 IPS Engine Monitor 1 1 IPS main 1 10 IPS main described 1 1 IPS Output Configuration 4 54 IPS Print Engine Monitor 2 6 IPS Print Service Console 1 1 Maximum Simplex 4 7...

Page 132: ...INDEX INDEX 6 XEROX DOCUPRINT 4850 4890 IPS GUIDE TO CONFIGURING AND MANAGING THE SYSTEM...

Page 133: ...onfirm TIF 112 dpi 2 4 IPS LPS Graphics sllanguage1 tif 144 dpi 3 2 IPS LPS Graphics slinterface1 tif 144 dpi 3 3 IPS LPS Graphics slchannel tif 144 dpi 3 4 IPS LPS Graphics sltcpip tif 144 dpi 3 5 IP...

Page 134: ...raphics 7192 mediadef tif 108 dpi 4 42 IPS LPS Graphics ingrnam wmf 4 43 IPS LPS Graphics 70 inputconfigdefault TIF 118 dpi 4 44 IPS LPS Graphics 70 input2 TIF 118 dpi 4 45 IPS LPS Graphics 70 input2...

Reviews: