background image

Xerox Scanner User’s Guide

7

Installation

Install the Software

1.

Start Microsoft Windows and make sure no other applications are 
running.

2.

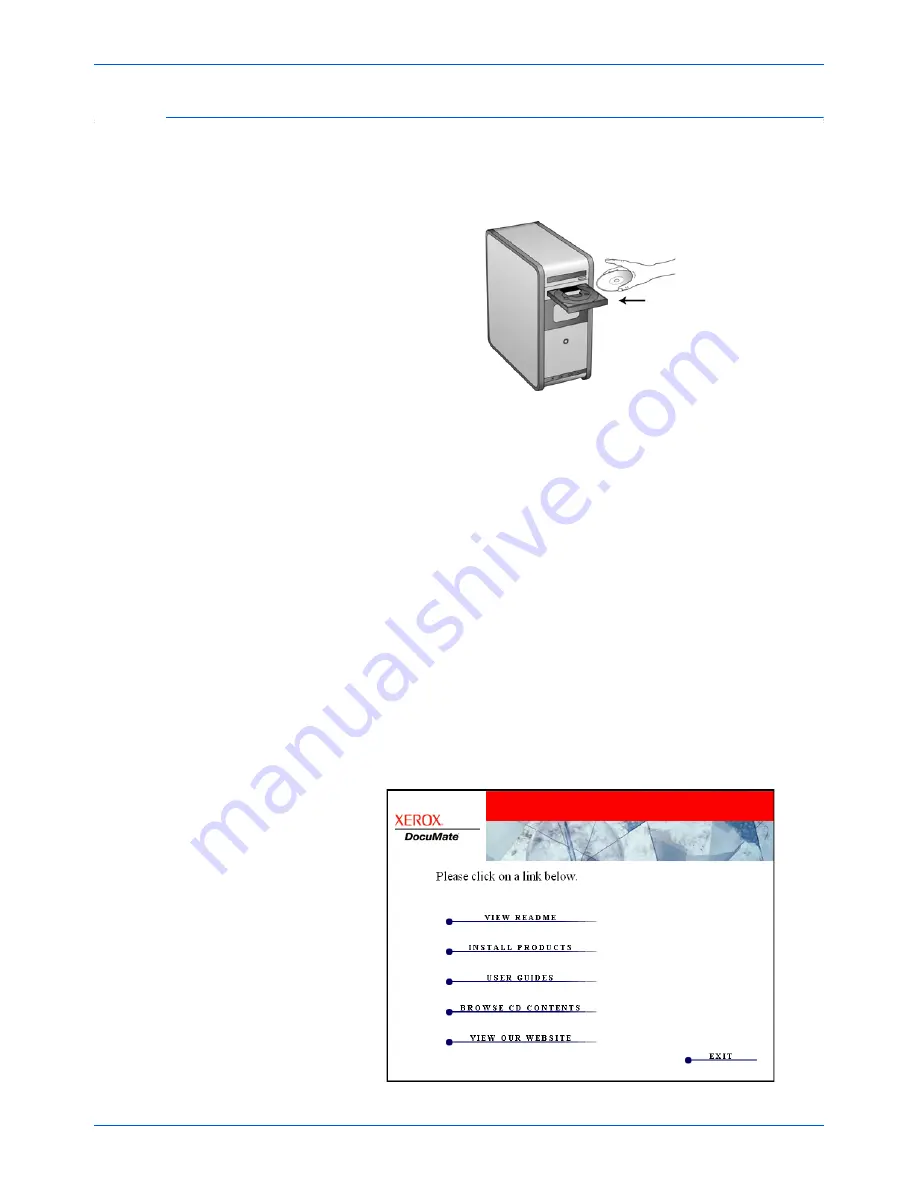
Insert the Installation Disc into your computer's DVD-ROM drive.

The disc automatically starts.

3.

On the Installation menu, select 

Install Products

.

NOTE:

If the disc does not start, check the following:

Make sure the disc drive’s door is completely shut.

Make sure the disc was inserted in the drive in the proper direction 
(label side up).

To launch the disc manually:

Open the Windows option for My Computer. You can do this by 
double-clicking on the 

My Computer

 icon on your desktop. 

Double-click the icon for your DVD-ROM drive. 

The Installation menu for the disc should now open.

If the menu does not open:

From the list of files on the disc, double-click the file named 
START32.EXE.

Summary of Contents for DocuMate 752

Page 1: ...DocuMate 752 user s guide scanner...

Page 2: ...roduct is installed on your computer Microsoft is a U S registered trademark of Microsoft Corporation Windows is a trademark and SharePoint is a registered trademark of Microsoft Corporation ZyINDEX i...

Page 3: ...he One Touch Buttons 19 Creating a New Scan Configuration 20 Selecting Document and File Format Options 24 Scanning with Optical Character Recognition OCR 26 Selecting One Touch Properties Options 27...

Page 4: ...3 Xerox DocuMate 752 Scanner Parts List 54 Notices 55 Section 1 Safety Introduction 55 Section 2 EMC 55 Section 3 Operational Safety Information 56 Section 4 Electrical Information 57 Section 5 Emerge...

Page 5: ...rd any information that does not apply to your scanner Some of the illustrations in this guide may not look exactly as they appear on your computer s screen The differences are minor and do not affect...

Page 6: ...e top 3 Remove all of the shipping tape and foam from the input tray and the scanner lid 4 Remove the scanner body from the shipping box 5 Place the scanner body on a level surface that can support th...

Page 7: ...into place 3 Press the ADF cover release and open the Automatic Document Feeder cover 4 Carefully remove any foam particles that may have gotten inside the document feeder and close the cover 5 Lift t...

Page 8: ...gs then lower the tray so the legs fit into the slots in the scanner lid 7 Flip up the input tray extension to fully extend it 8 Plug the ADF cable into the ADF port on the back of the scanner The ADF...

Page 9: ...holding it securely in position Lock the scanner when transporting it from one location to another but remember to unlock it before scanning The scanner will not scan when locked 10 When you re finis...

Page 10: ...ndows Vista you may see the Vista User Account Control screen asking you to confirm system changes Click the continue button to allow the installation to proceed What You Need IBM compatible Pentium 4...

Page 11: ...not start check the following Make sure the disc drive s door is completely shut Make sure the disc was inserted in the drive in the proper direction label side up To launch the disc manually Open th...

Page 12: ...he Welcome to the One Touch 4 0 Setup Wizard opens 6 Click Next 7 On the Xerox License Agreement window read the license agreement If you accept the terms select I Agree then click Next If you choose...

Page 13: ...N driver to scan from TWAIN applications If your scanner has buttons you will not be able to scan with the buttons on the scanner ISIS only The ISIS driver is installed without the One Touch software...

Page 14: ...w asking you to select one of the images for your Color Space setting 11 Select the option that looks best to you and click Next 12 STOP when you see the Complete the installation by connecting your h...

Page 15: ...he power supply into the power port on back of the scanner 2 Plug the power cord into the power supply and into a wall outlet NOTE Only use the power supply included with your scanner Connecting any o...

Page 16: ...s XP and have plugged the USB cable into a USB 1 1 port an information bubble may open explaining that A HI SPEED USB device is plugged into a non HI SPEED USB hub Plug the USB cable into a USB 2 0 po...

Page 17: ...u can also click More to see a quick overview about accessing and navigating the One Touch software When you re finished reading the additional information click OK 6 Click Close on the Installation C...

Page 18: ...the version provided on the installation DVD is a newer version than the one currently installed on your computer To view and save the User Guides 1 Click the name of a User Guide you want to view and...

Page 19: ...ys remove any staples or paper clips from documents before inserting them into the scanner s Automatic Document Feeder or placing them on the flatbed glass Staples and paper clips can jam the feed mec...

Page 20: ...cally detects if paper is in the ADF and will scan pages in it You must remove these pages prior to scanning if you want to scan from the flatbed 2 Lift the scanner cover and place the document face d...

Page 21: ...r has an LED number with an arrow button or a Function button to cycle through the 9 functions Scanners that do not have any buttons such as the DocuMate 510 and DocuMate 752 will still have the 9 on...

Page 22: ...scanner s hardware properties Red X click to close the One Touch panel The Button View Left click on a Destination Application icon to start scanning Right click on a Destination Application icon to...

Page 23: ...nner such as the DocuMate 515 and 7600 there will be one tab for each button on the scanner across the top of the One Touch Properties window 2 Click on an application name in the Select Destination l...

Page 24: ...ings of another configuration select the configuration then click the Copy button The Scan Configuration Properties dialog box opens The Scan Settings Tab 1 On the Scan Configuration Properties dialog...

Page 25: ...e are no other settings you want to change click OK to save the new configuration It will now be in the list of Scan Configurations on the One Touch Properties window for the appropriate Destination A...

Page 26: ...determine if a page is skewed then straighten its image If the page is fed through at too great an angle the image may not scan correctly In that case re scan the page using the paper guides to feed...

Page 27: ...uch Properties window for the appropriate Destination Applications The Advanced Settings Tab 1 Click the Advanced Settings tab The options of the Advanced Settings tab are for the Color or Grayscale s...

Page 28: ...and disabled if you have selected a format that only supports single pages such as BMP or JPG NOTE For the One Touch OCR options to work one of the Nuance OCR applications must be installed Not all o...

Page 29: ...ty option for your scanned images 3 Click OK or Apply on the One Touch Properties window Text Formats Selecting the text format option also selects OCR processing as an automatic step for scanning The...

Page 30: ...y to the other buttons as well 4 Click OK or Apply on the One Touch Properties window Scanning with Optical Character Recognition OCR 1 In the One Touch Properties window select a text editing program...

Page 31: ...ude all of the applications on your computer that can receive scanned images Select Destinations Individually choose the types of applications to include in the list of Destination Applications Check...

Page 32: ...t and a Scan Configuration 4 Click OK 5 Now start scanning using the button you selected to use to scan and burn to a CD When scanning is finished a bubble message on the screen tells you that files a...

Page 33: ...before being stored 1 Open the One Touch Properties window 2 Select Transfer to Storage as the Destination 3 Click the Properties button In the Storage Location browse to the folder you want your scan...

Page 34: ...ion to each button Setting up multiple folders for transfer to storage 1 Using Microsoft Windows create the folders that you want to use for storing scanned items 2 Open the One Touch Properties windo...

Page 35: ...documents 9 Click OK The selected folder will now be set as the Storage Location such as Business Receipts 10 Click OK 11 Repeat the process to create additional new configurations such as Personal Re...

Page 36: ...can to multiple storage folders 1 Insert the documents you want to scan to storage 2 On the One Touch Button Panel click on the first button that you set to scan to a Storage folder 3 When scanning is...

Page 37: ...ll the Kofax software For other models this module was installed automatically when you install One Touch from the installation disc The VRS options appear on the Scan Configurations Properties window...

Page 38: ...Your scanner has a built in power saving feature that is set to power down after 15 minutes of idle time Click the up or down arrow to adjust the time out from 1 minute to a maximum of 3 or 4 hours 4...

Page 39: ...TWAIN interface when you re scanning from the One Touch software without opening any other TWAIN compliant software first Accessing the TWAIN Interface From One Touch 1 Open the One Touch Properties...

Page 40: ...e listed twice One listing is for choosing TWAIN Interface the other is usually for choosing the WIA Interface 3 The TWAIN Interface will open Please refer to an application s user guide for the appro...

Page 41: ...ave the scanner automatically determine if a page is fed through at an angle and attempt to straighten the image If a page is fed through at too great of an angle the image will not straighten properl...

Page 42: ...on the Flatbed 3 Click one of the icons to select a configuration The configuration settings appear as a list Click the plus sign to see the full list Click the minus sign to collapse the list Color s...

Page 43: ...w a document before scanning from the ADF make sure only one page is loaded into the scanner 1 Click the Preview button 2 The scanner scans the item and displays a preview image 3 Adjust the Brightnes...

Page 44: ...ould use a higher dpi setting to enlarge a picture from the original size To adjust the resolution 1 To use one of the preset resolutions for typical scanned items click one of the options in the list...

Page 45: ...olor and Gray Scale configurations To adjust the brightness and contrast 1 Drag the Brightness slider to the left to make the item darker or to the right to make the item lighter 2 Drag the Contrast s...

Page 46: ...ration is the strength or purity of a color and hue is the color your eyes see as reflected from the image To adjust the color settings 1 Drag the Gamma Saturation and Color Hue sliders to the left to...

Page 47: ...er glass and click Preview in the TWAIN interface 2 In the previewed image click and drag a box around the area you want to scan 3 The dotted outline shows the selected area in the image 4 You can now...

Page 48: ...s The Scan Info Box The following figure shows the information on the Scan Info box The Scan Info box shows the size and position of the area The selected scan area This is the image that appears on t...

Page 49: ...preset profiles for example Custom 2 Adjust the settings and click the Save As button 3 Type a name for the new profile and click OK The name must be at least two characters long To change or delete a...

Page 50: ...u may have selected another source for images Problem The ADF won t feed pages properly Clean the scanner following the instructions in the Maintenance section If the ADF pad or feed rollers are dirty...

Page 51: ...ished loading Make sure the USB cable is plugged into the computer and the scanner If you are using a USB hub try plugging the USB cable directly into the back of the computer If the cable is already...

Page 52: ...click the Add Remove Programs icon Windows Vista Double click the Programs and Features icon 3 From the list of programs select One Touch 4 0 Click the Change Remove button 4 Click Yes when asked to c...

Page 53: ...tops scanning due to a paper jam in the Automatic Document Feeder a warning dialog box opens after a few moments To clear a paper jam 1 Press the ADF cover release to open the Automatic Document Feede...

Page 54: ...e springs on either side of the pad 5 Close the cover when you re finished Cleaning the Scanner Glass To ensure the best quality scanned item wipe the entire flatbed scanner glass with a soft dry clea...

Page 55: ...asses the paper across the glass If lines appear on the images scanned from the ADF but not from the Flatbed the glass may be dirty Replacing the ADF Pad Assembly The ADF pad will wear out and is desi...

Page 56: ...replace the ADF Pad assembly 1 Open the ADF cover The pad assembly is located inside the ADF 2 Squeeze the plastic clamps that hold the pad assembly in place and lift the pad up and out Reverse the pr...

Page 57: ...Cold cathode fluorescent lamp Interface USB 2 0 High Speed Scanner dimensions Width 26 37 inches 670 mm Depth 20 23 inches 514 mm Height 9 8 inches 249 mm Weight 43 9 pounds 19 9 kg Operating tempera...

Page 58: ...Scanner Parts List Please use the following part names and numbers when ordering replacements for your scanner Part Name Part Number ADF Pad 57 0115 000 USB Cable 35 0102 000 AC Power Cord 35 0103 000...

Page 59: ...t the product certification Please contact your Xerox representative for more information Section 2 EMC This equipment has been tested and found to comply with the limits for a Class B digital device...

Page 60: ...vice Department to arrange relocation of the copier to a location outside of your building Always locate the machine on a solid support surface that has adequate strength to support the weight of the...

Page 61: ...place objects on the power cable 8 Do not override or disable electrical or mechanical interlock devices 9 Do not push objects into slots or openings on the machine Electrical shock or fire may result...

Page 62: ...2 Do not carry out any maintenance on this product which is not described in the customer documentation 3 Do not use aerosol cleaners The use of cleaners that are not approved may cause poor performan...

Page 63: ...erox environmental programs visit www xerox com environment html If you are managing the disposal of your Xerox product please note that the product contains lamp s with mercury and may contain lead P...

Page 64: ...ation end of life electrical and electronic equipment subject to disposal must be managed within agreed procedures Energy Star for the USA Energy Program Compliance As an ENERGY STAR partner Xerox Cor...

Page 65: ...imensions of the original Postal Money Orders Bills Checks or Drafts of money drawn by or upon authorized officers of the United States Stamps and other representatives of value of whatever denominati...

Page 66: ...xchequer bill paper or revenue paper 4 The public seal of Canada or of a province or the seal of a public body or authority in Canada or of a court of law 5 Proclamations orders regulations or appoint...

Page 67: ...es and cheques Bank and government bonds and securities Passports and identification cards Copyright material or trademarks without the consent of the owner Postage stamps and other negotiable instrum...

Page 68: ...plication 28 button options 27 C Color 21 38 color hue 42 options 42 color filter 22 Contrast 21 41 D Destination Application 19 text file format 25 dots per inch 40 dpi 40 E Error codes 47 F File For...

Page 69: ...ration 23 42 Scan Configuration 19 Scan Info box 44 Scan Settings Tab 20 Scanner Assembly 2 Connect power 11 Full install 9 Troubleshooting 46 Uninstall 48 User guides 14 Select Destination 27 Show Al...

Page 70: ...VC 000...

Reviews: