background image

Getting to Know Your Product

2

Product Orientation Guide

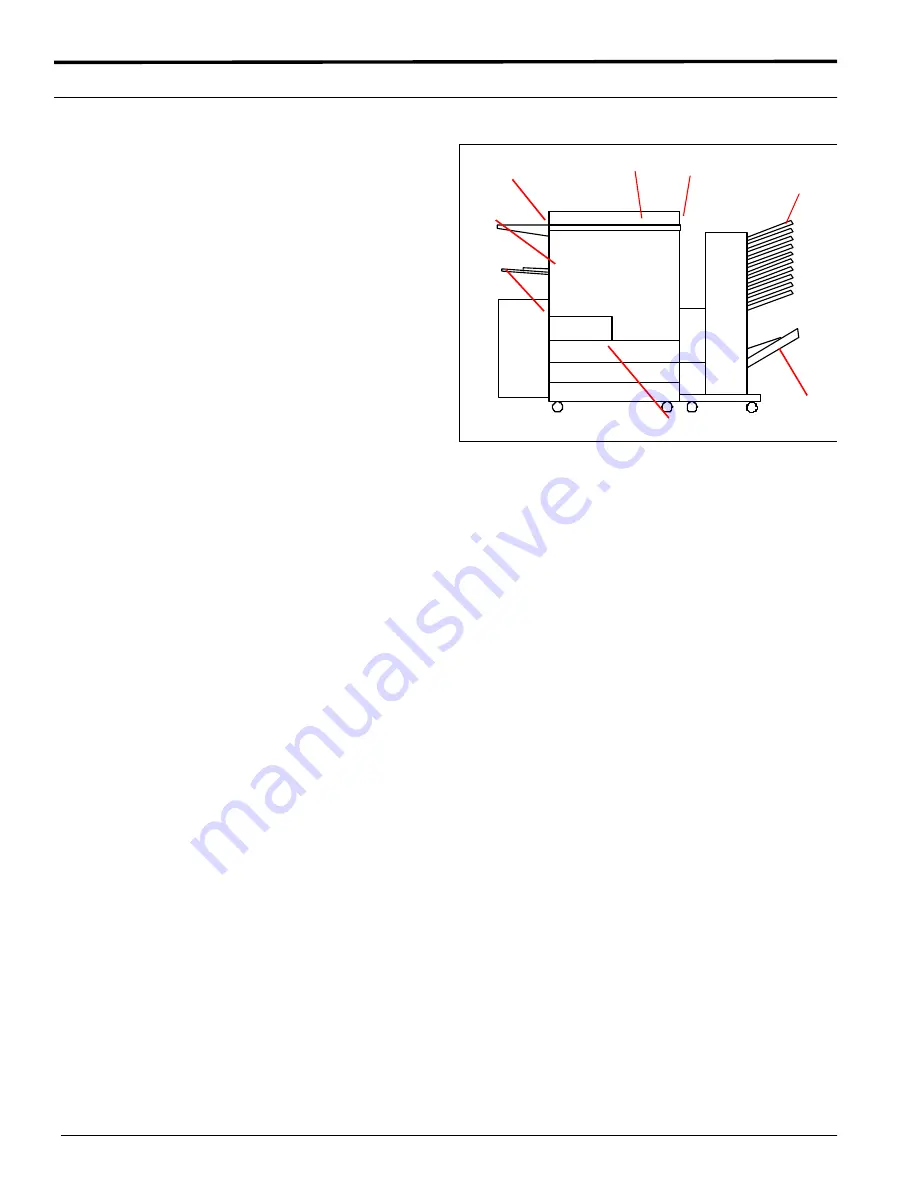
Component parts of the DocuColor 12 Printer

Component overview

Point out

 each component as you describe it. See 

Figure 1. 

Note:

 Some items shown are optional accessories 

and may not be present on the machine you are 
using.

1. The 

High Capacity Feeder

 (optional) holds up 

to 2000 sheets of 20 lb (75 gsm) paper.  Paper 
size is 8.5 x 11 in. (A4) oriented for long edge 
feed.

2.

Paper Tray


5

 is used for transparencies and 

non-standard paper sizes up to 12 x 18 in. or for 
12.6 x 18 in. (A3).

3. The 

Work Surface

 or the optional 

Work Sur-

face with Convenience Stapler


provides a con-

venient place to stack papers.

4. The 

Touch Screen

 shows the status of jobs and 

allows selection of paper, sides, etc., for new 
jobs.

5. The 

Keypad

  is used to enter the numeric infor-

mation.

6. The 

Sorter/Mailbox

 or 

In-Line Finisher

 pro-

vides 10 bins to collate jobs. Each bin can hold 
up to 100 prints.

7. The 

Offsetting Catch Tray 

stacks prints when 

they are not sorted.

8. Four 

Paper Trays

 allow different sizes of paper 

to be used. 

• Tray 1 holds up to 500 sheets of 20 lb 

(75gsm) 8.5x11 in. (A4) or A5 paper.

• Trays 2, 3, and 4 can be adjusted to hold up 

to 550 sheets of 20 lb (75gsm) paper from 
8x10 in. through 11x17 in. (A3 through 
B5).  They can be set to hold 12 x 18 in. paper 
by a Customer Service Representative.

1

2

3

4

5

6

7

8

Figure 1

Summary of Contents for DOCUCOLOR 12

Page 1: ...Getting to Know Your Product DocuColor 12 Printer Carrier Product Orientation Guide January 2001 POG00010 Note to Carriers Open this document and review it page by page with your Customer...

Page 2: ...tory or judicial law or hereinafter granted including without limitations material generated from the software programs which are displayed on the screen such as icons screen displays looks etc Printe...

Page 3: ...The User Interface 4 Performing routine tasks 5 Loading paper in tray 1 5 Loading paper in trays 2 3 and 4 5 Loading paper in tray 5 6 Loading paper in the high capacity feeder 6 Document s Output 7...

Page 4: ...Product iv Product Orientation Guide Customer Information Replacing a Dry Ink Cartridge 16 Troubleshooting When something goes wrong 17 Caring for your DocuColor 12 Printer 17 Resources 18 Frequently...

Page 5: ...is section contains a series of self guided activities designed to increase your product knowledge It can be used at your own pace As you complete these activities you are encouraged to consult the Do...

Page 6: ...Sur face with Convenience Stapler provides a con venient place to stack papers 4 The Touch Screen shows the status of jobs and allows selection of paper sides etc for new jobs 5 The Keypad is used to...

Page 7: ...he Ground Fault Protector is located at the rear of the machine where the power cord attaches The Ground Fault Protector removes all power from the machine if a fault is detected in the power to the p...

Page 8: ...9 are used to enter a password The C button clears an incorrect entry Administration used by the System Administrator Access brings up the Access screen to allow entry of a password when the printer i...

Page 9: ...aper stack so the edges are even 5 Close the tray by pushing it in toward the printer Loading paper in trays 2 3 and 4 Note Paper trays 2 3 and 4 can hold up to 550 sheets of paper Sizes can be adjust...

Page 10: ...front paper guide also must be readjusted by loosening the thumbscrew moving the guide then tightening the thumbscrew Loading paper in the high capacity feeder Note The high capacity feeder is an opti...

Page 11: ...alled Explain that the optional sorter mailbox may be used to sort up to 10 prints and will hold up to 100 sheets in each bin See Figure 10 1 The top bin is used when the top tray is selected Transpar...

Page 12: ...perate the latch on the door 2 Swing the door open toward the rear of the printer 3 Remove any paper and close the door Paper jam in tray 5 Show how to open paper tray 5 See Figure 12 1 Operate the la...

Page 13: ...the printer See Figure 13 1 Push the top of the latch toward the sorter mail box 2 Pull the sorter mailbox away from the printer until it stops Show how to open the right side door of the printer See...

Page 14: ...rked 5 down to release the baffle 5 Rotate the green knob marked 6 to clear any paper Gently remove the jammed paper 6 Return the handle marked 5 to the up closed position 7 Close the left front door...

Page 15: ...arked 1 and remove jammed paper Press the baffle gently back into place 3 Remove any paper from the entry to the fuser 4 Push the green handle marked 2 to the right and remove any paper from the exit...

Page 16: ...Always open the tray slowly and try to pull gently to remove any jammed paper 1 See Figure 20 Slowly open the paper tray If the sound of tearing or crumpling paper can be heard stop opening the tray a...

Page 17: ...ess the Meters icon on the touch screen 3 Read the totals on the various meters on the meters display 4 Press Closeto return to printing mode CA 1 2 3 4 5 6 7 8 9 0 C Meters Consumables Status Tools A...

Page 18: ...Getting to Know Your Product 14 Product Orientation Guide...

Page 19: ...Orientation Guide 15 This concludes the Delivery Crew Instructions Continue with the Customer Information that is appropriate for your Docucolor 12 configuration If you have any questions please cont...

Page 20: ...e unlocked symbol on printer 4 Pull the cartridge out of the housing and dispose of it according to local regulations 5 Remove the new dry ink cartridge from the package 6 Shake the cartridge from sid...

Page 21: ...on page8 for detailed information on clearing paper jams If you need further instructions refer to the Problem Solving section of the DocuColor 12 Printer User Guide and the Calling for Service secti...

Page 22: ...depending on the paper size and feeding orientation of the paper How fast is the printer in black and white mode Approximately 50 prints per minute using 8 5 x 11 in or A4 paper being fed long edge f...

Page 23: ...code and telephone number SD 1 Strongly disagree N 3 Neither way A 4 Agree D 2 Disagree SA 5 Strongly agree A The Carrier SD 1 D 2 N 3 A 4 SA 5 B The Quick Start Guide SD 1 D 2 N 3 A 4 SA 5 1 Was prep...

Page 24: ...BUSINESS REPLY MAIL First Class Mail Permit No 229 El Segundo CA Postage will be paid by Addressee Xerox Corporation Customer Education Services Attn GTKYP CSMS Suite 2000 ESL2 211 360 N Sepulveda Bou...

Reviews: