background image

Xerox

®

 D35 

Scanner Options, Maintenance and Troubleshooting

6-8

User Guide

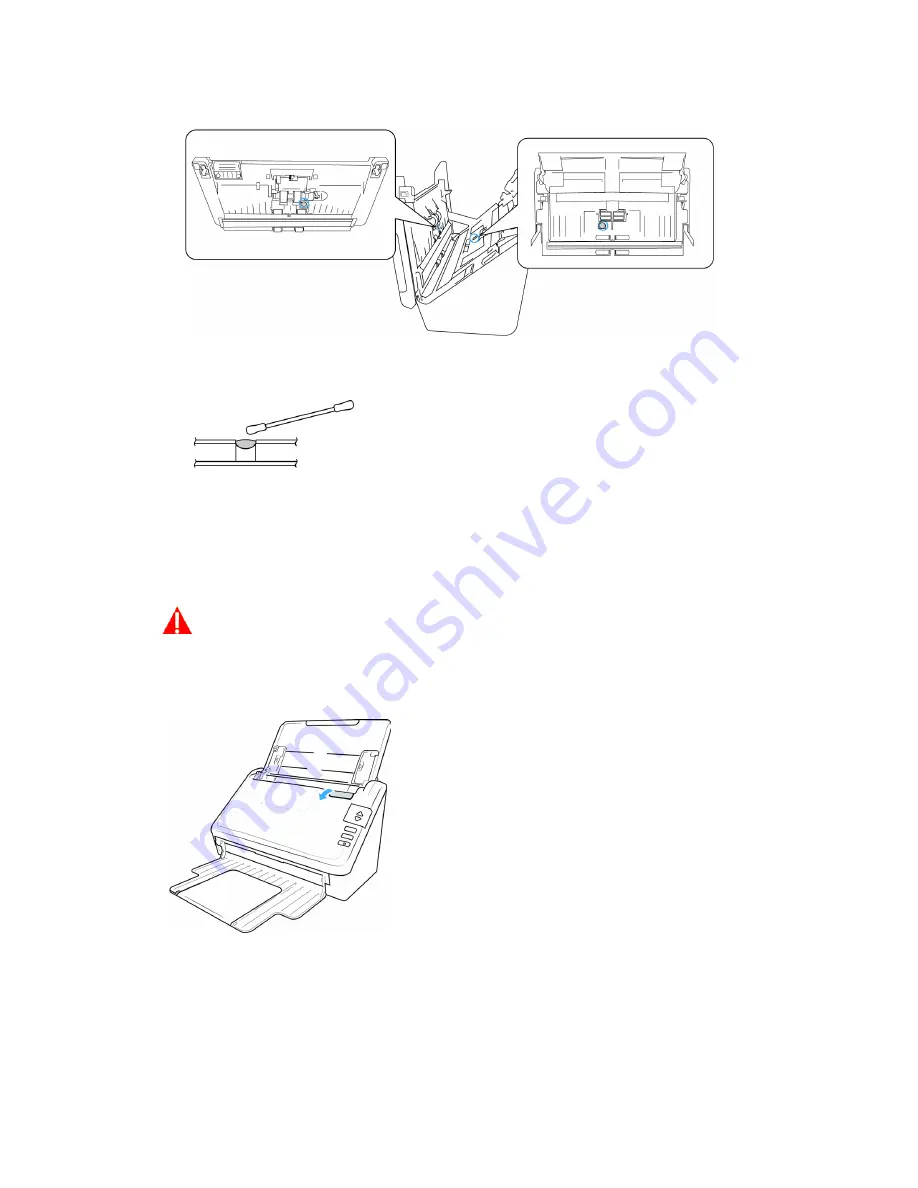
2. The following illustration shows the location of the sensors in the scanner.  

3. Using a clean, dry cotton swab, brush away any dust on the double feed detection sensors.

Replacing the Rollers

When replacing the rollers described in this section, you should replace all of the rollers at the 
same time. Do not replace just one roller and not the other. When you are finished replacing the 
roller, reset the roller count as described in the page 6-2.

WARNING: Keep all replaceable parts out of the reach of children. These parts are 

small and pose a choking hazard.

Turn off the scanner power then unplug the power supply from the scanner. Pull the cover release 
handle and open the scanner.

When you are done replacing the rollers, close the scanner carefully pressing down on both sides 
of the cover until it locks in place. Do not slam down the cover.

Summary of Contents for D35

Page 1: ...Xerox D35 Scanner Scanner User Guide for Mac OS X APRIL 2021 05 1008 000...

Page 2: ...niversal Serial Bus is a trademark of USB Implementers Forum Inc USB IF All other products mentioned herein may be trademarks of their respective companies and are hereby acknowledged Changes are peri...

Page 3: ...ocumentation 2 2 Xerox D35 Scanner 2 2 3 Scanner Setup 3 1 Connect the Scanner Power Supply 3 1 4 Installation 4 1 Install the Software and Connect the Scanner 4 1 Installing the Scanner Driver 4 2 Co...

Page 4: ...lacing the Rollers 6 6 Replacing the Feed Roller 6 7 Replacing the Friction Roller 6 9 Scanner Status Message Table 6 10 Troubleshooting 6 11 Xerox D35 Scanner Specifications 6 13 Xerox D35 Scanner Pa...

Page 5: ...ion approval and compliance with established environmental standards To ensure the continued safe operation of your Xerox Equipment follow these safety guidelines at all times Do these Always follow a...

Page 6: ...r an electrician for advice 2 The socket outlet shall be installed near the equipment and shall be easily accessible 3 Use the power cable that is supplied with your machine Do not use an extension co...

Page 7: ...safety device has been tripped Liquid is spilled into the machine The machine is exposed to water Any part of the machine is damaged Maintenance Information 1 Any operator product maintenance procedur...

Page 8: ...fety Contacts Contact Information For more information on Environment Health and Safety in relation to this Xerox Product and supplies please contact the following customer help lines North America Eu...

Page 9: ...purchased the scanner System Requirements Requirements Intel i3 or equivalent CPU Internet access for installation An available Universal Serial Bus USB port Apple Mac OS X operating system 10 14 11...

Page 10: ...r scanner setup installation operation maintenance safety and warranty The instructions in this guide cover how to properly use the scanner and perform maintenance Please refer to your scanning applic...

Page 11: ...the documents are exited out of the scanner Flip up an exit stopper to keep documents in the exit tray Exit extension pulls out to support various document lengths 3 Status light Power button Turns th...

Page 12: ...Xerox D35 Scanner Welcome 2 4 User Guide...

Page 13: ...ndicated in the following illustration s The illustrations are for example purposes only Your scanner s packaging may vary slightly Connect the Scanner Power Supply Note Only use the power supply incl...

Page 14: ...Xerox D35 Scanner Scanner Setup 3 2 User Guide 3 Plug the power supply into the power port on the scanner and into a wall outlet...

Page 15: ...wnload is complete 3 Double click the disc icon that appears on the desktop 4 Double click the Setup file to start the driver installer 5 Plug the USB cable into the USB port on the scanner then into...

Page 16: ...However if there is a newer version available it will be possible to download and install 12 The software will have to first be downloaded by clicking Download The total size of the download is shown...

Page 17: ...ill start first 1 Click Continue 2 On the Xerox License Agreement window read the license agreement Click Continue 3 If you accept the terms select Agree and continue with the installation If you choo...

Page 18: ...ion for the installation We recommend that you select the main disc drive and click Install 5 If you are prompted for a password input the name and password for a user that has permission to install s...

Page 19: ...loads the appropriate software to run the scanner Install the Visioneer Scan Utility The Visioneer Scan Utility software installation will start automatically after you click Close on the driver Insta...

Page 20: ...d scanning guides for TWAIN Scanner user guide Instructions for scanner setup installation operation maintenance safety and warranty TWAIN scanning guide Instructions for accessing and scanning using...

Page 21: ...th the scanner for our customer service contact information 1 Open Safari or any other Internet browser you have installed on your computer 2 In the web address field type www xeroxscanners com 3 Pres...

Page 22: ...Xerox D35 Scanner Installation 4 8 User Guide...

Page 23: ...width x length 2 9 x 2 0 inches 74 x 52 mm Maximum size width x length 8 5 x 14 0 inches 216 x 356 mm Maximum length with long document enabled at 300 dpi 218 0 inches 5540 mm at 600 dpi 59 0 inches 1...

Page 24: ...may tear while being fed through the scanner and the pressure of the rollers may leave streaks on the page The chemical coating on this paper will rub off on the rollers during the scan process increa...

Page 25: ...he leading edges slantwise to help prevent multiple pages from being fed through at a single time Loading Documents 1 Adjust the paper guides to the width of the document you want to scan Extend the i...

Page 26: ...ng the scanner TWAIN Interface TWAIN is a widely recognized standard that computers use to receive images from scanners and digital cameras The TWAIN scanning interface can be accessed from any TWAIN...

Page 27: ...aintenance unless the maintenance instructions below specifically state to leave the scanner plugged in and powered on Always unplug the USB cable from the scanner before performing maintenance unless...

Page 28: ...not be available for the current scanner Please disregard any information about features that you do not see in the interface for your scanner Scanner Details Firmware version this is the scanner s ha...

Page 29: ...you want to set back to 0 Show maintenance reminders select this option be notified when it is time to clean or replace the rollers After cleaning or replacing the rollers click the reset button next...

Page 30: ...a month to help limit the amount of dust build up in the scanner 1 Turn off the scanner power 2 Using a soft dusting cloth wipe down the body of the scanner input tray and exit area Make sure that the...

Page 31: ...papers can be purchased from our website at www xeroxscanners com in the Supplies Accessories page for your scanner When cleaning the inside of the scanner you should clean all of the rollers scanner...

Page 32: ...the free rollers are designed to rotate in one direction only Do NOT force the roller to rotate in the opposite direction Forcing the roller to rotate will damage it and cause the scanner to feed pag...

Page 33: ...any sticky residue on the surface CLEANING THE PAPER SENSORS The scanner has several sensors to detect the status of the paper when it is in the scanner You should clean these sensors as part of your...

Page 34: ...the same time Do not replace just one roller and not the other When you are finished replacing the roller reset the roller count as described in the page 6 2 WARNING Keep all replaceable parts out of...

Page 35: ...ull on the scanner cover release and lift the lid to open the scanner 2 Locate the roller cover in the body of the scanner 3 Pull down the paper feed roller cover using the tab indicated in the illust...

Page 36: ...e the new roller out of its packaging 8 Align the end of the bar with the hole at the left Push the plastic arm down to hold the roller in place 9 Lift the roller cover up and carefully push it closed...

Page 37: ...iction roller cover in the body of the scanner 3 Use the little tab to flip open the friction roller cover 4 Pull out the friction roller gently from the right side 5 Discard the roller it cannot be r...

Page 38: ...hes The number of flashes between pauses indicates the hardware error code The LED display will also flash an E then the error code number that matches the status light s blinking pattern Descriptions...

Page 39: ...ger than 6 you may lose connection to the scanner The recommended USB cable length is 6 or less the USB cable provided with your scanner is within this range Did you select another image source in the...

Page 40: ...ams smooth and straighten the paper before scanning and adjust the guides to the paper size Paper fed into the ADF at an angle can cause the feed mechanism to jam If paper jams are occurring more freq...

Page 41: ...nd which applications you installed during the scanner setup the application list may include OneTouch OneTouch OCR module Visioneer Organizer AI Visioneer Capture SE Uninstalling Visioneer Acuity Vis...

Page 42: ...black white Scan Method Duplex Automatic Document Feeder ADF Image Sensor CIS Contact Image Sensor Light Source RGB LED Interface USB 2 0 Port USB 1 1 compatible Certifications ENERGY STAR 3 USB 3 1 G...

Page 43: ...g Systems Apple Mac OS X 10 14 11 2 Scanner Drivers TWAIN ICA Bundled Software Visioneer Scan Utility Part Name Part Number Cleaning and Maintenance Kit Feed ADF Roller Friction Roller 96 X333 000 65...

Page 44: ...Xerox D35 Scanner Options Maintenance and Troubleshooting 6 18 User Guide...

Page 45: ...uit different from that to which the receiver is connected Consult the dealer or an experienced radio TV technician for help This device complies with Part 15 of the FCC Rules Operation is subject to...

Page 46: ...th and Safety Xerox Corporation Oxford Road Uxbridge UBS 1HE Telephone 1 800 ASK XEROX Turkey RoHS Regulation In compliance with Article 7 d We hereby certify It is in compliance with the EEE Regulati...

Page 47: ...permission of the copyright owner has been obtained or the reproduction falls within the fair use or library reproduction rights provisions of the copyright law Further information of these provisions...

Page 48: ...nment of Canada or of a province or of a government of a state other than Canada 7 Impressed or adhesive stamps used for the purpose of revenue by the Government of Canada or of a province or by the g...

Page 49: ...hlorate European Union RoHS and WEEE Compliance This product is compliant with RoHS Regulations of the European Parliament and Council Directive on the Restrictions of the Use of Certain Hazardous Sub...

Page 50: ...the office equipment industry to promote energy efficient copiers printers fax multifunction machine personal computers and monitors Reducing product energy consumption helps combat smog acid rain and...

Reviews: