background image

Version. 1.0 


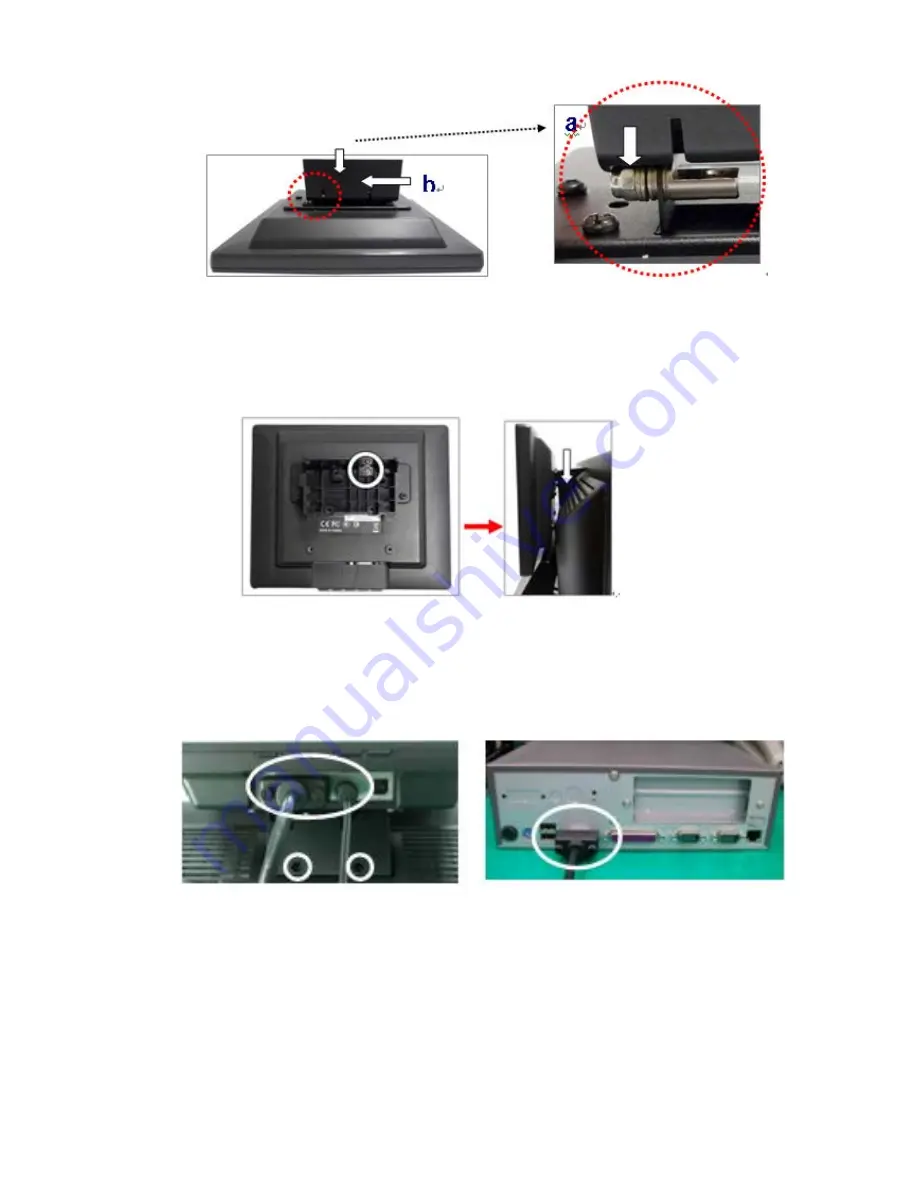
 Align the plastic bracket into position on the metal bracket.


(a)  Align the plastic bracket onto the metal bracket. 

(b)  Push left until the click sound is heard.   


2.  Fasten the screw (x1) to fix the plastic bracket and Second Display module 

with metal bracket. 

3.  Slide the Second Display Module into the slot. 


4.  Fasten the screws (x2) to fix the Second Display module with the System. 

5.  Connect the VGA cable to the Second Display Module and the System. 

6.  Connect the DC plug to the Second Display Module


and the other side to 

power source. 


Summary of Contents for 1200TS

Page 1: ...correct power voltage Do not expose this unit to rain or moisture as this may result in fire or electric shock Content I FCC Warning Statement 1 II Introduction 2 Features 2 Unpacking the monitor 2 II...

Page 2: ...ich can be determined by turning the equipment off and on the user is encouraged to try to correct the interference by one or more of the following measures Reorient or relocate the receiving antenna...

Page 3: ...al display resolution 1024 768 VESA 75 75 mm wall mount standard Durable and sturdy base design Optional 3 track Magnetic Strip Reader MSR Optional 2nd display 7 8 4 Adjustable viewing angle up to 90...

Page 4: ...ssory Please make sure all of the following accessories are included Standard Items a b c d e Optional Items a b a MSR b 2nd display 7 or 8 4 a LCD Monitor b VGA cable c Touch cable USB or RS232 d Pow...

Page 5: ...n I O placement 1 DC JACK 2 DVI 3 VGA 4 USB B Type 5 Dual USB A Type 6 RS232 7 RJ45 RS232 To PC 1 Connect VGA cable from monitor to PC 2 Connect USB touch cable to PC 3 Connect DC plug to monitor and...

Page 6: ...5 Touch Driver installation 1 Double click setup exe from driver menu 2 Click next from welcome window 3 Click next from License Agreement 4 Click next from Setup Type 5 Click next 6 Click next from...

Page 7: ...0 6 7 Click next from Setup Type 8 Click next from Choose Destination Location 9 Click next from Select Program Folder 10 Click next from Setup Type 11 Click next from Setup Type 12 Click next from Se...

Page 8: ...7 Calibration procedures 1 Double click the eGalax Touch icon to run calibration function 2 Follow 4 point linearity calibration procedures and save the data 3 Follow free draw calibration 4 Exit cali...

Page 9: ...tall the Second Display please open the VFD cover first Components of Second Display Kit with power adapter 1 Fix the parts of Second Display modules as steps as above left picture shows detailed step...

Page 10: ...2 Fasten the screw x1 to fix the plastic bracket and Second Display module with metal bracket 3 Slide the Second Display Module into the slot 4 Fasten the screws x2 to fix the Second Display module w...

Page 11: ...al effects Please follow the manual adjustment procedure Up a When OSD mode is activated When MENU key is pressed The two keys are used to select the adjustment items b When adjustment item is selecte...

Page 12: ...sampling time within the pixel can be adjusted Color 9300K 6500K 5800K Press UP or DOWN to choose three types of color temperature 9300 k 6500 k and user defined User Preset Red Green Blue Exit Exit O...

Page 13: ...notice any abnormal smell or noise please stop operation and call the nearest dealer or service center V Support timing chart Timing Mode Reference Standard Resolution Pixel MHz FH KHz FV Hz Interlace...

Page 14: ...ewing Angle L R U D 80 80 70 70 typ Input Video signal connector D Sub 15 pins DVI D Power consumption 20W Input Frequency H 31 5 60 2 kHz V 56 3 75Hz Power supply DC 12V 10 Temperature Operating 0 40...

Reviews: