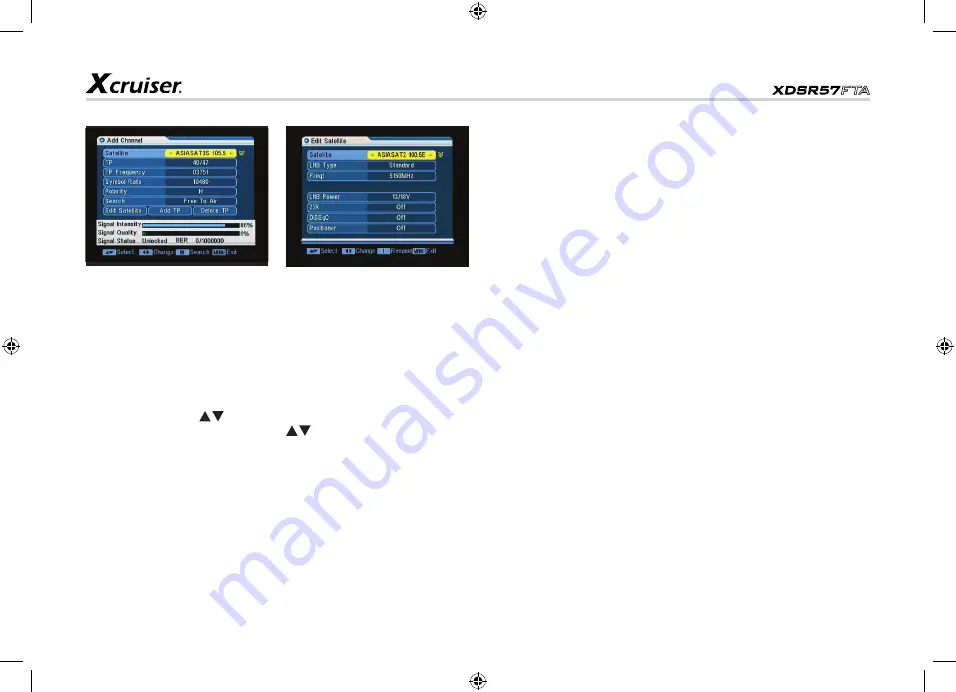
Xcruiser XDSR57FTA User Manual Download Page 11

11

1.2 Add Channel

In the Channel menu, select the 
option Add Channel and press 
OK.

Satellite

: Press OK to deploy the 

satellite list.
Select the satellite you want to 
check with pressing


. You 

also press to select the Satellite.

TP

: Transpronder, selectt the 

desired one from the pre-
program options.

TP Frequency

: lnput the value by 

using the numeric keys.

Symbol rate

: Symbol rate of the 

current transponder 

LNB Power:

 Select the desired 

option. lf your STB is connected 
to another receiver through 
LOOP ThROUCh support, you 
should check which receiver is 
connected diectly to the LNB. ln 
case the other receiver is directly 
connected to ghe LNB then 
select OFF.

22K: 

22khz control is 

automatically set for each LNB 
alternative. lf ”Univerasl” is 
selected. 22Khz control should 
be “Off State”.

DiSEqC:

 Select the port number 

to get the RF signal from the LNB, 
which is  connected, to DiSEqC 
switching box.

Positioner

: Satellite position. 

If your antenna is positioned 
incorrectly, you will not receive 
signal from the satellite. So the 
STB provides DISEqC 1.2 to let 
you have exact information to 
direct your antenna toward a 
satellite.

Polarization

: Vertical or 

horizontal polarization 

Search

: Select the desired mode 

for searching.

Edit Satellite:
Satellite:

 Press OK to deploy the 

satellite list. Select the satellite 
you want to check with pressing


.

You can also press to 

select the satellite.

LNB Type:

 Select proper LNB 

type using the Arrow keys 
according to your physical LNB 
type.

LNB Freq (1,2): 

Enter the proper 

LNB frequency referring to your 
LNB using the mumeric keys on 
the Remote control unit.

Satellite

: Select the desired 

satellite.

TP

: Select the desired 

transponder

Position No. & Save

: Select the 

Position NO or Null.

Limit Setup

: Setting of limits for 

the antenna.

Movement

: The satellite can 

now be turned into the desired 
direction using the  Arrow 
buttons.

Continuous Move

: The satellite 

can be continuous moved to the 
desired direction.

Recalculation

: Press 

OK

 to 

recalculate.

Go to Reference

: A starting point 

for the satellite Search function 
can be selected by pressing the 

OK

 button.

Add TP: 

Add a new transponder 

for the current satellite.

Delete TP: 

Delete the current 

transponder.

www.xcruiser.net

XDSR57FTA

Summary of Contents for XDSR57FTA

Page 1: ...1 User s Manual XDSR57FTA Free to Air Digital Satellite Receiver Please read this User s Manual carefully before installing the receiver www xcruiser net XDSR57FTA ...

Page 2: ...CIFICATION 15 TROUBLE SHOOTING 16 Table of Contents SAFETY INSTRUCTIONS 3 SYMBOLS USED ON THE RECEIVER 3 GENERAL INFORMATION 4 MainFeatures 5 Unpacking 6 General Operation of STB 6 OVERVIEW OF THE EQUIPMENT 5 1 Front Panel 5 2 Rear Panel 6 3 Remote Control Unit 7 INSTALLATION OF STB 8 First Steps 8 Menu Information 8 Menu Operation 8 1 Channel 9 1 1 TV Channel 9 1 2 Add Channel 11 2 lnstallation 1...

Page 3: ...tions through carefully before operating the receiver Please observe all warnings and instructions on the equipment and contained in these operating instructions Be sure to read this usre s manual before starting your operation You must install the dish with correct direction and angle lf the receiver antenna is not working properly contact your local dealer Never open the cover It is very dangero...

Page 4: ... on screen display and menus These menus will help you get the most from your STB guiding you through installation channel organizing viewing and many other functions All functions can be carried out using the buttons on the Remote control unit and some of the functions can be carried out using the buttons on the Remote control unit Should you experience any difficulties with the operation of your...

Page 5: ...e menu SENSOR Receives IR signals from remote controller unit SIGNAL Turns Green when receives signals POWER INDICATOR Turns Red when Power is ON 5 Front Panel Front Panel Display Upload Procedure System Waiting Download Procedure Invalid Download Info Error in Data Transmitting System Start up Overview of the Equipment 1 2 3 1 2 3 4 5 4 5 www xcruiser net XDSR57FTA ...

Page 6: ...ct to satellite antenna lf input from LNB to digital tuner 2 RS 232 Connect to a PC for software upgrade 3 L R AUDIO Connect to TV or audio tuner 4 100 240V Power supply 5 ON OFF Power switch 1 2 3 4 5 www xcruiser net XDSR57FTA ...

Page 7: ...e 8 SAT Press to display the satellite list of searched channels 9 FAV Press to display the favorite channel list 10 TV RADIO Press to switch between TV and Radio modes 11 AUDIO Press to display the Audio Setup window 12 PAGE Press page up or down 13 NAVIGATION KEYS Move cursor up down left right page up down Volume 14 EXIT Press to returm to the previous menu or escape from the item 15 INFO Press...

Page 8: ...of STB MENU INFORMATION The user interface has various ways to navigate through the menus and functions Some of the keys on the remote control unit give direct access to functions The most important keys are identified as EPG colored keys MENU and OK Other keys are multi functional which means that their function changes dependent of the mode that you are in unless otherwise specified this note ex...

Page 9: ...lect Cancel and press OK to cancel MENU OPERATION Once you have installed and connected the cables of the receiver press MENU key on the remote control unit to display the Main Menu This menu consists of 4 menu options as shown beow 1 Channel 2 Installation 3 System 4 Tools Use the keys to move the cursor uf or down in the menu Use the OK key to confirm a selection To escape the menu system at any...

Page 10: ... the numeric keys to input the value of parameter 4 Select save to confirm them otherwise select To delete all channels 1 ln the edition channelw screen press 5 in the remote control 2 All channels will be marked with the symbol X 3 To confirm the deletion press EXIT to exit the Edition channels menu 4 You will see a confirmation message 5 Pressing the arrow keys select option OK and press OK to c...

Page 11: ...he satellite So the STB provides DISEqC 1 2 to let you have exact information to direct your antenna toward a satellite Polarization Vertical or Horizontal polarization Search Select the desired mode for searching Edit Satellite Satellite Press OK to deploy the satellite list Select the satellite you want to check with pressing You can also press to select the satellite LNB Type Select proper LNB ...

Page 12: ...ite Press MENU to exit this menu LNB Type Select proper LNB type using the Arrow keys according go your physical LNB type LNB Freq 1 2 Enter the proper LNB frequency referring go your LNB using the Numeric Keys on the Remote control unit LNB Power Select the desired option If your STB is connected to another receiver through LOOP THROUGH support you should check which receiver isconnected directly...

Page 13: ...ildren from accessing the channel You can also protect your installed data and information using the lnstall lock If the STB Panel Lock item is set to OFF the keys of the front panel is invalidated The default password is 0000 When the correct Password is entered the selected menu opens automatically 3 System 3 1 Language Select deisred language for menu 3 2 TV System You can set the TV type by pr...

Page 14: ...t Press OK the orientation and elevation of the antenna will be display on the screen 4 3 Default Value This option allows you to restore the parameters to the original state Be careful when you use this option because you can lose data 4 4 Software Upgrade By this function you can upgrade software via RS 232 serial port Upgrade Mode Select the desired upgrade mode From code logo program list and ...

Page 15: ... Right and Stereo Audio Decoding MPEG 1 MPEG 2 layer l and ll Video Resolution ISO IEC 13818 2 MPEG 2 MP ML Aspect Ratio 4 3 Video Resolution 720 x 576 PAL 720 x 480 NTSC Video format 4 3 POWER SUPPLY Type Switching mode Input Voltage 100 240 V 50 60Hz Power Consumption 18W max PHYSICAL CHARACTERSTICS Rear Panel Connectors 1 x LNB lnput 2 x Audio L R RCA 1 x Video SIGNAL RCA 1 x RS 232 9 pin D sub...

Page 16: ...n the LNB and the receiver and or adjust the dish Bad picture Blocking error The satellite dish is not pointing at the satellite Adjust the dish Signal is too strong Connect a signal attenuator to the LNB input Satellite dish is too small Change to a larger dish LNB noise factor too High Change to an LNB with lower noise factor The LNB is faulty Change the LNB No picture appears on the TV screen T...

Reviews: