


24
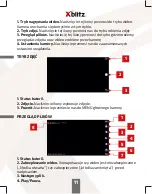
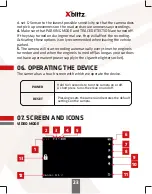
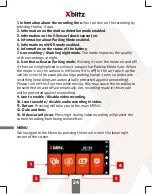
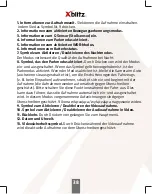
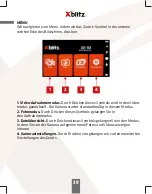
1.
Information about the recording time.
You can turn on the recording by
pressing the No. 9 icon.
2.
Information on the motion detection mode enabled.
3.
Information on the G-Sensor (shock sensor) on.
4.
Information about Parking Mode enabled.
5.
Information on WDR mode enabled.
6.
Information on the status of the battery.
7.
Icon enabling / disabling night mode.
The mode improves the quality
of the recordings at night.
8.
Icon that activates Parking mode.
Pressing it turns the mode on and o .
If the icon is highlighted in yellow it means that Parking Mode is on. When
the mode is on, the camera is left (even if it is o ) in the car to pick up the
vehicle's shock (for example, during a parking bump), turns on and starts
recording (recordings are automatically protected against overwriting).
Please turn o this function while driving, this may cause the recording to
be switched on and o automatically. Any recording made in this mode
will be protected against overwriting.
9.
Icon to enable / disable video recording.
10.
Icon to enable / disable audio recording in video.
11.
Return.
Pressing will take you to the main MENU.
12.
Date and time.
13.
Video security icon.
Pressing it during video recording will protect the
current recording from being overwritten.
MENU
We navigate to the Menu by pressing the return icon in the lower right
corner of the screen.
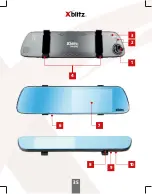
1
2
3
4
Summary of Contents for PRISM
Page 2: ...2...
Page 3: ...PL PRISM INSTRUKCJA OBS UGI...
Page 7: ...5 1 3 2 6 9 7 8 4 7...
Page 16: ...16...
Page 17: ...EN PRISM USER S MANUAL...
Page 21: ...21 5 1 3 2 6 9 7 8 4...
Page 30: ...30...
Page 31: ...DE PRISM BEDIENUNGSANLEITUNG...
Page 35: ...6 1 3 2 7 10 8 9 4 35...
Page 45: ...CZ PRISM N VOD K POU IT...
Page 49: ...49 6 1 3 2 7 10 8 9 4...
Page 58: ...58...
Page 59: ...59...
Page 60: ...EXPLORE THE FUTURE ID_ED 1906 07 KS_TR EDAP www xblitz pl...