4
ZPR68-10
1
01
23
4
5
6
7 8
9 A B
C
D
E
F
01
23
4
5
6
7 8
9 A B
C
D
E
F
1
A
B
C
ADJ-OFF
1
2
3
4
5
6
7
8
GLOBAL
Z-ADJ
TREBLE
VOL
MUTE
ON
OFF
E-FLAT
LAST
MAX-V
TRIM
OFF
C-BAL
BASS
INPUT
A
RC68+ PROGRAMMER
80
48
10
90
01
00
C0
50
D0
41
40
A0
30
B0
21
20
E0
70
F0
61
60
88
18
98
09
08
A8
38
B8
29
28
E8
78
F8
69
68
C8
58
D8
49
E1
89
C9
A9
E9
71
19
59
39
79
F1
99
D9
B9
F9
2
3
4
5
6
7
8
9
10
11
12
13
14
15
16
17
18
Front
19
Rear
20
0
12
3
4
5
6
7
8 9
A B
C
D
E
F
0
12
3
4
5
6
7
8 9
A B
C
D
E
F
01
23
4
5
6
7 8
9 A B
C
D
E
F
01
23
4
5
6
7 8
9 A B
C
D
E
F
CODE GROUP
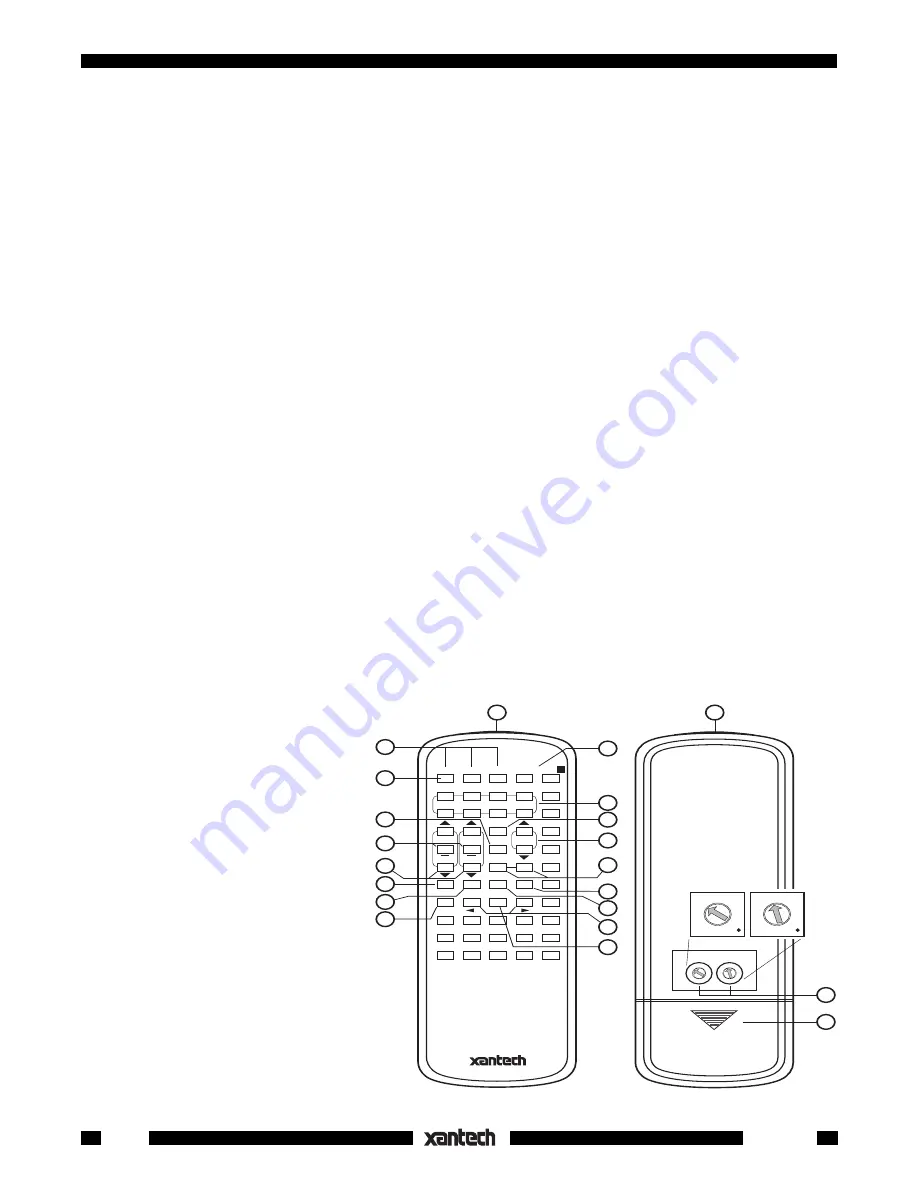
Fig. 5 RC68 Functions
ZPR68-10's are shipped from the factory with the jumper installed on one pin only (0 dB).
To gain access to the jumpers you will need to remove the top cover as follows.
a) Remove power supply plug from the Power Supply jack on the ZPR68-10 (if currently plugged in).
b) Remove the five (5) screws on each end of the top cover.
c) RAemoive the six (6) screws just under the six Video jacks of the Zone Outputs.
d) Remove one (1) screw just below the Power LED.
e) RAemove the two (2) hex nut screws from the COM PORT.
f) Carefully lift the cover off.
g) When reassembling, be sure to carefully align the holes in the top cover with the jacks and the LEDs
on all the PCB's before pressing it down into place and replacing the screws.
RC68+ PROGRAMMER / REMOTE CONTROL
The RC68+ (and the RC68) programmer, available separately, contains all the commands necessary to set
up and operate the ZPR68-10.
• In addition, you will need it to program the universal learning devices actually used by the client, such as
the Xantech URC-1 learning remote, the Xantech Smart Pads, the 590 Programmable Controller, the 710
Fone Link, etc.
• While the RC68+ will operate as a separate remote control, it is highly recommended it not be given to
the final user for the following reasons:
• First, since it includes special setup codes, the user may inadvertently alter the installer configurations.
• Also, since the user will require IR commands from other brands of equipment to control the total system,
in addition to those for the ZPR68-10, all commands should be consolidated into one learning device, for
ease of use.
RC68 BUTTON DESCRIPTIONS
1. IR Emitter Lens
2. ADJ-OFF button. Provides instant turn-off of the TRIM and Z-ADJ modes. TRIM and Z-ADJ will also
turn off automatically 10 seconds
after the last button press.
3. INPUT Select buttons. Press
these to select up to 8 audio/video
sources connected to the ZPR68-
10. Also, pressing any INPUT
button turns the addressed zone
ON.
4. GLOBAL button. After pressing
this button (within 5 seconds) all
subsequent commands (i.e. IN-
PUT, VOLUME, MUTE, BASS,
and TREBLE) will be applied to all
zones, in addition to the addressed
zone, from any zone location.
5. VOLUME Up/Down buttons.
When pressed, volume will in-
crease and decrease in 2 dB steps
between 0 dB and -80 dB. When
buttons are held down, the vol-