background image


Freedom XF102- User Manual


10.


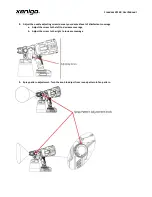
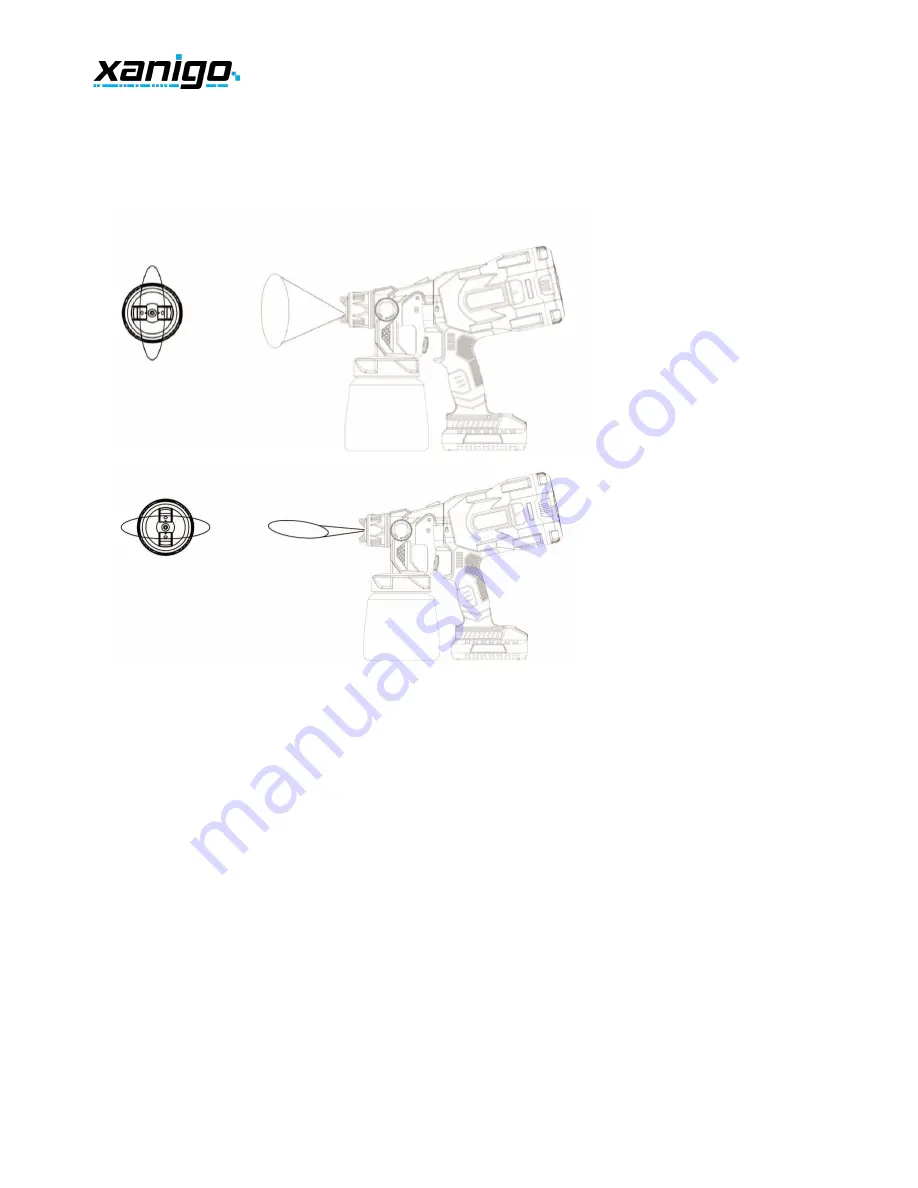
Adjusting spray pattern orientation


a.


The fan pattern can be adjusted from horizontal to vertical by adjusting the air cap. 


b.


Slightly loosen the air cap retaining nut and rotate air cap to desired position.


c.


Retighten the air cap retaining nut.


11.


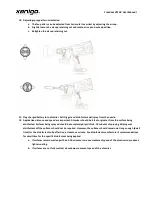
Plug charged battery into atomizer. Pull trigger and disinfectant will spray from the nozzle. 


12.


Application distance and speed are important. Atomizer should be 4 feet or greater from the surface being 

disinfected. Surfaces being sprayed should be completely dry within 5-10 minutes of spraying. Wiping wet 

disinfectant off the surfaces should not be required. However, the surfaces should remain wet long enough (dwell 

time) for the disinfectant to be effective, at least one minute. See disinfectant manufacturer’s recommendations 

for dwell time for the specific disinfectant being applied. 


a.


If surfaces remain wet longer than 5-10 minutes, increase movement speed of the atomizer to produce a 

lighter coating.


b.


If surfaces are not fully wetted, slow down movement speed of the atomizer. 


Summary of Contents for XF102

Page 1: ...Cordless Atomizer for Disinfecting INSTRUCTIONS FOR HVLP CORDLESS ATOMIZER XF102 Before using the atomizer read this manual thoroughly Any improper use can cause damage or serious injury including death ...

Page 2: ...Freedom XF102 User Manual Disinfecting Log Sheet Area Disinfected Chemical Used Date Time ...

Page 3: ...s that can explode or ignite Severe injury or property damage can occur Only clean up with water or soap water To avoid these risks take the following preventions Exhaust and fresh air introduction must be provided to keep the air within the spray area free from accumulation of flammable vapors Keep spray area well ventilated Avoid all ignition sources such as static electricity sparks open flames...

Page 4: ...cord to carry the charger or pull the plug from an outlet Keep cord away from heat oil sharp edges or moving parts Replace charger if cord is damaged WARNING SKIN INJECTION HAZARD May cause severe injury To avoid these risks take the following preventions NEVER aim the atomizer at any part of the body Do not aim the atomizer at or spray any person or animal NEVER allow any part of the body to come...

Page 5: ... damage take the following actions Always wear appropriate gloves eye protection and a respirator or mask when disinfecting Do not aim the atomizer at or spray any person including self or animal Do not spray outdoors on windy days Wear protective clothing to keep spray material off skin and hair Follow all appropriate local state and national codes governing ventilation fire prevention and operat...

Page 6: ...Freedom XF102 User Manual ...

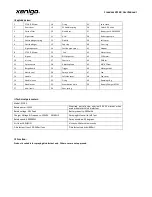
Page 7: ...ard 29 Trigger 46 Motor gasket 13 Nozzle seal 30 Spray a knob 47 Fan 14 Needle 31 Left side cover 48 Fan cover 15 Needle insert 32 O ring 49 Damping ring 16 Needle seat 33 Atomization circle 50 Battery Charger XC101 17 bowl seals 34 Vent spring II Technical parameters Model XF102 Rated power 120W Atomized particle size nominal 90 120 microns when used with water thin disinfectant Rated voltage 20V...

Page 8: ...b If spraying downward the angled end of the suction tube should be pointing toward the front of the atomizer c Do not operate nor store atomizer on its side or inverted when liquid is in the canister d The suction tube in the canister should always be submerged in the liquid in the canister when in use Do not operate the atomizer in a manner attitude that allows the suction tube to become unsubme...

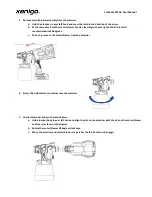
Page 9: ... it counterclockwise 90 degrees c Pull out to remove the motor blower from the atomizer 6 Screw filled disinfectant container onto the atomizer 7 Connect atomizer body with motor blower a Hold atomizer body in your left hand and align the slot on the atomizer with the slot on the motor blower and insert as shown in the figure b Rotate the motor blower 90 degrees clockwise c When the atomizer and m...

Page 10: ...ting screw to meet your desired level of disinfectant coverage a Adjust the screw to the left to decrease coverage b Adjust the screw to the right to increase coverage 9 Spray pattern adjustment Turn the knob to adjust from round pattern to fan pattern ...

Page 11: ...should be 4 feet or greater from the surface being disinfected Surfaces being sprayed should be completely dry within 5 10 minutes of spraying Wiping wet disinfectant off the surfaces should not be required However the surfaces should remain wet long enough dwell time for the disinfectant to be effective at least one minute See disinfectant manufacturer s recommendations for dwell time for the spe...

Page 12: ...mately 200 mL of water to disinfectant container A few drops of liquid soap or dishwashing liquid can also be added f Reassemble container to atomizer then assemble atomizer with motor blower g Swish water in container to wet the interior of the container and to mix in soap if used h Reattach battery pack i Turn on atomizer and run until container is empty j Repeat steps above one additional time ...

Page 13: ...ED UP BY ENSURING THE PACK AND CHARGER ARE IN A NORMAL INDOOR ROOM TEMPERATURE ENVIRONMENT IDEALLY 60 F TO 80 F 3 Battery pack fuel gauge a The battery pack has a fuel gauge to help the user understand approximately how much capacity is left in the battery charge Push the button on pack to light the indicators i 3 LEDs indicates the pack is above 40 charged ii 2 LEDs indicates the pack is between ...

Page 14: ...tern runs sags or remains wet 1 applying too much material 1 adjust material flow or increase movement of atomizer F too much over spray 1 atomizer too far from target area 2 too much material applied 1 reduce distance 2 turn material volume setting to right G pattern is very light and splotchy 1 moving the atomizer too fast 1 adjust material flow or decrease movement of atomizer H large cloud of ...

Page 15: ...Freedom XF102 User Manual Xanigo llc 3236 Huntington Weston FL 33332 https xanigo com Contact Us 800 514 7837 info xanigo com support xanigo com 07 2021 ...

Reviews: