background image

-4-

Using the ACB1 CommBack

1.Turning the CommBack On and 
Off

STEP 1 –

 Press and hold the power button 

STEP 1 –

 until the indicator LEDs flashing, 

STEP 1 –

 then again hold the Power 

STEP 1 –

 Button to turn on the ACB1 

STEP 1 –


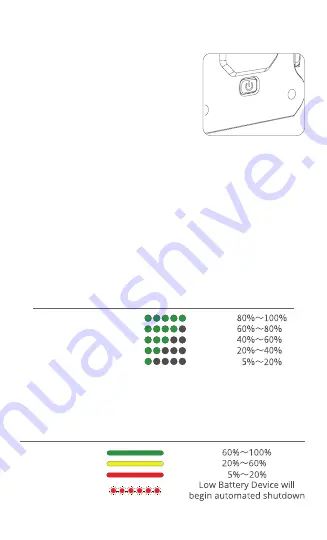
The Battery Level Indicator (LED 1) displays the battery level of the 
CommBack when it is powered ON. See the table below for details 
on these indicators:

STEP 2 –

 CommBack

STEP 2 –

 Within 60 seconds, the Indicator


LED 3 will flash slowly 

STEP 1 –

 indicating the device communication module is starting

STEP 3 – 

Repeat Step 1 to turn off the CommBack

2. Checking battery level

Press the power button once to check the current battery level. 
When ACB1 CommBack is OFF, the indicator LEDS displays the 
battery level of the CommBack. See the below for details on these 
indicators.

LED light display

Battery level

5 SOLID LIGHT

4 SOLID LIGHT

3 SOLID LIGHT

2 SOLID LIGHT

1 SOLID LIGHT

LED light display

Battery level

SOLID GREEN 

SOLID YELLOW

SOLID RED

FLASHING RED

Summary of Contents for ACB1 CommBack

Page 1: ...ACB1CommBack Quick Start Guide en Version 1 0 ...

Page 2: ...best experience possible XAG recommend that you should read through this Quick Start Guide and Disclaimer within this document before attempting to use the ACB1 CommBack XAG Support If you have any question about this document please contact us at Technical Support by Email Support xa com ...

Page 3: ...e carefully check to see if it contains all the items listed in this list Please contact XAG or your dealer if there are any missing items USB To Type C Data cable 1 Type C To Type C Data cable 1 Micro USB To Type C Data cable 1 ACB1 CommBack 1 Charger adapter 1 ...

Page 4: ... View 1 Antenna Press to talk button Power button Speaker 1 2 3 4 Control keypad Indicator LEDS Data Port Type C 5 6 7 1 2 3 4 5 LED 1 Battery Level LEDS Flight status LEDS 1 2 3 4 Task status LEDS 5 Indicator LEDS Device connectivity LEDS LED 2 UAV connectivity LEDS LED 3 LED 4 LED 5 ...

Page 5: ...Back STEP 2 Within 60 seconds the Indicator LED 3 will flash slowly STEP 1 indicating the device communication module is starting STEP 3 Repeat Step 1 to turn off the CommBack 2 Checking battery level Press the power button once to check the current battery level When ACB1 CommBack is OFF the indicator LEDS displays the battery level of the CommBack See the below for details on these indicators LE...

Page 6: ...evice following the STEP 6 on screen instructions STEP 7 Press the Power Button once the device will enter update STEP 7 mode and the indicator LEDS will flash RED STEP 8 The indicator LEDS will stop flashing once the update is STEP 6 completed Repeat this process if the firmware update are unsuccessful 4 2 Method 2 Update via PC STEP 1 Turn ON the ACB1 CommBack STEP 2 Press and HOLD the Control K...

Page 7: ...ick on the icon to check for Hotspot Details Default name XAG123 Default Password 20070401 Hotspot Details on ACB1 CommBack can be edited STEP 4 Edit the Hotspot detail to be consistent with your Smart STEP 4 Phone and enable Hotspot STEP 5 Disconnect the USB Cable connecting your Smart Phone STEP 4 and ACB1 CommBack and waits for the device connection STEP 4 via WiFi Once it is connected the WIFI...

Page 8: ...uires sufficient Operator Level Follow the on screen instruction and Power on the UAV and select the corresponding device to be paired 7 Aircraft Operation by Control Keypad Operators can remotely control the flight of the UAV by the Control Keypads during the Flight Operation Hovering or Return to Home When the UAV are operating the UAV by the CommBack the Flight Status LEDs LED 4 will turn Green...

Page 9: ... 8 Forward key Left key Emergency key 1 2 3 4 5 Right key Backward key ...

Page 10: ...ging environment temperature 5 C to 45 C Charging voltage current 5V 2A 9V 1 5A 12V 1 5A Mesh network support Voice broadcast support Press to talk function support GPS positioning support Mesh network support Voice broadcast support Press to talk function support GPS positioning support Mesh spraying support External power supply support External power supply parameters 5V 2A Protection grade IP5...

Page 11: ... RED SLOW FLASH GREEN SOLID GREEN OFF RED SOLID GREEN OFF Smart Controller has been connected 5 20 60 100 20 60 Rapid Charging Low Battery Device will shutdown Normal Charging Not connected The module is starting UAV Connected Connection FAIL Not connected Auto Mode Manual Mode LED 1 Battery Level LEDS LED 2 Device Connectivity LEDS LED 2 UAV Connectivity LEDS LED 2 Flight Status LEDS Indicator on...

Page 12: ...This Guide is subject to update without prior notice Visit our website for more information www xa com XPLANET official account XAG official account ...

Reviews: