background image

1

1

Chapter 4

  The player

The player

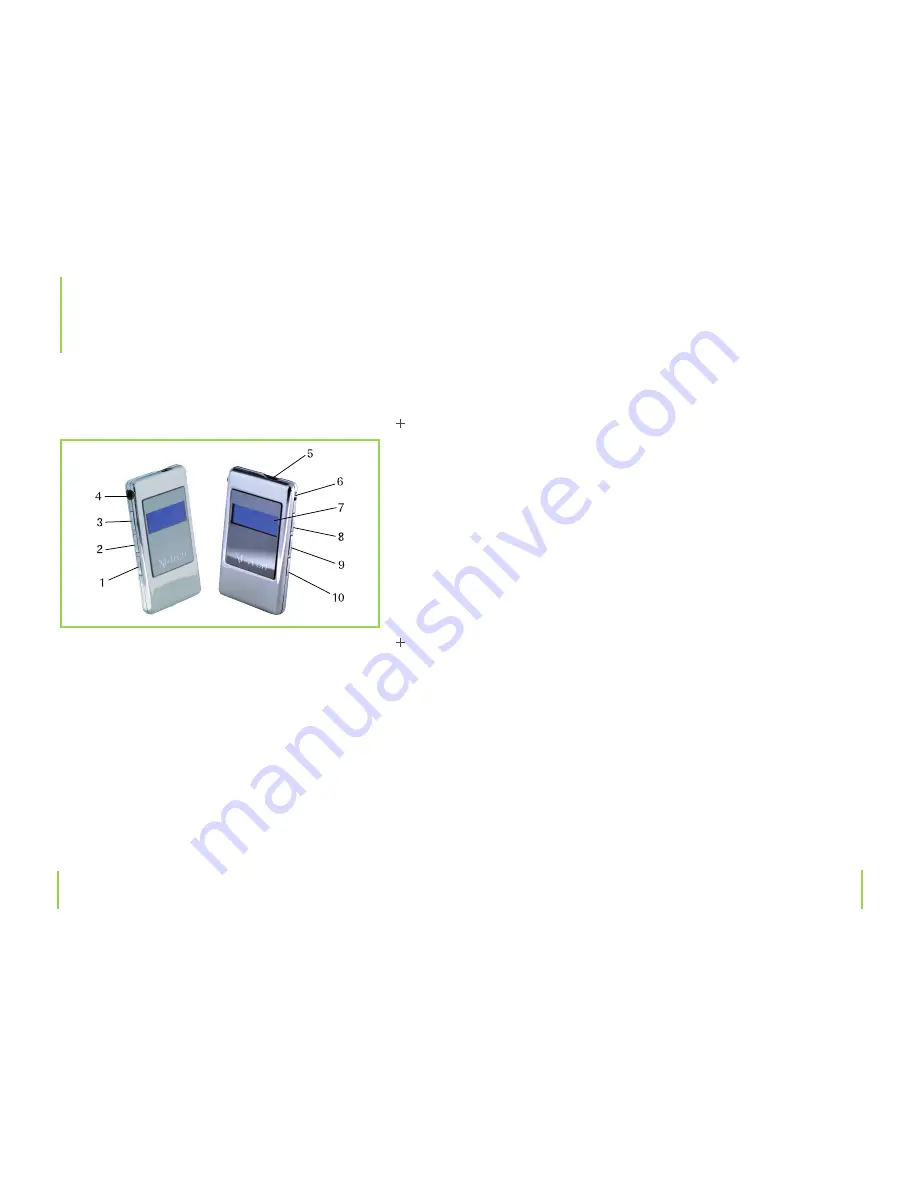
Controls and indicators

1.  ON/OFF, PLAY/PAUSE/STOP button 
2.    Volume –
3.    
4.    3.5 mm stereo jack for audio output
5.    USB cable connection
6.    Main ON/OFF switch
7.    LC display
8.    Next
9.    Previous
10.  Mode button

Chapter 4

  The player

Connections and cable

An USB cable and earphones are included in delivery. You 
can also use an optional 3.5 mm stereo connection cable to 
connect your MP3 player to a stereo system. The earphone 
jack  not  only  serves  as  an  audio  output  connection,  but 
also as an earphone connection.

Summary of Contents for SlimStyler

Page 1: ...MP3 Chrome Edition Instruction manual...

Page 2: ...000 Vista 25 Chapter 7 Music mode Music 25 Choosing a music file 25 Starting pausing playback 26 A B Repeat 28 Chapter 8 Voice mode Voice 28 Choosing a recorded file 28 Starting pausing playback 30 Ch...

Page 3: ...ll company names and product names are trademarks of theirrespectiveowners Allrightsreserved Welookforward to you recommending us to others and wish you hours of enjoyment with this MP3 player Your X4...

Page 4: ...y instruc tions improper operation and handling Under such cir cumstances all claims under warranty will become void Please note The following Safety and Hazard Warnings serve as a general guideline f...

Page 5: ...he device e g lighted candle Operate this device in a moderate climate and never ex pose to extreme temperatures such as high humidity Do not bend or place any heavy objects on the cable Never leave p...

Page 6: ...veloped for storing musicindigitalform Ananalogsignalismeasuredatspecific intervals transferred in numerical value and stored in a spe cific form on the CD A CD player or amplifier evaluates the compu...

Page 7: ...are both free of charge and or very expensive programs for almost all operating systems available on the market that can be used with any available audio CD or other source to help you create compres...

Page 8: ...ell as WMA files are nothing more than a specific compression format designed to re duce the amount of space needed for saving and storing compressed songs Depending on player version order number ava...

Page 9: ...ion 6 Main ON OFF switch 7 LC display 8 Next 9 Previous 10 Mode button Chapter 4 The player Connections and cable An USB cable and earphones are included in delivery You can also use an optional 3 5 m...

Page 10: ...er has over 6 different modes to choose from Navigation This mode lets you view choose and organize files In the main menu navigate to Navigation and press the MODE 10 button to confirm Use the VOL 2...

Page 11: ...eed as follows Keep the MODE 10 button pressed down long enough approx 2 sec until the modes Music Voice Setting and Record are displayed In case the MP3 player has been turned off during one of these...

Page 12: ...that you can have on your player e g for each artist or for your favorite songs and so on This limitation naturally does not apply to normal data transmission e g when pictures are to be transmitted...

Page 13: ...river letter in My Com puter Explorer This extra driver can now be used for your MP3 player for copying and deleting files creating new folders etc Chapter 7 Music mode Music The mode allows you to pl...

Page 14: ...he beginning and B the end of the range to be repeated Choose the title to be repeated and press the PLAY 1 button to start playback During playback press the MODE 10 button down short ly to mark the...

Page 15: ...rded file Navigate with the or button to choose either the previous or next recording Starting pausing playback Press the PLAY 1 button shortly once on the left side of the LC display The selected rec...

Page 16: ...ording as a WAV file on the player Repeat this process for further voice recordings The MP3 player stores recorded files as WAV files that can be found in the Voice folder Chapter 10 System settings S...

Page 17: ...ubstitute for a ma nual pitch and intensity setting Choose a timbre setting according to your own desired taste and type of music Chapter 10 System settings Chapter 10 System settings Playback mode Th...

Page 18: ...mode you can use the or Chapter 10 System settings Chapter 10 System settings button to set the backlight time Press the MODE 10 button down shortly to confirm the selected backlight setting After con...

Page 19: ...e all of your files You also have the alternative to delete files directly from your MP3 player In the main menu navigate to Delete and press the MODE 10 button to confirm and enter this menu Now you...

Page 20: ...type of firmware version that your MP3 player has Should you have any questions or need to contact a service hotline number you will be asked exactly what type of firmware your MP3 player has In addit...

Page 21: ...ell as in many other surroundings Using or listening to your MP3 player with earphones headphones can divert one s attention and be just as dis tracting as using your cell phone while driving In the c...

Page 22: ...e you have created files yourself please use some other type of software to create MP3 or WMA files Chapter 15 Maintenance and cleaning 15 Maintenance and cleaning This is a maintenance free product t...

Page 23: ...ng and functioning properly An update will not change the player s technical functions but for example might only improve the menu There are numerous different programs available Win dows Media Player...

Page 24: ...tery USB 2 0 Internal flash memory 100 000 x rewriteable Operating systems MS Windows XP 2000 VISTA MAC SUSE LINUX starting with 10 2 18 Delivery contents Chapter 18 Delivery contents MP3 player Stere...

Page 25: ...48 www x4 tech de Version 2 0 1 2008...

Reviews: