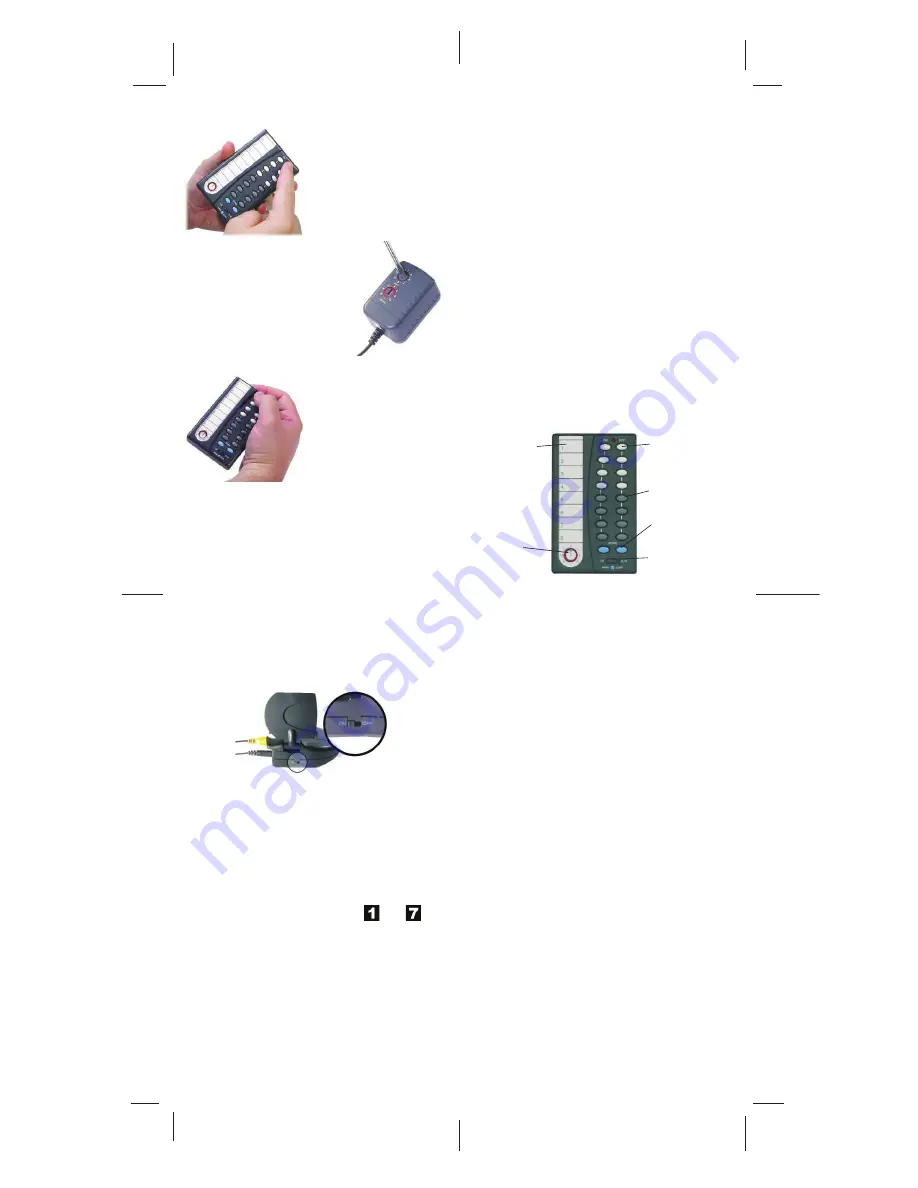
5. Press 1 Off on the remote
control to turn the fi rst
camera off.
6. Set the dials on the second
camera’s power supply to A
and 2.
7. Connect the second camera to
power. A picture will appear on
your TV.
8. Press 1 On to switch to
camera 1 and then 2 On to
switch back to camera 2.
Multi-Camera Systems, cont.
Repeat steps 6 through 8 for each additional camera,
changing the Unit Code as appropriate. For each extra
camera, set the Unit Code (number) dial to the next
number. For example, your third camera will be set
to ‘3,’ your fourth camera set to ‘4’ and so on. Set all
cameras to A.
Cameras 1-4 on
and off.
Next/Previous
camera.
Write camera
names here.
Set House
Code the same
as cameras.
Switching Cameras with the Remote
To switch from one camera to another with the remote
control, simply press the On button for that camera. For
example, press 2 On to switch from the current camera
to camera 2. When you do that, the current camera
switches off and camera 2 switches on, displaying its
picture. Note: If you have 8 cameras set up, before
turning on a camera in group 1-4, turn off any cameras
in group 5-8, and vice versa.
Scanning Between Cameras with the
Remote
If you select a camera with the remote, you can then use
the scan buttons to cycle through cameras 1 through 4.
First select a camera using its On button. Then use the
blue arrow buttons at the bottom of the remote to go to
the next or previous cameras. Each press of the button
switches to the next or previous camera in order.
Unit Switch
Cameras 5-8 on
and off.
Troubleshooting
If there’s no camera picture on your TV:
1. Make sure your Wireless Video Receiver is
connected to power and turned on.
2. Select the appropriate video input on your TV.
Usually you can select the input mode by pressing
the VIDEO or INPUT button on the remote control.
Or, you might have to change the TV to Channel 0
or 2, and then use Channel Down to change video
inputs. See your TV’s owner’s manual if you still
aren’t sure how to change the video source.
3. Make sure your camera is connected to power and
turned on.
5. Follow the setup steps again (steps 1 thru 7 ),
and check that you have done each step correctly.
If the picture on your TV isn’t clear:
First, adjust the antennas on the video receiver and
camera so they point towards each other. The side of the
camera’s antenna with the dot on it should face the side
of the receiver’s antenna marked with four squares. You
can also try moving the video receiver itself to another
location near the TV. Sometimes moving it just a foot
can make a big difference.
If the picture is out of focus:
The camera is shipped with the focus preset for optimal
use. You can adjust the focus by turning the lens.
Try turning it counterclockwise fi rst. If you turn it
clockwise do not force or overtighten it.
If you can’t switch cameras:
If you have a multi-camera setup and are having trouble
switching, start by unplugging all the cameras but one.
Use your remote control to turn the remaining camera
on and off. If you fi nd that you can’t control it, plug it
into a different power outlet and try again. You may
have to try several outlets. If you still can’t control
a camera, try the following (page 15):
Troubleshooting, cont.
Multi-Camera Systems, cont.
9
10
13
14
Trim
to
crop
marks
Trim
to
crop
marks
Trim to crop marks
Trim to crop marks
Trim
to
crop
marks
Trim
to
crop
marks
Fold
Fold
Fold
Fold
For more help with setup please visit
www.x10.com/support
FCC & IC Caution
THIS DEVICE COMPLIES WITH PART 15 OF THE
FCC RULES. OPERATION IS SUBJECT TO THE
FOLLOWING TWO CONDITIONS:
(1) THIS DEVICE MAY NOT CAUSE HARMFUL
INTERFERENCE, AND
(2) THIS DEVICE MUST ACCEPT ANY
INTERFERENCE RECEVIED, INCLUDING
INTERFERENCE THAT MAY CAUSE UNDESIRED
OPERATION.
This equipment has been tested and found to comply with
the limits for a Class B digital device, pursuant to Part 15
of the FCC Rules. These limits are designed to provide
reasonable protection against harmful interference in a
residential installation. This equipment generates, uses
and can radiate radio frequency energy and, if not
installed and used in accordance with the instructions,
may cause harmful interference to radio communications.
However, there is no guarantee that interference will not
occur in a particular installation. If this equipment does
cause harmful interference to radio or television
reception, which can be determined by turning the
equipment off and on, the user is encouraged to try to
correct the interference by one or more of the following
measures:
-- Reorient or relocate the receiving antenna.
-- Increase the separation between the equipment and
receiver.
-- Connect the equipment into an outlet on a circuit
different from that to which the receiver is connected.
-- Consult the dealer or an experienced radio/TV
technician for help.
For more help on setup, please visit:
www.x10.com/support


