15
14
WARRANTY
12 MONTH LIMITED WARRANTY
X10 (USA) INC. (X10) WARRANTS ITS PRODUCTS TO BE FREE FROM
DEFECTIVE MATERIAL AND WORKMANSHIP FOR A PERIOD OF ONE (1)
YEAR FROM THE ORIGINAL DATE OF PURCHASE AT RETAIL. X10 AGREES
TO REPAIR OR REPLACE, AT ITS SOLE DISCRETION, A DEFECTIVE X10
PRODUCT IF RETURNED TO X10 WITHIN THE WARRANTY PERIOD AND
WITH PROOF OF PURCHASE.
IF SERVICE IS REQUIRED UNDER THIS WARRANTY:
1. RETURN THE DEFECTIVE UNIT POSTAGE PREPAID TO THE ADDRESS
ON BACK COVER.
2. ENCLOSE A CHECK FOR $4.00 TO COVER HANDLING AND RETURN
POSTAGE.
3. ENCLOSE A DATED PROOF OF PURCHASE.
4. X10 IS NOT RESPONSIBLE FOR SHIPPING DAMAGE. UNITS TO BE
RETURNED SHOULD BE PACKED CAREFULLY.
THIS WARRANTY DOES NOT EXTEND TO ANY X10 PRODUCTS WHICH
HAVE BEEN SUBJECT TO MISUSE, NEGLECT, ACCIDENT, INCORRECT
WIRING OR TO USE IN VIOLATION OF OPERATING INSTRUCTIONS
FURNISHED BY US, NOR EXTEND TO ANY UNITS ALTERED OR REPAIRED
FOR WARRANTY DEFECT BY ANYONE OTHER THAN X10. THIS
WARRANTY DOES NOT COVER ANY INCIDENTAL OR CONSEQUENTIAL
DAMAGES AND IS IN LIEU OF ALL OTHER WARRANTIES EXPRESSED OR
IMPLIED AND NO REPRESENTATIVE OR PERSON IS AUTHORIZED TO
ASSUME FOR US ANY OTHER LIABILITY IN CONNECTION WITH THE
SALE OF OUR PRODUCTS.
SOME STATES DO NOT ALLOW LIMITATIONS ON HOW LONG AN
IMPLIED WARRANTY LASTS, AND/OR THE EXCLUSION OR LIMITATION
OF INCIDENTAL OR CONSEQUENTIAL DAMAGES SO THE ABOVE
LIMITATIONS AND EXCLUSIONS MAY NOT APPLY TO THE ORIGINAL
CUSTOMER. THIS WARRANTY GIVES YOU SPECIFIC RIGHTS AND YOU
MAY ALSO HAVE OTHER RIGHTS WHICH VARY FROM STATE TO STATE.
F
INE
T
UNING
YOUR
S
YSTEM
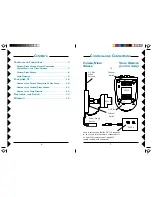
The Wireless Video Sender usually works best with the flat faces of
the antennas on the Sender and Receiver unit facing each other (i.e.
in “Line of sight” - see diagram below). Sometimes, however,
reflections and other effects in the home may affect the signal so that
some adjustment of either the Sender or Receiver antenna may be
necessary to get the best the signal.
I
F
YOU
ARE
NOT
GETTING
ANY
SIGNAL
AT
ALL
Check that the CHANNEL slide switch (labeled A, B, C, D) on both
units (on bottom) is set to the same letter.
If you are using coaxial TV connections from the Video Receiver,
check that the TV is tuned to the same channel as the TV Channel
switch on the bottom of the Video Receiver (3 or 4).
Check that the camera's remote controlled power supply is turned on
(using any X10 remote control, sold separately). Note, when you first
plug the power supply in, it will normally be ON.
I
F
THE
SIGNAL
IS
POOR
,
OR
THERE
IS
INTERFERENCE
Try changing the channel on both units. Do this by adjusting the
CHANNEL slide switch on each unit to any position (A, B, C, or D).
Make sure both units are set to the same letter.


