

1. Lift X Rocker out of box.
2. Keep the chair in the folded position and place it on the floor so that back side of the chair is touching the floor and
the bottom of the seat is facing up.
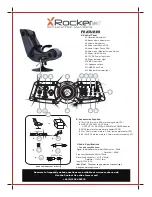
3. Review the set up diagrams to familiarize yourself with the X Rocker’s components, accessories and set - up.
4. Please complete steps 1- 7 to assemble the chair.
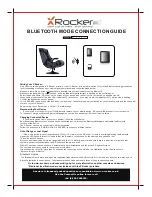
5. Unpack the power adapter and connect it to the main power outlet, then to the power jack on the control panel(A8).
6. Press the power button(A7) and confirm that the power indicator light(A9) is on. In Bluetooth mode, Please keep the
band to “ ”(A6), confirm that its indicator light is flashing.(A 13)
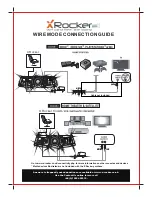
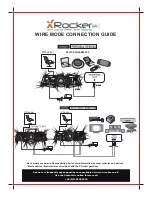
8. Follow the connection diagrams. They show how to connect the X Rocker to the audio source of your choice.
9. Adjust the bass and volume levels to your preference...start rocking.
ATTENTION:
FUNCTIONS:
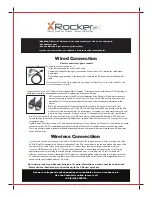
USB port only can be used to charge electronic devices.
Bluetooth connection has a 30 feet / 10 meters. range of virtually unlimited wireless listening in your home.
When using in wire mode, Please keep the band to “AUX” (A6)
When using in Bluetooth mode, Please keep the band to “ ”
(A6)
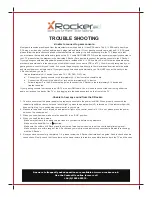
Answers to frequently asked questions are available at www.x-rocker.co.uk.
Use the Contact Us online form or call
Foldable construction for ease of storage and portability.
Side control panel with volume, bass control, vibration control, input/ output jacks, and band switch.
Ergonomic design with full back support.
Headphone jack for personal use.
Play your Bluetooth device through your X Rocker.
Control your music from your Bluetooth device.
Connect device without ever going near X Rocker.
Always make sure hinge is locked before moving.
Always make sure hinge is locked before sitting in the chair.
Excessive use of audio equipment could lead to hearing loss.
Excessive sound pressure from earphones and headphones can cause hearing loss.
Children under the age of 13 should not use this product without adult supervision.
Strictly for indoor use. Do not expose to direct sunlight, moisture or extreme temperatures.
If the cover becomes wet, disconnect the power immediately and don’t use until it is completely dry.
Do not attempt to remove the cover or any components. Removal of the cover or tampering with components puts you
at risk for injury or death from electrical shock.
More information please see additional assembly instruction!
READ BEFORE USAGE:
SET UP:
+44 (0)1992 450333.


