background image


X-Rite DensiEye 100 and 700 


14 

DensiEye Reference Manual 4 

3.2. Density 


3.2.1. Density 

(Paper) 


  Set White Base to Paper or Paper Auto in the Function Settings 

  Make sure the instrument is calibrated for paper white base 

  Set reference values in the References menu  


  Select Density in the main menu 

o

  The status displays the current reference set if the Pass/Fail detection is activated 

or Absolute/Difference is set to Difference 

o

  The status displays the current filter/color 


 Select 

Filter 

  The pop-up window shows a list with automatic or manual filter/color selections 

  Set the automatic or manual filter/color selection  

o

  The status displays the current filter/color  


 Select 

Absolute/Difference 

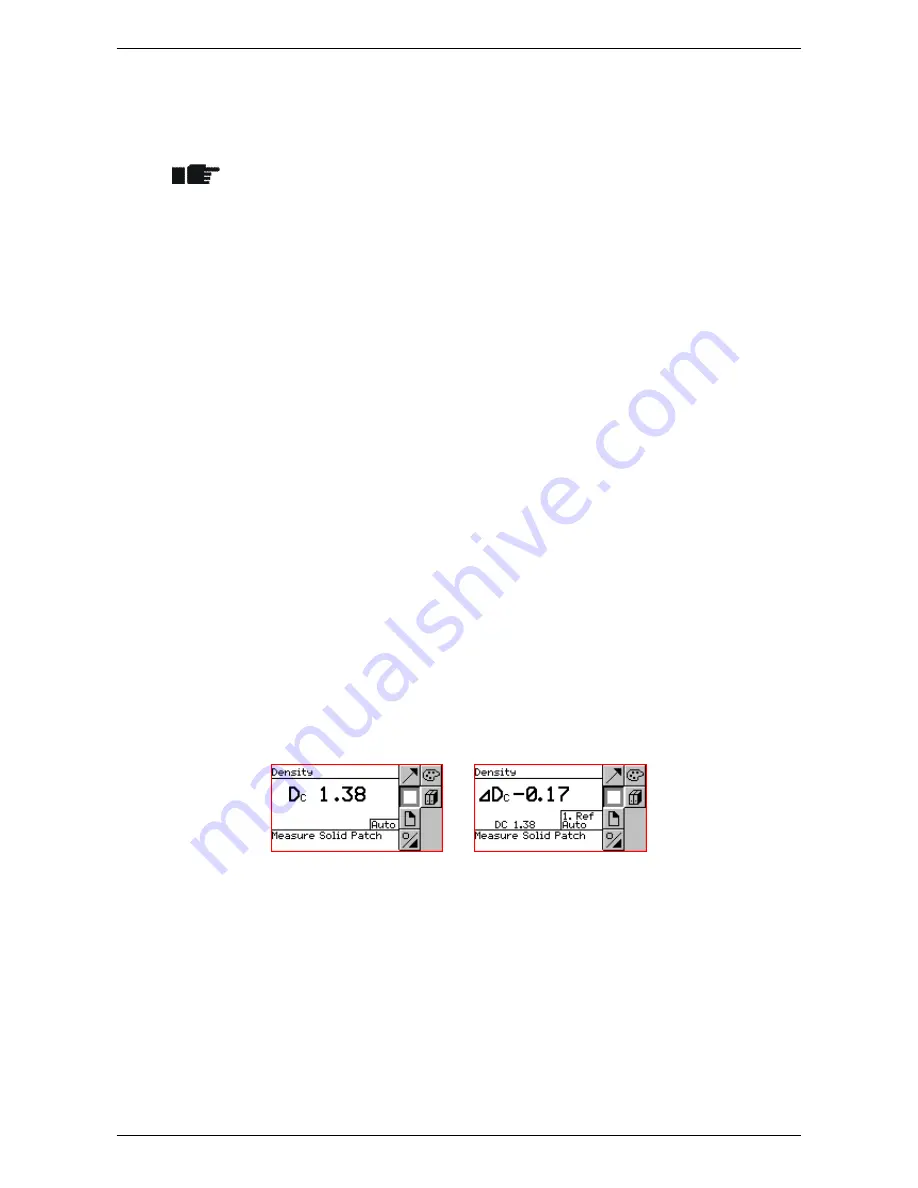
  Select Absolute for absolute density values 

o

  The output area displays D 

  Select Difference for difference density values 

o

  The output area displays 


  Select Reference for difference readings 

  The pop-up window shows a list with reference sets 

  Select a reference set 

o

  The status area displays the selected reference set 


  Select Paper and measure paper white 

  After the measurement, the message box briefly displays “White Measurement 

done” 


 Measure 

Solid 

  The output area shows absolute or difference density values and the corresponding 

color of the last patch 


  Select Return to return to the main menu 

Summary of Contents for DensiEye 100

Page 1: ...DensiEye Reference Manual E N G L I S H...

Page 2: ...5 Gray Balance 19 3 5 1 Gray Balance Paper 19 3 5 2 Gray Balance Absolute 20 3 6 Dot Area 21 3 7 Print Characteristic 22 4 References 24 4 1 Select a reference set 24 4 2 Solid reference 25 4 2 1 Mea...

Page 3: ...6 2 2 Instrument type 39 6 2 3 Language 40 7 USB Interface 41 7 1 USB Driver Installation 41 7 2 USB Interface Protocol 41 8 DensiEye 100 to 700 Upgrade 41 9 Maintenance and Care 43 9 1 Reset 43 9 2 T...

Page 4: ...res an easy to use graphical user interface and a high level of automation Its high measurement accuracy makes this a truly unique instrument In this reference manual all functionality of the DensiEye...

Page 5: ...e the DensiEye to direct sunlight Protect the DensiEye against chemical substances corrosive vapors strong vibrations and mechanical influences Always use the original packaging to transport the Densi...

Page 6: ...contents Item Name 1 DensiEye 2 Calibration card 3 USB cable 4 Quick start guide 5 Device certificate 6 Registration card 7 CD with operating instructions and software 8 Device case 1 4 Packaging and...

Page 7: ...ximately 30 seconds of inactivity the DensiEye goes into power saving mode Press any button to wake up the instrument 2 2 2 Lock measuring head Lower the measuring head and slide the locking button fo...

Page 8: ...ute Difference values Absolute White base Paper Reference set 1 reference set Filter color selection Auto Pass Fail indicator Off Scale graduation for print characteristic 10 Number of decimal places...

Page 9: ...ity DensiEye 100 is selected in the main menu All settings are retained Reset Enter 2 Auto Mode function is pre selected in the main menu All settings are reset to factory settings The reference and t...

Page 10: ...ance reference Any patch Measure any patch using Auto Mode function View Edit mode View and edit halftone measurements Absolute Difference mode Toggle between absolute and difference values First soli...

Page 11: ...for difference display o Selected density filter setting Auto Cyan Magenta Yellow or Black Symbol area Header Output area Help area Status area 2 7 2 Message box A message box displays information an...

Page 12: ...buttons to select a function from the main menu Press the Enter button in the main menu to open the function screen Press the Enter button in a popup window to activate the selected option 2 9 Symbol...

Page 13: ...o The status displays A for automatic filter color detection Select Absolute Difference Select Absolute for absolute measurement values o The output area displays D Select Difference for difference me...

Page 14: ...measurement values of the last patch Absolute or difference values for solid density and the corresponding color Halftone reference and dot gain value and the corresponding color Trapping value and th...

Page 15: ...lter color selections Set the automatic or manual filter color selection o The status displays the current filter color Select Absolute Difference Select Absolute for absolute density values o The out...

Page 16: ...he pop up window shows a list with automatic or manual filter color selections Set the automatic or manual filter color selection o The status displays the current filter color Select Absolute Differe...

Page 17: ...lection The pop up window shows a list with automatic or manual filter color selections Set the automatic or manual filter color selection o The status displays the current filter color Select Referen...

Page 18: ...e 2 Halftone if activated o The output field displays solid density 1 and 2 halftone reference and dot gain values Measure 3 Halftone if activated o The output field displays 1 2 and 3 halftone refere...

Page 19: ...r color selections Set the automatic or manual filter color selection o The status displays the current filter color Select Paper and measure paper white After the measurement the message box briefly...

Page 20: ...lute Difference o Select Absolute for gray balance absolute values The output area displays DC DM and DY o Select Difference for gray balance difference readings The output area displays DC DM and DY...

Page 21: ...ed or Absolute Difference is set to Difference Select Absolute Difference o Select Absolute for gray balance readings The output area displays DC DM and DY o Select Difference for gray balance differe...

Page 22: ...ilter selection The pop up window shows a list with automatic or manual filter color selections Set the automatic or manual filter color selection o The status displays the current filter color Select...

Page 23: ...or Select Filter selection The pop up window shows a list with automatic or manual filter color selections Set the automatic or manual filter color selection o The status displays the current filter c...

Page 24: ...lect View Edit o A vertical bar points to the last measured halftone o Use the Up Down button to select and view the desired halftone o Re measure the desired halftone o Press the Enter button to exit...

Page 25: ...ay Balance o If paper white base is set the Paper symbol appears 4 1 Select a reference set The DensiEye includes 6 reference sets A reference set contains o Solid density references and tolerance val...

Page 26: ...t done Select Solid o The output area displays a table with solid density reference and tolerance values for cyan magenta yellow and black o Measure solid reference values The output area displays mea...

Page 27: ...reference values Select Return to return to the main menu 4 2 4 Edit Solid reference and tolerance values Absolute Set White Base to Absolute or Absolute Auto in the Function Settings Make sure that...

Page 28: ...s a table with halftone and dot gain reference values and dot gain tolerance values for cyan magenta yellow and black Press the Enter button o Highlight dot area and dot gain reference and dot gain to...

Page 29: ...Measure Gray Balance reference values Paper Set White Base to Paper or Paper Auto in the Function Settings Make sure that the instrument is calibrated for paper white base Select Paper and measure pap...

Page 30: ...e values and the edited gray balance density tolerance values Continue editing the other colors as described Select Return to return to the main menu 4 4 3 Measure Gray Balance reference values Absolu...

Page 31: ...ference and tolerance values for cyan o Press the Enter button to open the edit or measure screen Edit or measure gray balance density reference value Press the Enter button to open the edit window fo...

Page 32: ...r precise measurements make sure to only use the calibration reference you received with your DensiEye The density standard and the filter type on the calibration card must correspond with the device...

Page 33: ...button to open the edit or measure screen for Black o Edit density value Continue editing the other colors as described Select Return to return to the main menu 5 1 3 Check Calibration Paper Select De...

Page 34: ...e a week or whenever the ambient temperature has changed by more than 10 C 18 F Recalibrate the instrument if necessary The density standard and the filter type on the calibration card must correspond...

Page 35: ...e other colors as described Select Return to return to the main menu 5 2 3 Check Calibration Absolute Select Gray Balance in the main menu Measure White Patch on the calibration card o The difference...

Page 36: ...Do not use the X Rite calibration cards after the expiration date Always keep the X Rite calibration card in its protective cover in a dry place Treat the calibration card with care and make sure not...

Page 37: ...ail indicator The Pass Fail indicator can be switched On and Off A green light indicates that the measured value is within tolerance A red light indicates that the measured value is out of tolerance S...

Page 38: ...Absolute Auto causes an automatic paper white measurement only for Dot Gain and Trapping White Base Paper Auto corresponds to White Base Paper White Base Absolute Auto corresponds to White Base Auto...

Page 39: ...p up screen Set Scale Graduation 5 50 for Print Characteristic o The output field displays the current setting Select Return to return to the main menu 6 1 4 Decimal places The number of decimal place...

Page 40: ...tate display for left or right hand operation o The output field displays the current setting Select Return to return to the main menu 6 2 2 Instrument type This screen displays important information...

Page 41: ...ge The texts can be displayed in different languages Select Language o The output area displays the current language Press the Enter button to open the pop up screen Select Language o The output area...

Page 42: ...indows Device Manager as follows Open the Control Panel and select System The System Properties opens Select the Hardware tab and click on Device Manager From the View menu select Devices by type Sele...

Page 43: ...purchase the upgrade code Upgrade Procedure Press and hold the Reset button Press and hold the Down button Release the Reset button Release the Down button o The DensiEye is now in programming mode Th...

Page 44: ...menu the settings Auto Mode DensiEye 700 or Density DensiEye 100 are selected All settings remain the same Procedure Press the Reset button for approximately 3 seconds 9 2 Total Reset After a Total Re...

Page 45: ...l number and firmware version Procedure Select Device Settings in the main menu Select Instrument Type o The output field displays instrument information Type Instrument type Firmware Firmware version...

Page 46: ...Remove the cover from the battery compartment Remove the two old batteries Insert the new batteries while taking the polarity into account The polarity and the mounting position are illustrated in the...

Page 47: ...ton and keep it pressed Press and release the Up button Release the Reset button The instrument is now in programming mode the screen is empty Start the X Rite Firmware Downloader application Click th...

Page 48: ...recommends annual recertification of the DensiEye reflectance densitometer Contact your X Rite dealer or your nearest X Rite Service Center for more information on the recertification process 9 8 Serv...

Page 49: ...ce Sets predefined but customizable Density Calibration Absolute White and Paper White base switchable 10 2 Technical Specification Specification Illumination 3 LED red green blue Measuring geometry 4...

Page 50: ...1 616 803 2705 Corporate Headquarters Europe Althardstrasse 70 8105 Regensdorf Switzerland Phone 41 44 842 24 00 Fax 41 44 842 22 22 Corporate Headquarters Asia Room 808 810 Kornhill Metro Tower 1 Ko...

Reviews: