background image

Module for process control in CO

2

 refrigeration plants with rack and gas cooler control

ANI-2F1-A_V2.0.0_PI_2022-01_EN

11

Subject to technical changes

ANI-2F1-A

1.5  Installing

The module is designed for top-hat rail installation. The housing is also suitable for installation in fuse

boxes or distribution switch cabinets. Modules can be positioned side by side without gaps.

WARNUNG

DANGER TO LIFE FROM ELECTRIC SHOCK AND/OR FIRE!

• Switch off the power to the entire plant before installing. Otherwise, mains voltage and/or exter

-

nal voltage may still be present, even if the control voltage is switched off.

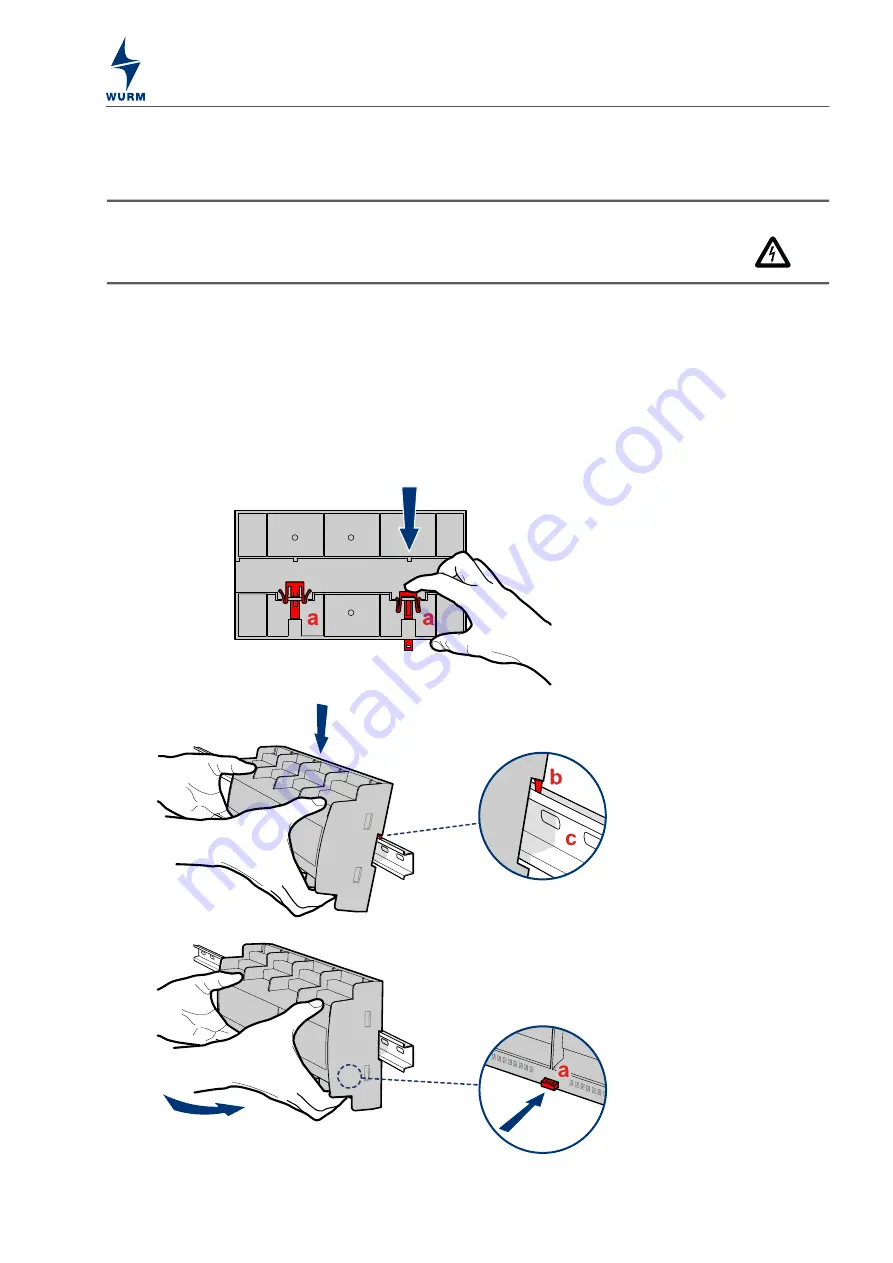
Top-hat rail installation

1. There are 2 fastening safety catches located on the back of the module. 

(A)

Press both fastening

safety catches

(a)

 downward until they engage with a click.

2. There are 4 retaining lugs located on the back of the module. 

(B)

Set the module with retaining

lugs 

(b)

 on the top-hat rail

(c)

. Make sure that you position the module 

parallel

 to the top-hat rail

with both hands and that all retaining lugs are located behind the edge of the top-hat rail.

3. Push the module down onto the top-hat rail.

4.

(C)

Swivel the bottom of the module towards the top-hat rail.

5.

(D)

Press the fastening safety catches

(a)

 towards the module until they engage in the top-hat

rail.

Fig. 6: Top-hat rail installation

A

B

C

D

Summary of Contents for FRIGOLINK ANI-2F1-A

Page 1: ... compressor 2 directly controlled Frigotakt Monitoring of suction gas temperature Oscillation protection function Blocking time after compressor fault 3 step load shedding including Fastreturn Operating hours counter and cycle counter for each compressor High pressure and medium pressure control Gas cooler fan control Gas cooler monitoring Refrigerant monitoring CAN bus connection via patch cable ...

Page 2: ...r supply 5 Functional earth FE 5 1 4 1 Input circuit diagram 6 Digital inputs DI 1 DI 20 6 Analogue inputs Voltage Uin 1 Uin 2 7 Analogue inputs Current Iin 1 Iin 5 7 Analogue inputs Sensors S 1 S 16 7 1 4 2 Output circuit diagram 8 Digital outputs Relays K 1 K 14 8 Digital outputs SSR V 1 V 4 9 Analogue outputs Uout 1 Uout 5 9 1 4 3 Communication circuit diagram 10 Communication 10 1 5 Installing...

Page 3: ...urposes other than the intended purpose WARNUNG DANGER TO LIFE FROM ELECTRIC SHOCK AND OR FIRE Switch off the power to the entire plant when carrying out installation wiring or disassembly work Otherwise mains voltage and or external voltage may still be present even if the control voltage is switched off The wiring of the device must be carried out only by qualified electricians Use the correct t...

Page 4: ...ions not listed are special solutions for individual projects and are not described in detail in this document This document will automatically cease to be valid if a new technical description is issued Manufacturer Wurm GmbH Co KG Elektronische Systeme Morsbachtalstraße 30 D 42857 Remscheid You can find more information on our website at www wurm de Version Date V2 0 0 and higher 2022 01 Document...

Page 5: ...the functional earth Connect the functional earth connection via the enclosed earthing terminal and the pre assem bled cable directly to the device with the earthed installation plate 7 æ 7 æ 7 N 3FMBZ 3FMBZ 4PMJE 4UBUF 3FMBZ 7 7 OBMPH 0VUQVU 6PVU 7 OBMPH OQVU 6JO N OBMPH OQVU JO JHJUBM OQVUT 7_ LQ P SDUW RI 5 2 1 7 æ 3FMBZ 3FMBZ 4PMJE 4UBUF 3FMBZ 7 7 OBMPH 0VUQVU 6PVU LQ P 7 OBMPH OQVU 6JO 7 æ N ...

Page 6: ... 7 æ N OBMPH OQVU JO 7 N JHJUBM OQVUT 7_ Terminal Digital input Potential Assignment 101 DI 1 230V Not available 111 N 102 DI 2 230V Night signal 112 N 103 DI 3 230V Load shedding 1 113 N 104 114 DI 4 Not used 105 115 DI 5 Not used 106 DI 6 230V CP 1 operating feed back 116 N 107 DI 7 230V CP 2 operating feed back 117 N 108 118 DI 8 Not used 109 119 DI 9 Not used 110 DI 10 230V CP 1 fault 120 N 12...

Page 7: ...gue input Potential Assignment 41 Uin 1 GND Not available 42 0 10V 43 Uin 2 GND Not available 44 0 10V Terminal Analogue input Potential Assignment 151 Iin 1 4 20mA MT 1 p0 152 23V 153 Iin 2 4 20mA p mp 154 23V 155 Iin 3 4 20mA p gc 156 23V 157 158 Iin 4 Not used 159 160 Iin 5 Not used Terminal Sensor input Sensor type Assignment 161 162 S 1 TRK Ts MT 163 164 S 2 Not used 165 166 S 3 Not used 167 ...

Page 8: ...Z 3FMBZ 4PMJE 4UBUF 3FMBZ 7 7 OBMPH 0VUQVU 6PVU Terminal Digital output Contact arrange ment Assignment 201 Change over con tacts K 1 4 2 A 230V COM Alarm output prio 1 202 NC 203 NO 204 Change over contact K 2 4 2 A 230V COM Alarm output prio 2 205 NC 206 NO 207 NO contact K 3 3 1 A 230V COM MT CP 1 operation 208 NO 209 NO contact K 4 3 1 A 230V COM MT CP 2 operation 210 NO 211 212 K 5 Not used 2...

Page 9: ...Terminal Digital output SSR Contact arrange ment Assignment 231 232 V 1 Not used 233 234 V 2 Not used 235 Semiconductor V 3 4 60VA 230V NO Not available 236 237 Semiconductor V 4 4 60VA 230V NO Not available 238 COM Terminal Analogue output Potential Assignment 241 Uout 1 0 10V FC CP 1 242 GND 243 Uout 2 0 10V GC fan 244 GND 245 Uout 3 0 10V MP valve 1 246 GND 247 Uout 4 0 10V HP valve 248 GND 249...

Page 10: ...anges ANI 2F1 A 1 4 3 Communication circuit diagram Fig 5 Communication circuit diagram Communication 7 æ 7 æ 7 N 3FMBZ 3FMBZ 4PMJE 4UBUF 3FMBZ 7 7 OBMPH 0VUQVU 6PVU 7 OBMPH OQVU 6JO N OBMPH OQVU JO JHJUBM OQVUT 7_ LQ P SDUW RI 5 2 1 Terminal Potential Assignment 81 0V C BUS 82 L 83 S 84 H 71 0V F BUS 72 L 73 S 74 H 11 0V RS 485 12 B 13 A 14 5V ...

Page 11: ...ent even if the control voltage is switched off Top hat rail installation 1 There are 2 fastening safety catches located on the back of the module A Press both fastening safety catches a downward until they engage with a click 2 There are 4 retaining lugs located on the back of the module B Set the module with retaining lugs b on the top hat rail c Make sure that you position the module parallel t...

Page 12: ...upply 230V 10 15 50Hz max 13VA Display Optional control panel with graphic display 1 x LED green red operating voltage green fault red 4 x LED green CAN bus data traffic CAN Tx CAN Rx Sensors 4 x DGF TRK C BUS communication 3 conductor CAN bus interface shielded galvanically iso lated screw terminals 2 5mm2 and RJ45 socket F BUS communication 3 conductor CAN bus interface shielded galvanically iso...

Reviews: