background image

3.Advanced Settings   

3.1 Volume Setting

This intercom has 8 levels of volume available. Press VOL+/VOL- to set the volume.

3.2 Code & Channel Setting

The intercom is a real-time communication system, and it requires that the two machines have the same 
channel and code. If you would like to communicate between 2 intercom stations, you will need to set the 
same channel and code for each of them before communication can begin. 
This intercom has 3 code settings (A, B, and C) and 10 channels (0-9) available. 

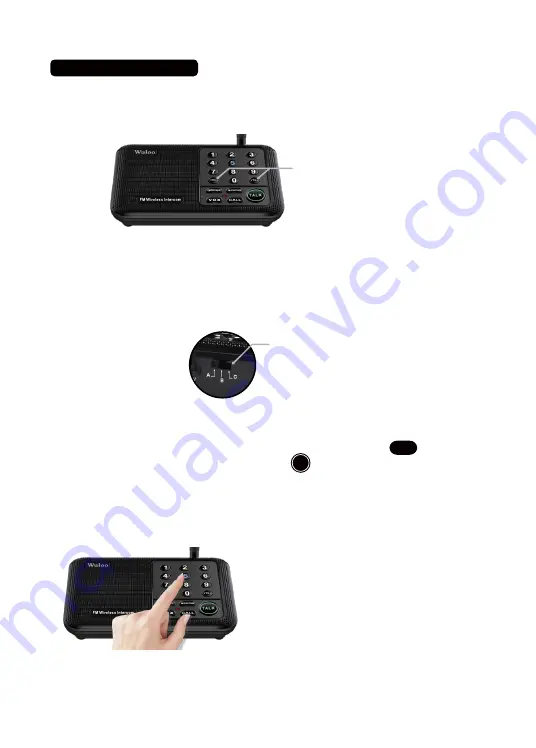
Set the code on the back of the intercom. Press and hold any channel number key for 3 seconds to set the 
channel number to that intercom. When you want to call another intercom station, press the channel 
number of the intercom you wish to communicate with, then press the CALL button           . To speak to the 
user of the other intercom, press and hold the TALK button         as you speak. After communication has 
ended, each intercom will automatically restore to their original channel number within 1 minute of 
intercom inactivity.
We suggest setting all the stations to the same code to ensure efficient communication. After setting up 
your intercom codes, you can simply start adjusting the channels to make calls. You do not have to set a 
new code every time you call a different user.

3.3 Functions Description

This intercom has multiple functions you can enjoy:

8 levels of volume available

Digital Code(A/B/C)

TALK

CALL

Set the code on the back of the intercom. 

Press and hold any channel number key for 3 
seconds to set the channel number to that intercom.

Summary of Contents for WL-666

Page 1: ...Wuloo Wireless Intercom System Model WL 666 FCC ID 2AOBR 666 E mail support wulooofficial com Facebook page WulooOfficial ...

Page 2: ...ference problems User friendly design This product is shipped with a quick start guide and detailed instructions You can also contact the Wuloo service team for product related questions and help at any time We are dedicated to providing customers with a 100 satisfactory service Please feel free to contact us if you have encountered any problems with your purchase Our fast and friendly team will p...

Page 3: ...ng 2 5 Distribute Different Stations to Different Users 2 6 Notes 3 Advanced Settings 3 1 Volume Setting 3 2 Code Channel Setting 3 3 Functions Description 3 3 1 TALK 3 3 2 GROUP 3 3 3 MONITOR 3 3 4 VOX 3 3 5 CALL 3 4 Usage Scenario 4 Additional Notes 5 Troubleshooting 6 Adding Additional Units 6 1 Expand to more intercom stations 7 Questions Answers 8 Warranty ...

Page 4: ...asic steps for setting up your intercom are as follows 2 1 Connect AC Power 2 2 Set Code Channel 2 3 Make an Address List 2 4 Test Connection 2 5 Distribute Different Stations to Different Users Note The examples that follow are for 2 intercom stations For multiple intercom stations follow the same directions as listed below Power Port DC 5V 1A Digital Code A B C Speaker VOL VOL Channel Number 0 9...

Page 5: ...ntered any problems with the adapter or cable We will send you a free replacement as covered by the warranty and will give you a discount on future purchases if your warranty expires 2 2 Set Code Channel This intercom has 3 codes A B and C as well as 10 channels 0 9 available The right table shows the different frequencies and codes Code Setting In the area beside the power port you can select cod...

Page 6: ...teps above you have successfully set up all the units of your intercom system Step 2 Set up each intercom to have the same code but different channels For this test Intercom A will have code A and channel 3 while Intercom B will have code A and channel 5 If you are testing multiple units continue to program them to the same code while assigning each intercom a different channel number 0 9 Step 4 I...

Page 7: ...ress the TALK button on both sides of the system at the same time One side may press and hold the TALK button to speak then release the TALK button after they have finished their message The other side can then answer your message by pressing and holding the TALK button and repeating the same steps You will not be able to hear the other user s voice if both sides are pressing and holding the TALK ...

Page 8: ...rcom station press the channel number of the intercom you wish to communicate with then press the CALL button To speak to the user of the other intercom press and hold the TALK button as you speak After communication has ended each intercom will automatically restore to their original channel number within 1 minute of intercom inactivity We suggest setting all the stations to the same code to ensu...

Page 9: ...y table check the table in the 2 2 in this instruction manual Notes 1 Intercom is single way same frequency communication system When you press the TALK button you cannot receive messages 2 Intercoms have a TOT transmission time limit of 1 minute This means you cannot press and hold the TALK button to speak for more than 1 minute per message 3 When multiple intercom stations are set to the same ch...

Page 10: ...s you get interference by GROUP function from your neighbors so you can turn off the GROUP function of your intercom units then you can solve the interference Turn off the GROUP How to turn on or turn off the GROUP function The GROUP function is turned on by default at the factory Press Hold the GROUP button and VOL button at the same time you will hear a beep voice it means you have turned off th...

Page 11: ...peak closely into the intercom station to activate it When you are speaking closely into the intercom the indicator light will turn red meaning it has successfully detected your voice Any other intercom unit with the same channel and code can receive your audio message and can press and hold the TALK button to answer you Besides other station can also enter VOX mode at the same time When both side...

Page 12: ...annel and code for every intercom and distribute them to every department shows as below table An intercom unit in MONITOR mode should be put in the monitored room like a baby s room Monitor mode lasts for up to 10 hours The monitor does not need voice activation In MONITOR mode monitoring side cannot send audio messages even if you press and hold the TALK button You can only hear the voice from t...

Page 13: ... notify all the intercoms at the same time General Manager Room Channel 2 Code A Financial Department Channel 3 Code A HR Department Channel 4 Code A Sales Department Channel 5 Code A Press Hold the GROUP button to talk to all the members at the same time General Manager Room Channel 2 Code A Financial Department Channel 3 Code A HR Department Channel 4 Code A Sales Department Channel 5 Code A AC ...

Page 14: ... the channel to 4 as same as the HR department s Channel number 2 Press the MONITOR buttom to enter monitored mode 3 General manager can hear the audio from Monitored side HR department office 2 Sales hear the voice from General Manager then press hold the TALK button to reply Usage Scenario 4 There is a meeting in the HR departmental office but the general manager is busy and doesn t have time to...

Page 15: ...utton 3 Check to make sure the intercom is not in monitor mode Monitor mode can only send audio but cannot receive it If so you can press the MONITOR button again to quit monitor mode 4 Your volume may be too low Press the VOL button to increase the volume of your intercom device 1 Check to make sure the intercoms have been set to the same channel and code The two intercoms must have the same chan...

Page 16: ...ven more convenience 6 1 Expand to more intercom stations If you find that you do not have enough intercom stations and you wish to expand to include more devices you can purchase additional intercom units in our store Please select the same model number when purchasing additional units Once your additional intercoms arrive set them to the same channel and code as your existing system to communica...

Page 17: ... at support wulooofficial com We will do our best to answer you within 12 business hours You can also visit our official Facebook page and WulooOfficial We will reply to you immediately if our admin is online or usually within 6 hours if the admin is not immediately available Thank you very much for choosing Wuloo We believe in honesty and reliability for all our products That s why all of our pro...

Reviews: