background image

MRTALP4-DC3: #35058AUS

Rev 1.0/2-21

6

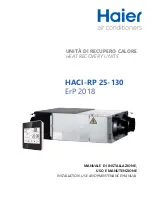
Features shown here are underlined on their first appearance in each section following.

1     LIFT POINT

2     INSTRUCTIONS CANISTER

3     LIFT BAR

4     ROTATION RELEASE LEVER

5     PAD FRAME

6     CONTROL HANDLE

7     COTTERLESS HITCH PIN

8     INTELLI-GRIP® CONTROL UNIT

8a    LCD SCREEN with BATTERY GAUGE

8b   “FUNCTION” BUTTON

8c   “ATTACH” BUTTON

8d   “RELEASE” BUTTON

8e   “POWER” BUTTON

9     Cover for VACUUM PUMP, VACUUM SENSORS  9a   AIR FILTERS

9b   VACUUM GAUGE

9c   VACUUM LIFT LIGHT

9d   STROBE LIGHT   

10   TILT RELEASE LEVER

11   QUICK CONNECTOR

12   SLIDING/MOVABLE PAD MOUNT

13   PAD FRAME T-

ARM

 ASSEMBLY

14   VACUUM RESERVE TANKS

15   VACUUM PAD

16   BATTERY CHARGER

17   BATTERY

 Not shown:  NOTIFICATION BUZZER

Note: A standard MRTALP4625DC3 is shown. Although some of the following photos do not 
show this specific lifter, they all illustrate how this kind of lifter functions.

For information about specific parts, see 

“REPLACEMENT PARTS”

 and/or any separate 

instructions for Product Options.

OPERATING FEATURES

Summary of Contents for MRTALP410TDC3

Page 1: ...x 368 Laurel MT USA 59044 800 548 7341 phone 406 628 8231 phone 406 628 8354 fax www WPG com Record serial number in blank space above to locate see serial label on the product LOW PROFILE MANUAL ROTA...

Page 2: ...MRTALP4 DC3 35058AUS Rev 1 0 2 21 2...

Page 3: ...CS 13 OPERATING ENVIRONMENT 13 TYPICAL APPLICATIONS 14 DISPOSAL OF THE LIFTER 14 OPERATION 15 BEFORE USING THE LIFTER 15 Taking Safety Precautions 15 Selecting a Screen Language 15 Performing Inspecti...

Page 4: ...r Load Compatibility Test 30 Operational Tests 31 Vacuum Test 31 Rated Load Test 32 MAINTENANCE 33 VACUUM PAD MAINTENANCE 33 Pad to Load Friction Coefficient 33 Pad Inspection 33 Pad Cleaning 34 TO RE...

Page 5: ...th surface conditions overhang angle center of gravity and temperature can also affect the lifting capacity A qualified person should evaluate the effective lifting capacity for each use see definitio...

Page 6: ...MRTALP4 DC3 35058AUS Rev 1 0 2 21 4 Note Standard MRTALP410TDC3 top and MRTALP4625DC3 models are shown SPECIFICATIONS...

Page 7: ...lifter if the Maximum Load Capacity or any safety label appears to be missing or obscured Make sure the contact surfaces of the load and vacuum pads are clean before attaching the lifter see MAINTENAN...

Page 8: ...or VACUUM PUMP VACUUM SENSORS 9a AIR FILTERS 9b VACUUM GAUGE 9c VACUUM LIFT LIGHT 9d STROBE LIGHT 10 TILT RELEASE LEVER 11 QUICK CONNECTOR 12 SLIDING MOVABLE PAD MOUNT 13 PAD FRAME T ARM ASSEMBLY 14 V...

Page 9: ...Note Position the lift point to avoid contact with the pad frame during rotation 4 Suspend the lifter from appropriate hoisting equipment 4 1 Select a crane and or hoist rated for the Maximum Load Cap...

Page 10: ...e the hoisting equipment to remove the lifter from the shipping container Avoid damaging the vacuum pads 5A 5C 5B 5D 6A 5 Connect the electrical connectors figs 5A B and figs 5C D and install the 9 vo...

Page 11: ...components in a clean dry location Installing Removing Vacuum Pads Notes Use only 2 vacuum pads on each T arm assembly Pads must be arranged symmetrically to keep the lifter balanced 1 1B 2B Position...

Page 12: ...of the quick connector together until they lock fig 1A To disconnect a vacuum hose move the release ring on the female end until the quick connector separates fig 2A 4A 3A Make sure all hoses are con...

Page 13: ...THE PAD FRAME The illustrations above show the range of MRTALP4 DC3 vacuum pad positions available to accommodate different load dimensions and weight distribution Note These adjustments do not affec...

Page 14: ...ad mount Repeat these steps to position other pad mounts as needed Repositioning T Arm Cross Members When more precise pad alignment is needed eg on contours of insulated panels the cross members of t...

Page 15: ...m is the allowable thickness at Maximum Load Capacity 4 Note Standard vacuum pads can stain or deform load surfaces with light colors or soft coatings Test such surfaces for damaging effects before us...

Page 16: ...PPLICATIONS 1A 1B 1C Fig 1A On center of roof panel pad frame extensions required Fig 1B On center of horizontally oriented wall panel Fig 1C Above center of vertically oriented wall panel See Positio...

Page 17: ...ards for lifter operation in your region Follow trade association guidelines about precautions needed for each load material Selecting a Screen Language When the lifter is powered up for the first tim...

Page 18: ...gy level 3 4 If battery energy is in the red range discontinue lifter use and charge the battery see 12 VOLT BATTERY RECHARGE If battery energy continues to decrease and you try to attach the lifter t...

Page 19: ...on center fig 1A 1 1B To tilt loads lengthwise from the flat to upright orientation center the pad frame from left to right on the load and position the vacuum pads toward what will be the top end whe...

Page 20: ...er chirps once per minute Replace the battery as needed see NOTIFICATION BUZZER BATTERY REPLACEMENT Sealing the Pads on the Load Press the lifter s attach button fig 1B The vacuum pump will run until...

Page 21: ...the pads have sealed the lifter should be able to maintain sufficient vacuum for lifting except when used above the maximum Operating Elevation 2 If it does not perform the Vacuum Test 1 The gauge fac...

Page 22: ...r The tilt linkage minimizes operator effort and automatically holds a balanced load in either the upright or the flat position However an unbalanced load may tilt unexpectedly resulting in load damag...

Page 23: ...nostic code see INTELLI GRIP DIAGNOSTIC CODES 1 Such leaks can cause the battery to be discharged more quickly If the vacuum pump is unable to overcome leakage the notification buzzer sounds continuou...

Page 24: ...ttery failure or electrical system failure the notification buzzer will sound continuously Although the vacuum reserve tanks are designed to support the load for at least 5 minutes without power this...

Page 25: ...oad oriented in flat position 2 Make sure the load has enough clearance to rotate without contacting anyone or anything 3 Use the control handle circled in fig 3A to keep the load under control at all...

Page 26: ...the control handle fig 2A to keep the load under control at all times Unbalanced loads may tilt unexpectedly when tilt latch is disengaged 3 If the pad frame is latched pull the tilt release lever ci...

Page 27: ...g may force you to release the handle as the load approaches the flat position In this case use hand cups circled in fig 1A or other appropriate means to control the load Note The pad frame automatica...

Page 28: ...se completely because such movement could result in load damage or personal injury Continue to hold the function and release buttons until the vacuum pads release the load completely Otherwise the vac...

Page 29: ...e lifter has VPFS10T pads protect their sealing rings by making sure each pad rests on spacers 2 Transporting the Lifter Secure the lifter in the original shipping container with the original shipping...

Page 30: ...3 3B 3D 3E 3C Disconnect the electrical connectors figs 3A B and figs 3C E to prevent battery discharge 4 Store the lifter in a clean dry location Store the battery between 32 and 70 F 0 21 C Avoid s...

Page 31: ...UAL Perform Vacuum Test Check for unusual vibrations or noises while operating lifter Examine entire lifter for evidence of looseness excessive wear or excessive corrosion deformation cracks dents to...

Page 32: ...ING Is load attached the notification buzzer chirps rapidly and the strobe light flashes 6 Take precautions in case load should fall during test Raise the load a minimal distance to make sure it is su...

Page 33: ...hould fall during test Raise the load a minimal distance Then hold the function button and the power button for at least 5 seconds to power down the lifter 2 5 Watch the vacuum gauges The vacuum level...

Page 34: ...ended for 2 minutes 5 Once the test is completed lower and release the load as previously directed 6 Never use lifter that has failed test Inspect the lifter for any stress damage and repair or replac...

Page 35: ...serts every 2 years or more often when necessary Pad Inspection 1A Inspect each vacuum pad fig 1A according to the INSPECTION SCHEDULE and correct the following faults before using the lifter see REPL...

Page 36: ...Never use rubber conditioners on vacuum pad Many rubber conditioners can leave a hazardous film on pads 2 Prevent liquid from entering the vacuum system through the suction hole on the pad face 3 Wipe...

Page 37: ...sh the sealing ring into the mounting groove beginning in 4 locations as shown circled in fig 3A 4 Push gently and firmly on the outside edge of the sealing ring until the flat side fits flush against...

Page 38: ...A 3 Remove the old pad insert fig 3A Note Save the filter screen circled in fig 3A 4 Install the new pad insert making sure the smooth side of the insert is facing down fig 4A Note The new insert will...

Page 39: ...recheck the battery as previously directed 1 You may use a battery charger other than the one supplied provided it is designed for 12 volt DC AGM type lead acid batteries Disconnect the battery from t...

Page 40: ...the buzzer battery holder by pressing inward and sideward in the direction marked on the holder 3 3A Slide the battery tray out fig 3A 4 Install a new 9 volt battery according to the polarity marking...

Page 41: ...n be activated in error if battery charger is plugged into power source while lifter is powered up If so power down lifter disconnect charger from power source and power up again If code persists chec...

Page 42: ...04 Failed to turn controls power off 1 chirp every 2 seconds none Remove 9V battery Disconnect connector between 12V battery and vacuum generating system Charge battery completely see 12 VOLT BATTERY...

Page 43: ...running and try again V000 INSUFFICIENT VACUUM continuous on Immediately lower load onto stable support until adequate vacuum can be obtained Check load and vacuum pads for damage Consult relevant top...

Page 44: ...nnectors are attached correctly V050 DANGER INSUFFICIENT VACUUM continuous on Vacuum levels in BOTH circuits are insufficient for lifting Keep everyone away from suspended load until it can be safely...

Page 45: ...4NC Power Lead 1 53124 Pad Fitting Elbow 5 32 ID Long Stem for VPFS10T pads 4 49726 Pad Insert Model VIFS625 6 x 25 15 cm x 64 cm for VPFS625 pads 4 49724TT Sealing Ring Model VIFS10T2 Closed Cell Foa...

Page 46: ...l wear and tear and or the product has been damaged misused or neglected If a problem is not covered under warranty WPG will notify the customer of costs prior to repair If the customer agrees to pay...

Page 47: ...Rev 1 0 2 21 MRTALP4 DC3 35058AUS 49...

Page 48: ...MRTALP4 DC3 35058AUS Rev 1 0 2 21 50...

Reviews: