background image


HDMI V2.0 4x4 Matrix Switcher 

Panel Description 

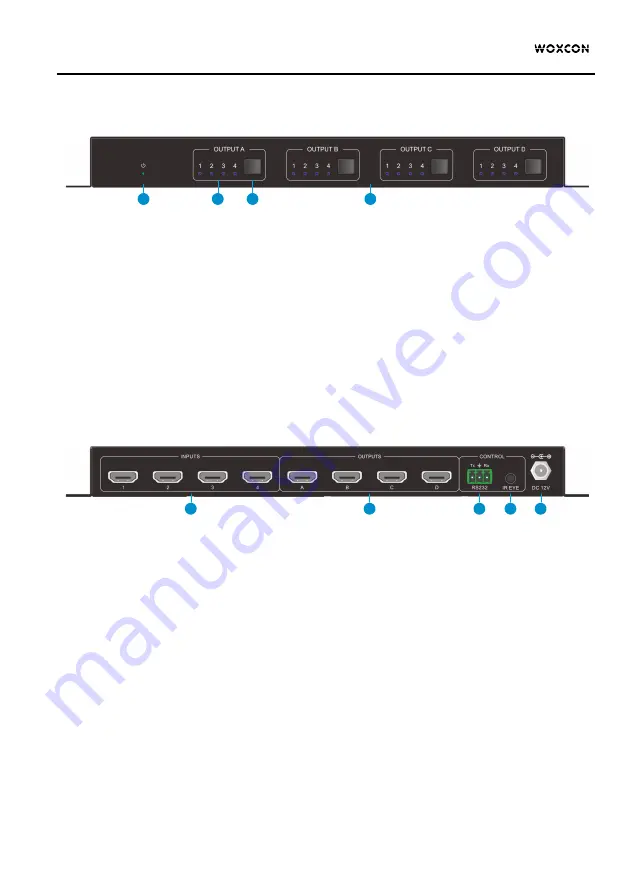
Front Panel 


1.


Power LED:

 Illuminates green when switcher is powered on. 

2.


Signal Switching Zone:


l


A: 

Total four output zones, and each zone is including four blue indicators for four 

input sources, numbered from "1" to "4". One of LED illuminates green to indicate 
which source is selected for the output channel.


l


B: 

Total four output buttons. Press the button repeatedly to cycle through the sources 

from inputs 1 to inputs 4. 


Rear Panel 


1.


INPUTS (1~4):

 Four HDMI ports to connect HDMI source devices. 

2.


OUTPUTS (A~D):

 Four HDMI ports to connect HDMI display devices. 

3.


RS232: 

Connects to control device (e.g. PC) to control the matrix by sending RS232 

commands. 

4.


IR EYE: 

Connects to IR receiver to receive IR signals from IR remote to control the matrix. 

5.


DC 12V: 

DC connector for the power adapter connection. 


1

A

B

2

1

2

3

4

5

Summary of Contents for NPG-MX44-H2

Page 1: ...User Manual NPG MX44 H2 HDMI V2 0 4x4 Matrix Switcher with 4K to 1080p Down scaling All Rights Reserved Version NPG MX44 H2_2020V1 2...

Page 2: ...ckage List 1 Panel Description 2 Front Panel 2 Rear Panel 2 System Diagram 3 IR Remote Control 3 RS232 Control 5 System Command 5 Signal Switching 6 Preset Setting 7 Audio Setting 7 EDID Management 7...

Page 3: ...luding 1080p 3D Fully compliant with HDMI V2 0 and HDCP 2 2 specifications Supports 4K to1080p down scaling for each independent output to compatibility with the legacy 1080p displays Smart EDID manag...

Page 4: ...ed for the output channel l B Total four output buttons Press the button repeatedly to cycle through the sources from inputs 1 to inputs 4 Rear Panel 1 INPUTS 1 4 Four HDMI ports to connect HDMI sourc...

Page 5: ...or the ALL 5 button then press the ENTER 4 button to execute the change Examples To send input 3 to output 2 first press the INPUTS 3 button then press the OUTPUTS 2 button and finally press the ENTER...

Page 6: ...s the ENTER button to execute the change To set the EDID for one or more source devices to the EDID capabilities of a specific output press the EDID 6 button then press the desired INPUTS 2 or the ALL...

Page 7: ...00 Data bit 8 Stop bit 1 Parity bit none System Command Command Description Command Example and Response Type Report system model NPG MX44 H2 Lock Lock front panel buttons System Locked Unlock Unlock...

Page 8: ...Through x Turn off output x x 1 4 2 02 Closed x Turn on output x x 1 4 2 02 Open All Turn on all outputs All Open x V y1 y2 y3 y4 Switch input x to outputs y x 1 4 y 1 4 1V1 2V1 2 3 3V1 2 3 4 AV 01 0...

Page 9: ...ut x x 1 4 When x 5 it means to turn off all outputs DigitAudioOFF2 DigitAudio OFF with Output 2 9977 Report HDMI digital audio status of outputs Out 01 02 03 04 Audio Y Y Y Y EDID Management Command...

Page 10: ...eration will be cancelled in 10 seconds EDIDUpgrade1 Please send the EDID file within 10s GetInPortEDID x Report the EDID of input x x 1 4 GetInPortEDID4 Input 04 EDID Data 00 FF FF FF FF FF FF 00 HDC...

Page 11: ...ort 1080p 30Hz 4 4 4 4 4K 25Hz 4 4 4 Support 1080p 25Hz 4 4 4 5 4K 24Hz 4 4 4 Support 1080p 24Hz 4 4 4 6 4K 23Hz 4 4 4 Support 1080p 23Hz 4 4 4 7 4K 60Hz 4 2 0 Support 1080p 60Hz 4 4 4 8 4K 50Hz 4 2 0...

Page 12: ...k General Maximum Video Resolution Up to 4K 60Hz 4 4 4 HDR10 Dolby Vision including 1080p 3D Maximum Bandwidth 18Gbps HDMI Audio Supports PCM Dolby Digital and DTS Control Options Front Panel IR Remot...

Reviews: