


2.1
2.2
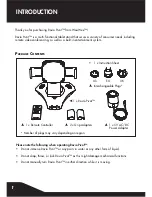
2
BATTERY INFORMATION
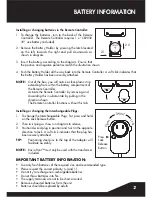
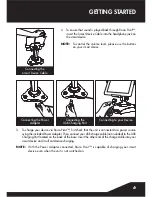
Installing or changing batteries in the Remote Controller:
1. To change the batteries, turn to the back of the Remote
Controller. The Remote Controller requires 1 x “CR2032
3V” size battery (included).
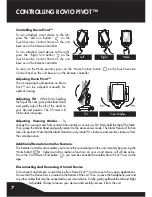
2. Remove the Battery Holder by pressing the latch located
on the left, towards the right and pull downwards as
shown in diagram.
3. Insert the battery according to the diagram. Ensure that
the positive and negative polarities match the illustration shown.
4. Push the Battery Holder all the way back into the Remote Controller. A soft click indicates that
the Battery Holder has been securely attached.
NOTE:
Out of the box, you will notice a clear plastic strip
extending from within the battery compartment of
the Remote Controller.
Activate the Remote Controller by removing and
discarding this insulation tab by pulling in the
direction shown.
The Remote Controller functions without this tab.
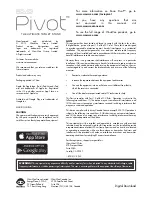
Installing or changing the Interchangeable Plugs:
1. To change the Interchangeable Plugs, first press and hold
on the Lock Release Button.
2. Then twist plug as shown in diagram to release.
3. Position desired plug in position and twist in the opposite
direction to lock. A soft click indicates that the plug has
been securely attached.
TIP:
Positioning steel pins to the top of the adapter will
facilitate assembly.
NOTE:
Rovio Pivot™ must only be used with the transformer
included.
IMPoRtant BatteRY InFoRMatIon:
• Use only fresh batteries of the required size and recommended type.
• Please respect the correct polarity, (+) and (-).
• Do not try to recharge non-rechargeable batteries.
• Do not throw batteries into fire.
• The supply terminals are not to be short-circuited.
• Remove exhausted batteries from the unit.
• Batteries should be replaced by adults.
Press
Lock
Release
Button
TWIST
O
pe
n
Lo
ck
CR2032
3V


