12
Electric lawn mower EN
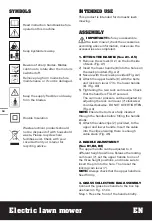
SYMBOLS
INTENDED USE
This product is intended for domestic lawn
mowing.
ASSEMBLY
IMPORTANT!
Before you assemble
the lawn mower, check the accessories
according above information, make sure the
accessories are completed.
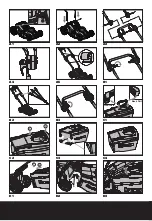
1. FITTING THE HANDLE (See A1- A5)
1) Remove the screws (X 2) on the both side
of deck. (Fig. A1)
2) Insert the lower handle (8) into the holes on
the deck provided.(Fig. A2)
3) Secure with the screws provided.(Fig. A2)
4) Attach the upper handle (6) with the bolts
and lock cam lever (7) to the lower handle
(8). (Fig. A3)
5) Tightening the two Lock cam levers. Check
that the handle is FULLY secured.
The cam lever pressure can be adjusted by
adjusting the lock cam lever (7) clockwise/
counter-clockwise. DO NOT OVER TIGHTEN.
(Fig. A4)
NOTE:
Ensure the bolts are fully inserted
through the handles before fitting the handle
knobs.
6) Attach the cable clips (2) provided, to the
upper and lower handle. Insert the cable
into the clips ensuring there is enough
cable slack. (Fig. A5)
2. HANDLE ADJUSTMENT
(See B1,B2, B3)
The upper handle can be adjusted to 3
different height positions. Release the locking
cam lever (7), set the upper handle to one of
the three height positions, and make sure to
insert the pin into the hole. Then reset the
locking cam lever (7).
NOTE:
Always check that the upper handle is
fixed firmly.
3. GRASS COLLECTION BAG ASSEMBLY
Connect the grass box handle to the box top
as shown in Fig. C1-C4.
Step 1. Press the front of the handle briefly.
Read instruction handbook before
operation this machine
Keep bystanders away.
Beware of sharp blades. Blades
continue to rotate after the motor is
switched off.
Remove plug from mains before
maintenance or if cord is damaged.
Keep the supply flexible cord away
form the blades.
Double Insulation
Waste electrical products should
not be disposed of with household
waste. Please recycle where
facilities exist. Check with your
Local Authority or retailer for
recycling advice.
Summary of Contents for WG708E
Page 3: ...1 2 3 4 5 6 7 8 9 10 11 15...
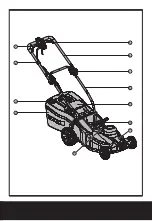
Page 4: ...7 Front Part Back Part 1 2 3 1 2 a A1 A2 A3 A4 A5 B1 B2 B3 C1 C2 C3 C4 D1 D2 D3...
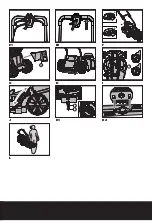
Page 5: ...14 13 15 a b 12 E1 E2 F G H I J K1 K2 L...
Page 155: ...155 GR 1 2 3 4 5 6 7 8 9 10 11 12 G 13 K1 14 K1 15 I...
Page 157: ...157 GR 100 C 1 1 1 2 2...
Page 158: ...158 GR a b c d a...
Page 159: ...159 GR b c d a b c d e V f g h i j k l...
Page 160: ...160 GR m n o p a b c d e f g...
Page 161: ...161 GR RCD 30mA...
Page 163: ...163 GR 1 E1 E2 5 1 2 3 F 4 G 1 2 3 4 5 G 1 2 3 4 6 H...
Page 164: ...164 GR 7 I 1 20mm 2 8 J 6 20mm 70mm 9 1 2 38 mm 3 4 5...
Page 165: ...165 GR K1 K2 14 13 K1 50 2 L 10...
Page 166: ...166 GR...
Page 168: ...168 RU 1 2 3 4 5 6 7 8 9 10 11 12 G 13 K1 14 K1 15 I...
Page 170: ...170 RU 100 C 1 1 1 2 2...
Page 171: ...171 RU a b c...
Page 172: ...172 RU d a b c d a b c d e f g h i...
Page 173: ...173 RU j k l m n o p P a b c d...
Page 174: ...174 RU e f g 30...
Page 176: ...176 RU 9 1 E1 E2 5 1 2 3 F a b 4 G 1 2 3 4 5 G 1 2 3 4...
Page 177: ...177 RU 6 H 7 I 1 20 2 8 J 6 20 70 9 1 2 38 3 4...
Page 178: ...178 RU 5 K1 K2 14 13 K1 50 2 L 10...
Page 179: ...179 RU...
Page 181: ......
Page 182: ......
Page 183: ......
Page 184: ...AR01280200 Copyright 2016 Positec All Rights Reserved www worx com...


